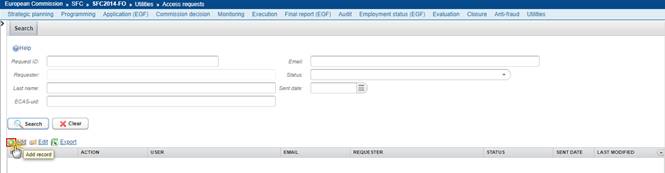
Access Requests/User Accounts
PURPOSE OF THE USER AND SECURITY MODULE
The User and Security Module (USM) is a functionality within SFC2014 Front-Office that allows Member State Liaison Officers (and Member State Liaison Deputy Officers) to enter access requests for the node(s) and fund(s) they manage.
ROLES
You are an identified user of SFC2014 and you have MSARQ or ECARQ role.
How to access the functionality
How to access the User and Security Module?
The USM is a functionality within SFC2014 Front-Office. This means that a MS liaison (deputy) who has access to SFC2014 Front-Office can use his/her nominative ECAS username and password to log in to SFC2014 Front-office and access the USM.
|
IMPORTANT |
MS liaisons (and deputies) should never share their access codes with anyone else! Any misuse of their access codes is under their responsibility! |
The SFC2014 application has different environments used for different purposes:
· The PRODUCTION environment is the real working environment where users enter real data.
· The ACCEPTANCE environment is used for training purposes. This environment does not contain real data. In this environment the users can "play" with SFC2014 and learn how to use it (if they want to). This environment is also used by Technical (IT) teams of countries dealing with web-services (no manual data entry but automatic processing between local systems in the Member State and SFC2014).
Concretely, this means that the MS liaison (deputy) must connect to the environment concerned to enter a request!
Link to the different environments:
· PRODUCTION: https://webgate.ec.europa.eu/sfc2014/frontoffice/ui
· ACCEPTANCE: https://webgate.acceptance.ec.europa.eu/sfc2014/frontoffice/ui
The User and Security Module menus
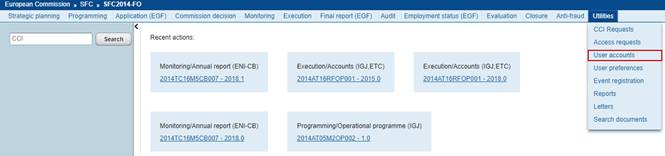
The USM is accessible from SFC2014 Front-Office via the menu Utilities.
The following submenus allow the creation of requests and consulting existing users:
· Access Requests: via this submenu, the MS liaison (deputy) can enter the requests for access. This submenu is visible to MS liaisons and deputies only.
· User Accounts: via this submenu it is possible to view the list of existing users managed by the MS liaison (deputy). This submenu is visible to MS liaisons and deputies only.

Access Requests
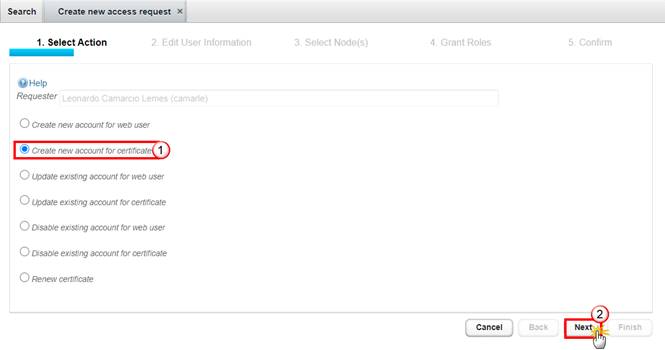
An MS liaison (deputy) can create and send requests for different actions on users:
· Create new account for web User
· Create new account for Certificate
· Update existing account for Web User
· Update existing account for Certificate
· Disable existing account for Web User
· Disable existing account for Certificate
· Renew certificate
· Grant access to an existing web-user managed by another Member State Liaison
|
IMPORTANT |
A certificate user account enables local information systems to authenticate when communicating with SFC2014 through the web services. Requests for certificate user accounts should only be created by countries using the web services! Unlike the web user accounts that access the application SFC2014 with a nominative ECAS user account, certificate user accounts remain generic user accounts starting with w005… |
The following chapters explain step by step how to manage these types of requests.
Create new account for web user
You can request the creation of a new account when a user doesn't exist yet and has never existed in SFC2014 before.
· If a user existed but is inactive because he/she was disabled, you can create a request to UPDATE EXISTING ACCOUNT FOR WEB USER (see chapter 3.3)
· If the user exists but is managed by another MS liaison, you can request to GRANT ACCESS TO AN EXISTING WEB-USER MANAGED BY ANOTHER MEMBER STATE LIAISON (see chapter 3.4)
· If the user already exists and is active, you can create a request to UPDATE EXISTING ACCOUNT FOR WEB USER (see chapter 3.3)
|
BEFORE YOU START |
Ensure that the user does not yet exist by verifying in the list of users: Display the list of existing users Ensure that the user is not managed by another MS liaison (see chapter 3.4.1) Ensure that you have all necessary information about the user including the ECAS-uid*. *The user must have an ECAS nominative account and communicate his/her ECAS-uid to the MS Liaison (deputy). A video on how to create an ECAS nominative account & how to find your ECAS-uid is available on the SFC2014 Support portal http://ec.europa.eu/sfc/2014/en/multimedia The request must be created and sent in a single operation! |
Workflow

* only for multi-node countries
Select the type of request
1.
On the menu Utilities >
Access Requests click on the icon  to create a new Access
Request:
to create a new Access
Request:

The creation wizard appears:

2.
Select the action Create New
Account For Web User  and click Next
  .
.
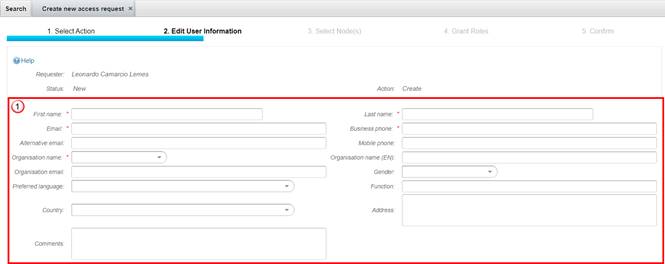
Enter the user information
The Edit User Information screen appears:

3.
Enter the requested information  :
:
Fields marked with a red asterisk (*) are mandatory:
· ECAS-uid*
· First Name*
· Last Name*
· Email*
· Business Phone*
· Alternative Email
· Mobile Phone
· Organisation name*
· Organisation name (EN)
· Gender
· Preferred Language (for the notifications)
· Function
· Address
· Country
· Comments
You can click Back to go back to the previous step or click Cancel to cancel the creation of the whole request.
4.
Click Next to
continue .
.
|
TIP |
The fields with a down-arrow contain a 'drop-down' list. You can click on the arrow to select the value from the list directly or you can enter the first letters and click on the value from the selection that is displayed:
|

Select Node(s) (only for multi-node countries)
|
IMPORTANT |
This step is only available for the MS liaison (deputy) from countries having a multi-node structure. For countries with a single node structure this step is skipped by the wizard! You can continue to the chapter to Grant roles & permissions |
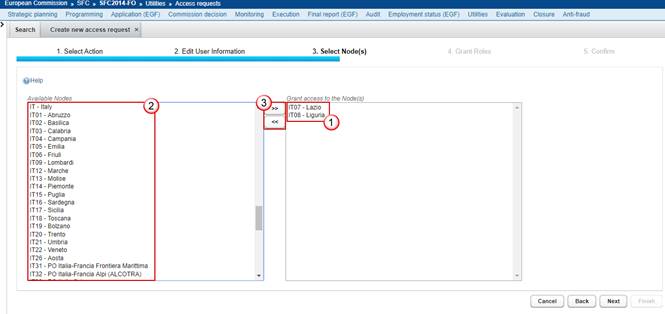
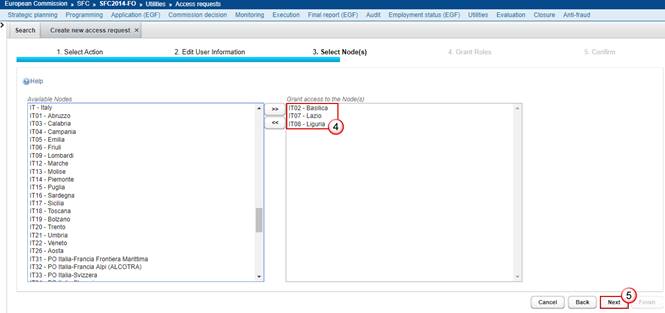
You must define the nodes the user will have access to. As there are different nodes within your country, the user probably needs only access to one or some of them, so you must specify this.
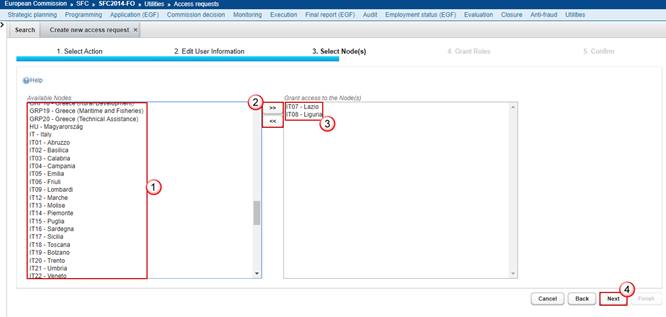
1. On
the select nodes window, select the node from the left pane (Available Nodes) .
2. Click
the right-arrow button in the middle of the panels.
3. The
node is added to the pane on the right side .
.
4. Repeat these steps for each node you want to add.
5. When
finished, click Next to go to the
next step .
.
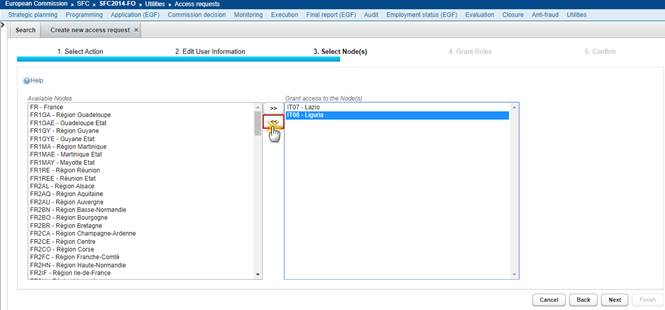
To remove a node form the list in the right pane, select the node and click on the left-arrow button.
Once the user has been created, each node defined for the user will become a profile. When connected in SFC2014 the user has to choose the profile he/she wants to use and will have access to the node corresponding to the profile selected.
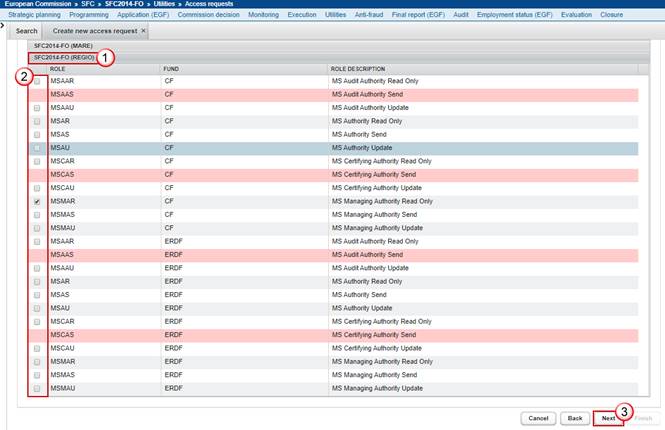
Grant roles & permissions
The Grant Roles screen appears. On this screen you must select the roles and permissions you want to grant for this user.
The roles and permissions shown correspond to the roles and permissions related to the Funds for which the MS liaison (deputy) can request access.
· EMPL: ESF - YEI - FEAD - IPA Component IV
· REGIO: ERDF - CF –ENI - IPA Component II and III
· MARE: EMFF
· AGRI: EAFRD - IPA Component V
· HOME: ISF - AMF
The roles and permissions are created on the Node for which the MS liaison (deputy) can request (or on each of the nodes selected in previous step).
|
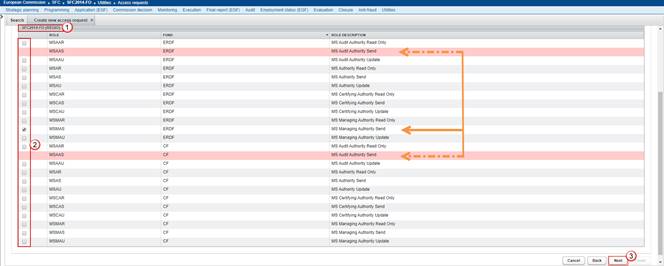
IMPORTANT |
The USM automatically detects incompatible roles. The roles that are incompatible with the role you selected are greyed. You cannot select these. Example: You select "MS Managing Authority ESF Send". The roles, "MS Certifying Authority ESF Send" and "MS Audit Authority ESF Send", "MS Certifying Authority FEAD Send", "MS Audit Authority FEAD Send", "MS Certifying Authority YEI Send" and "MS Audit Authority YEI Send" are greyed. |
If you are dealing with a multi-node country, you must first select each of the nodes you have chosen in the previous step.
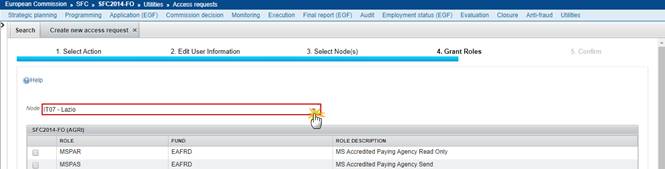
If you are dealing with a single-node country, the node is automatically displayed.
6. Click
on the fund to display the list of roles . For each fund tick
the boxes to select the roles and permissions you want to grant  . The USM
automatically detects incompatible roles. The roles that are incompatible with
the role you select are greyed. You cannot select these (see example below).
. The USM
automatically detects incompatible roles. The roles that are incompatible with
the role you select are greyed. You cannot select these (see example below).
7. Click
Next to get to the final step
(reviewing and sending the request to the Commission) .
You can click Back to go back to the previous step or click Cancel to cancel the creation of the whole request.
Send the request to SFC2014 Support team
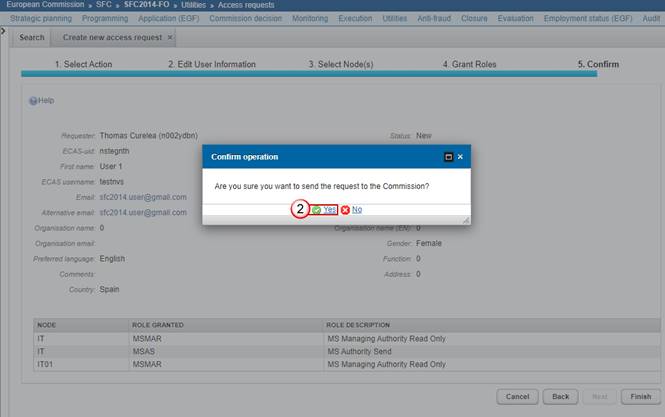
After entering the User Information, the nodes and the roles and permissions to grant, you are ready to send the request to the SFC2014 Support team.
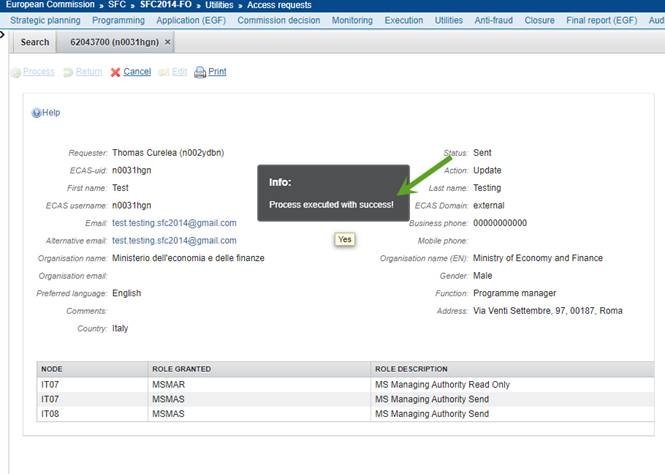
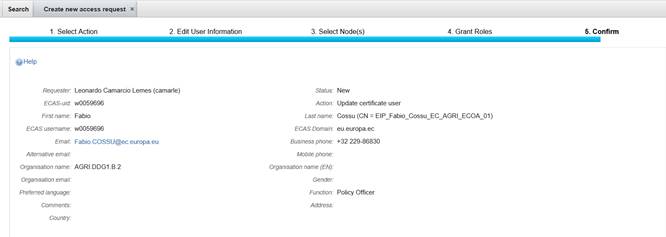
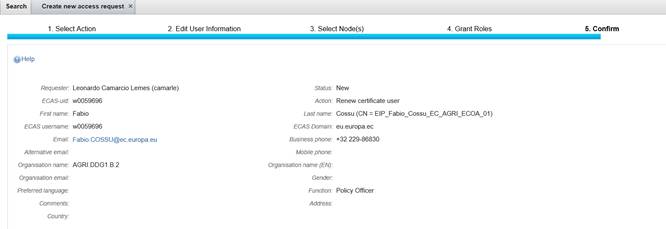
The overview of your request is shown. You see:
· The user information you entered.
· The roles and permissions you selected to be granted for the selected nodes.
· Before sending the request, you can click Back to go back to the previous step or click Cancel to cancel the creation of the whole request.

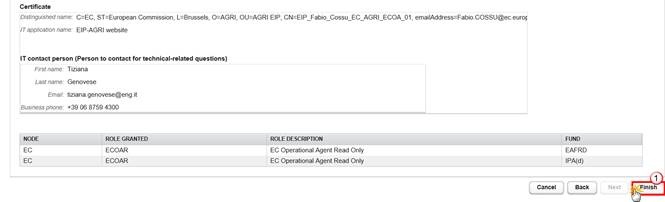
8.
Click the button FINISH
to send the request to the SFC2014 Support team.

9.
Click Yes
to confirm
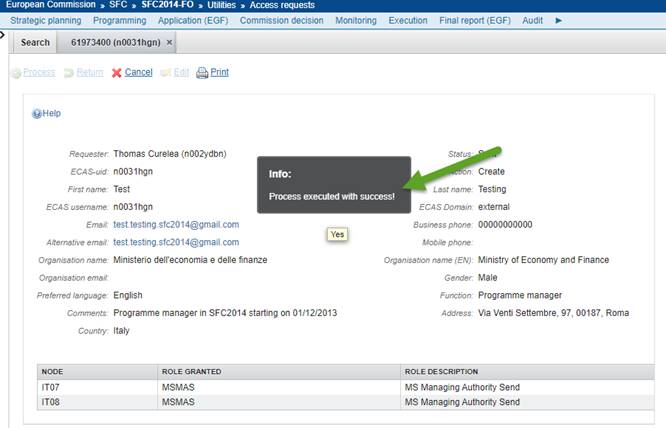
Once the request is sent, the system attributes a unique identifier number (ID) to the request. The status of the request is SENT.

The request can now be processed by the SFC2014 Support team. If there are mistakes or other issues, the request is returned to you by the SFC2014 Support team.
|
INFO |
You can click on the SEARCH tab to go back to the list of requests:
You can click on the icon
|

 to
close the access request tab:
to
close the access request tab:
If the request is processed…
If the request is processed, the status becomes Processed and two automatic e-mails are sent:
· One e-mail to the MS liaison or MS liaison Deputy who created the request containing:
o A link with the request identifier (ID) to view the processed request.
· One mail to the concerned user containing:
o The access details and roles and permissions granted for each node.
If the request is returned (not processed)…
If the Support team detects problems or missing information, or if the user appears to exist already, the status becomes Returned and one e-mail is sent to the MS liaison or MS liaison Deputy with an explanation on the reason for returning.
The MS liaison (deputy) can:
· Correct the request and send it again or
· Cancel the request
Update existing account for web user
You can create a request to update (modify) a user if any information must be updated:
· the user information (personal details);
· the node(s) the user should have access to;
· the roles and permissions needed;
And to re-activate a disabled user account.
|
BEFORE YOU START |
Ensure that you have all necessary information about the user. The request must be created and sent in a single operation! |

* only for multi-node countries
Select the type of request
1. On the menu Utilities > Access Requests click on the icon to create a new Access Request.

2. The
wizard appears. Select the action Update Existing
Account For Web User .
3. Enter
the first name of the user in the blank field that appears next to the selected
type of request and select the user you want to update from the list displayed.
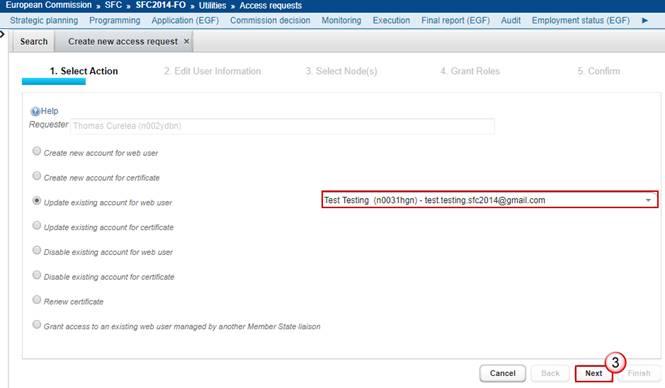
4.
After having selected the user, click NEXT.
|
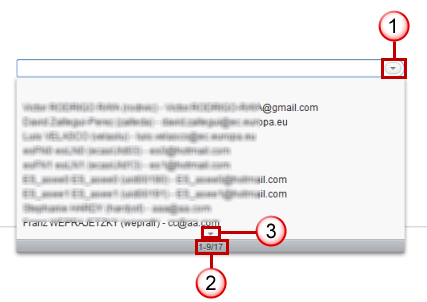
TIP |
The fields with a down-arrow contain a 'drop-down' list. To select the user you want to create the request for, you can either: • enter the (first
letters of) the user's first name • or you can click on
the down-arrow
|

Modify the user information
The Edit User Information screen appears.

5.
Modify the requested information if necessary .
You can modify the information on the user or you can skip this step by clicking Next. The following information can be modified.
Fields marked with an asterisk (*) are mandatory:
· First Name*
· Last Name*
· Email*
· Business Phone*
· Alternative Email
· Mobile Phone
· Organisation name*
· Organisation name (EN)
· Gender
· Preferred language (for the notifications)
· Function (within the organisation)
· Address
· Country
· Comments
6.
Click NEXT
to continue
You can click BACK to go back to the previous step or click CANCEL to cancel the creation of the whole request.
|
IMPORTANT |
The ECAS-uid cannot be modified! |
|
IMPORTANT |
You can click on the button Get User Info to retrieve the details of the user from ECAS. Clicking on this button will update the First name, Last name, Email, Business Phone, Organisation name and Address from ECAS for the current ECAS-uid. Clicking on the Get User Info button will overwrite the current information in SFC2014 with the information from ECAS! Please make sure that the information in ECAS for that user is up to date! If not, please ask the user to update the information in his/her ECAS account first. |
Modify nodes (only for multi-node countries)
|
IMPORTANT |
This step is only available for the MS liaison (deputy) from countries having a multi-node structure. For countries with a single node structure (this step is skipped by the wizard! You can continue to the following chapter. |
You can modify the nodes the user will have access to. In case you only want to modify roles and permissions, you can skip this step by clicking Next.
7. The
Select Node(s) window shows the current User Profile Node(s) on the right pane.
8. To
add another Node select the Node from the left pane (Available Nodes) .
9. Click
the right-arrow button in the middle of the panes
10.
The node is added to the pane on the right side.
Repeat these steps for each node you want to add.
11.
When finished, click NEXT
to go to the next step
|
TIP |
To remove a node from the list in the right pane, select the node and click on the left-arrow button.
|

Modify the user's roles and permissions
You can modify the roles and permissions for the user or you can skip this step by clicking Next.
The Grant Roles screen appears. You can check additional roles or you can uncheck roles that are no longer needed.
If you manage several nodes and you have selected more than 1 node for the user in the previous screen you will have to grant roles and permissions for each node separately and thus select each of the nodes first.
|
IMPORTANT |
The USM automatically detects incompatible roles. The roles that are incompatible with the role you selected are greyed. You cannot select these. Example: You select "MS Managing Authority ESF Send". The roles, "MS Certifying Authority ESF Send" and "MS Audit Authority ESF Send", "MS Certifying Authority FEAD Send", "MS Audit Authority FEAD Send", "MS Certifying Authority YEI Send" and "MS Audit Authority YEI Send" are greyed. |

12. Select the
node (if you have selected more than 1 node in the previous screen).
13. Open the
fund(s).
14. Tick the
boxes to select the additional roles and permissions you want to grant or
uncheck the boxes of the roles that are no longer needed.
15. Once you've
flagged the roles on each Node and for each fund click NEXT to get to the final step
(reviewing and sending the request to the Commission).
Send the request to the SFC2014 Support team
After modifying the User Information, nodes, roles and permissions to grant, you are ready to send the request to the SFC2014 Support team.
The overview of your request is shown. You see:
· The user information you entered.
· The roles and permissions you selected to be granted for the selected nodes.
· Before sending the request you can click BACK to go back to the previous step or click CANCEL to cancel the creation of the whole request.

16.
Click the button FINISH
to send the request to the SFC2014 Support team.

17.
Click YES
to confirm.
Once the request is sent, the system attributes a unique identifier number (ID) to the request. The status of the request is SENT.
The request can now be processed by the SFC2014 Support team. If there are mistakes or other issues, the request is returned to you by the SFC2014 Support team.
If the request is processed…
If the request is processed, the status becomes PROCESSED and two automatic e-mails are sent:
· One e-mail to the MS liaison or MS liaison Deputy who created the request containing:
o A link with the request identifier (ID) to view the processed request.
· One mail to the concerned user containing:
o The updated access information.
If the request is returned (not processed)…
If the Support team detects problems or missing information the status becomes RETURNED and one e-mail is sent to the MS liaison or MS liaison Deputy with an explanation on the reason for returning.
The MS liaison (deputy) can:
· Correct the request and send it again or
· Cancel the request
Granting access to a web user managed by another MS liaison
This option is only available for the MS liaisons dealing with cross-border programmes and for the MS liaisons of countries having a different MS liaison for each fund, region or community.
Using this type of request, you can grant roles and permissions to a user that exists already in the system but is managed by another MS liaison (this means that the user has roles and permissions on (a) node(s) different from the nodes(s) you manage).
When you grant access to a user, SFC2014 creates a new "profile" for this user. The user can then choose between the different profiles he or she has to connect to (one profile per node).
|
BEFORE YOU START |
Ensure that you have all necessary information about the user. The request must be created and sent in a single operation. |

* only for multi-node countries
Select the type of request you want to create
1.
On the menu UTILITIES
> ACCESS REQUESTS click on the icon to create a new
Access Request.
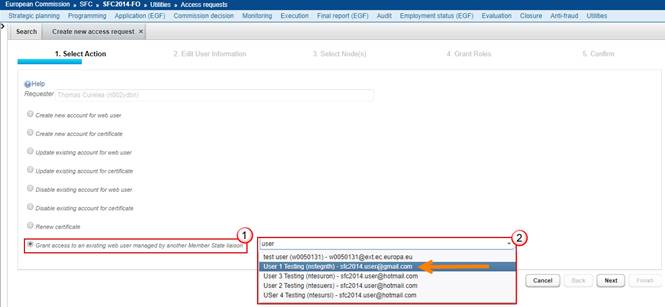
2. The
wizard appears. Select the action GRANT ACCESS TO
AN EXISTING WEB-USER MANAGED BY ANOTHER MEMBER STATE LIAISON.
3. Enter
the first name of the user in the blank field that appears next to the selected
type of request and select the user you want to grant access to from the list
displayed.

4.
After having selected the user, click NEXT .
|
INFO |
As this user is managed by another MS liaison, you cannot modify the User information. This step is therefore skipped by the wizard. |
Select Node(s) (only for multi-node countries)
|
IMPORTANT |
This step is only available for the MS liaison (deputy) from countries having a multi-node structure. For countries with a single node structure this step is skipped by the wizard! You can continue to chapter 3.4.3. |
You must define the node(s) the user will have access to. As there are different nodes within your country, the user probably needs only access to one or some of them, so you must specify this.
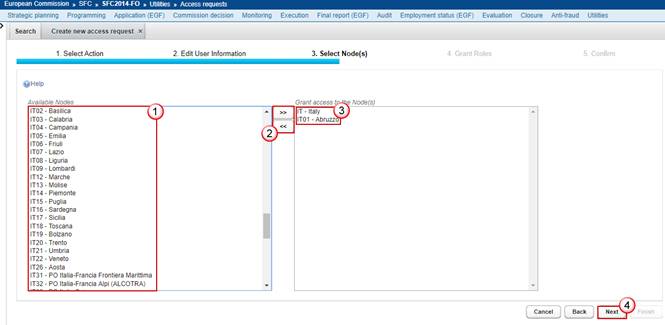
5. On
the select nodes window, select the node from the left pane (AVAILABLE NODES) .
6. Click
the right-arrow button in the middle of the panes .
7. The
node is added to the pane in the right .
8. Repeat these steps for each node you want to add.
9. When
finished, click NEXT to go to the
next step .
|
TIP |
To remove a node form the list in the right pane, select the node and click on the left-arrow button.
|

Grant roles and permissions
The GRANT ROLES screen appears. On this screen you can select the roles and permissions you want to grant for this user on the node(s) you selected in the previous step.
|
Important |
The USM automatically detects incompatible roles. The roles that are incompatible with the role you selected are greyed. You cannot select these. Example: You select "MS Managing Authority ESF Send". The roles, "MS Certifying Authority ESF Send" and "MS Audit Authority ESF Send", "MS Certifying Authority FEAD Send", "MS Audit Authority FEAD Send", "MS Certifying Authority YEI Send" and "MS Audit Authority YEI Send" are greyed. |
10. If you are dealing with a multi-node country, you first must select each of the nodes you chose in the previous step:

If you are dealing with a single-node country, the node is automatically displayed.
11. Click on
the fund to display the list of roles . For each fund tick
the boxes to select the roles and permissions you want to grant .
12. Click NEXT to get to the final step
(reviewing and sending the request to the Commission) .
You can click BACK to go back to the previous step or click CANCEL to cancel the creation of the whole request.
Send the request to the SFC2014 Support team
After having selected the nodes and the roles and permissions to grant, you are ready to send the request to the SFC2014 Support team.
The overview of your request is shown. You see:
· The user information.
· The roles and permissions you selected to be granted for the selected nodes.
· Before sending the request you can click BACK to go back to the previous step or click CANCEL to cancel the creation of the whole request.

13. Click the
button FINISH to send the request to the
SFC2014 Support team .
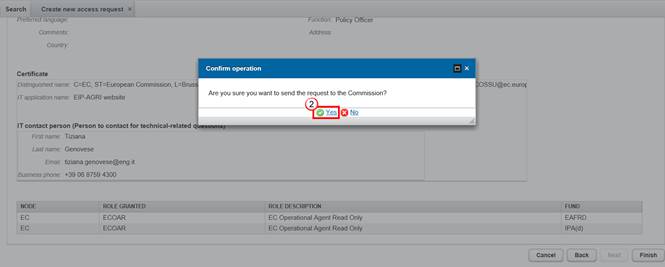
14.
Click YES
to confirm .

Once the request is sent, the system attributes a unique identifier number (ID) to the request. The status of the request is SENT.
The request can now be processed by the SFC2014 Support team. If there are mistakes or other issues, the request is returned to you by the SFC2014 Support team.
If the request is processed…
If the request is processed, the status becomes PROCESSED and two automatic e-mails are sent:
· One e-mail to the MS liaison or MS liaison Deputy who created the request containing:
o A link with the request identifier (ID) to view the processed request.
· One mail to the concerned user containing:
o The existing roles and permissions (the ones the user had already from the other MS liaison) and the roles and permissions granted by you on your node (s). For each node, there will be a profile the user can choose when connected to SFC2014.
If the request is returned (not processed)…
If the Support team detects problems or missing information, the status becomes RETURNED and one e-mail is sent to the MS liaison or MS liaison Deputy with an explanation on the reason for returning.
The MS liaison (deputy) can:
· Correct the request and send it again or
· Cancel the request
Disabling a web user
When a user no longer needs access to SFC2014 the MS liaison (and deputies) can create a request to disable (deactivate) the user.

|
Important |
If you request for disabling a user that has roles and permissions granted by another MS liaison, the USM will only deactivate the user profile corresponding to the nodes, roles and permissions you manage. However, the user remains active for the other MS liaison (deputy) who deals with the user. The user only becomes totally inactive when ALL MS liaisons dealing with this user have requested the deactivation of the user. |
Select the type of request you want to create
1. On
the menu UTILITIES > ACCESS REQUESTS click on
the icon to create a new Access Request.
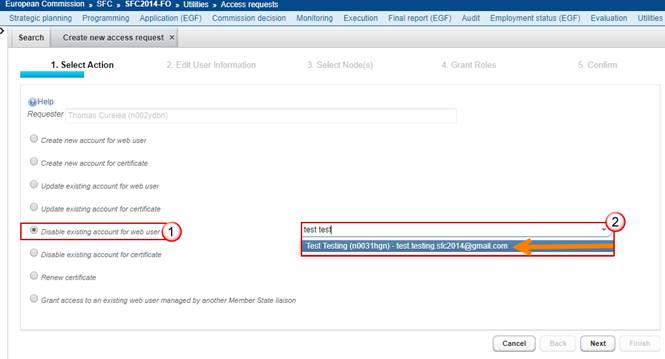
2. The
wizard appears. Select the action DISABLE
EXISTING ACCOUNT FOR WEB USER.
3. Enter
the first name of the user in the blank field that appears next to the selected
type of request and select the user you want to disable from the list displayed.

4.
After having selected the user, click NEXT .
|
INFO |
As this user will be deactivated, it is not necessary to modify or remove the User information or the Roles and Permissions. These steps are therefore skipped by the wizard. |
Send the request to the SFC2014 support team
The overview of your request is shown. You see:
· The user information and the nodes, roles and permissions the user currently has.
· Before sending the request you can click BACK to go back to the previous step or click CANCEL to cancel the creation of the whole request.
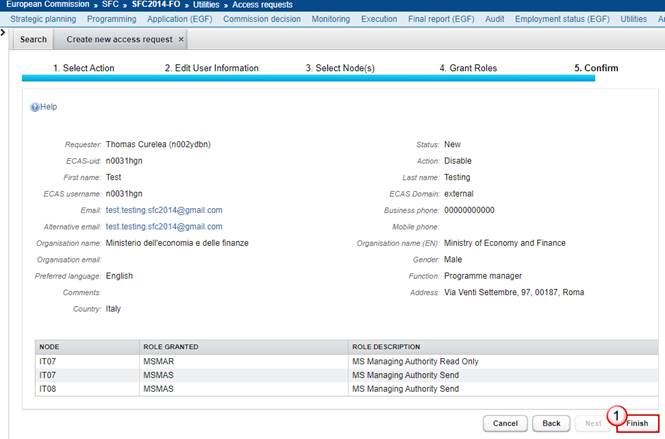
5. Click
the button FINISH to send the request to the
SFC2014 Support team.

6.
Click YES
to confirm.
Once the request is sent, the system attributes a unique identifier number (ID) to the request. The status of the request is SENT.
The request can now be processed by the SFC2014 Support team. If there are mistakes or other issues, the request is returned to you by the SFC2014 Support team.
If the request is processed…
If the request is processed, the status becomes PROCESSED and one e-mail is sent to the MS liaison or MS liaison Deputy informing that the request has been processed successfully. No e-mail is sent to the user (as the user no longer needs the account, the USM assumes the user doesn't expect to be notified).
If the request is returned (not processed)…
If the Support team detects problems or missing information the status becomes RETURNED and one e-mail is sent to the MS liaison (deputy) with an explanation on the reason for returning.
The MS liaison (deputy) can:
· Correct the request and send it again or
· Cancel the request
Create a request for a new certificate
|
Important |
A certificate user account enables local information systems to authenticate when communicating with SFC2014 through web-services. Requests for certificate user accounts should only be created by countries using the web-services! Unlike the web user accounts that access the application SFC2014 with a nominative ECAS user account, certificate user accounts remain generic user accounts starting with w005… |
You can request the creation of a new certificate when no certificate exists for the purposes you need to (i.e. currently no other certificate exists for the same fund, node and with the same roles and permissions as the one you want to request for).
· If a certificate exists but has expired, you can create a request to RENEW CERTIFICATE (see chapter 3.8).
· If the certificate exists but there are changes on the information of the user linked to the certificate or in the IT contact person, you can request to UPDATE EXISTING ACCOUNT FOR CERTIFICATE (see chapter 3.7).
Select the type of request
1.
On the menu Utilities >
Access Requests click on the icon to
create a new Access Request:
The creation wizard appears:
2.
Select the action Create New
Account For Certificate and click Next .
Enter the user information
The Edit User Information screen appears:
3.
Enter the requested information :
Fields marked with a red asterisk (*) are mandatory:
· ECAS-uid*
· First Name*
· Last Name*
· Email*
· Business Phone*
· Alternative Email
· Mobile Phone
· Organisation name*
· Organisation name (EN)
· Gender
· Preferred Language (for the notifications)
· Function
· Address
· Country
· Comments
You can click Back to go back to the previous step or click Cancel to cancel the creation of the whole request.
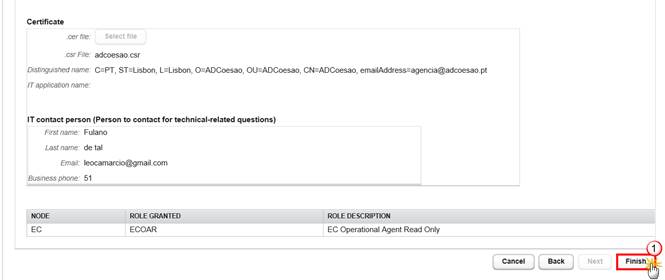
4.
Upload the Certificate file (.csr) and enter the IT Contact
person data
|
Important |
Make sure to verify that your Certificate file (.csr) contains the following elements: · Distinguished Name string with the attributes: C=, ST=, L=, O=, OU=, CN=, emailAddress= · no blank included before or after each element of the Distinguished Name · none of the elements in the DN contains quotes " " . · none of the elements in the DN contains a comma or a special character like " / ", " & ", " ü ", " ñ " etc. This is very important because it may block their internal system in connecting to connect to SFC2014 . · the Public Key size equals 2048 bit · the Signature Algorithm is SHA256: Signature Algorithm: sha256WithRSAEncryption |

Fields marked with a red asterisk (*) are mandatory:
· .csr File*
· First Name*
· Last Name*
· Email*
· Business Phone*
5. Click Next to continue.
|
IMPORTANT |
This step is only available for the MS liaison (deputy) from countries having a multi-node structure. For countries with a single node structure this step is skipped by the wizard! You can continue to the chapter to Grant roles & permissions |
Select node(s) (only for multi-node countries)
|
This step is only available for the MS liaison (deputy) from countries having a multi-node structure. For countries with a single node structure this step is skipped by the wizard! You can continue to the chapter to Grant roles & permissions |
You must define the nodes the user will have access to. As there are different nodes within your country, the user probably needs only access to one or some of them, so you must specify this.

6. On
the select nodes window, select the node from the left pane (Available Nodes) .
7. Click
the right-arrow button in the middle of the panels.
8. The
node is added to the pane on the right side.
9. Repeat these steps for each node you want to add.
10. When
finished, click Next to go to the
next step.
To remove a node form the list in the right pane, select the node and click on the left-arrow button.

Once the user has been created, each node defined for the user will become a profile. When connected in SFC2014 the user has to choose the profile he/she wants to use and will have access to the node corresponding to the profile selected.
Grant user's roles and permissions
The Grant Roles screen appears. On this screen you must select the roles and permissions you want to grant for this user.
The roles and permissions shown correspond to the roles and permissions related to the Funds for which the MS liaison (deputy) can request access.
· EMPL: ESF - YEI - FEAD - IPA Component IV
· REGIO: ERDF - CF –ENI - IPA Component II and III
· MARE: EMFF
· AGRI: EAFRD - IPA Component V
· HOME: ISF - AMF
The roles and permissions are created on the Node for which the MS liaison (deputy) can request (or on each of the nodes selected in previous step).
|
IMPORTANT |
The USM automatically detects incompatible roles. The roles that are incompatible with the role you selected are greyed. You cannot select these. Example: You select "MS Managing Authority ESF Send". The roles, "MS Certifying Authority ESF Send" and "MS Audit Authority ESF Send", "MS Certifying Authority FEAD Send", "MS Audit Authority FEAD Send", "MS Certifying Authority YEI Send" and "MS Audit Authority YEI Send" are greyed. |
If you are dealing with a multi-node country, you must first select each of the nodes you have chosen in the previous step.

If you are dealing with a single-node country, the node is automatically displayed.

11. Click on
the fund to display the list of roles . For each fund tick
the boxes to select the roles and permissions you want to grant . The USM
automatically detects incompatible roles. The roles that are incompatible with
the role you select are greyed. You cannot select these (see example below).
12. Click Next to get to the final step
(reviewing and sending the request to the Commission) .
You can click Back to go back to the previous step or click Cancel to cancel the creation of the whole request.
Send the request to the SFC2014 Support team
After having selected the nodes and the roles and permissions to grant, you are ready to send the request to the SFC2014 Support team.
The overview of your request is shown. You see:
· The user information.
· The roles and permissions you selected to be granted for the selected nodes.
· Before sending the request you can click BACK to go back to the previous step or click CANCEL to cancel the creation of the whole request.

13. Click the
button FINISH to send the request to the
SFC2014 Support team .

14.
Click YES
to confirm .

Once the request is sent, the system attributes a unique identifier number (ID) to the request. The status of the request is SENT.
The request can now be processed by the SFC2014 Support team. If there are mistakes or other issues, the request is returned to you by the SFC2014 Support team.
If the request is processed…
If the request is processed, the status becomes PROCESSED and two automatic e-mails are sent:
· One e-mail to the MS liaison or MS liaison Deputy who created the request containing:
o A link with the request identifier (ID) to view the processed request.
· One mail to the concerned user containing:
o The existing roles and permissions (the ones the user had already from the other MS liaison) and the roles and permissions granted by you on your node (s). For each node, there will be a profile the user can choose when connected to SFC2014.
If the request is returned (not processed)…
If the Support team detects problems or missing information, the status becomes RETURNED and one e-mail is sent to the MS liaison or MS liaison Deputy with an explanation on the reason for returning.
The MS liaison (deputy) can:
· Correct the request and send it again or
· Cancel the request
Update existing account for certificate
You can request for a modification of a certificate when the details of the user linked to the certificate have changed, when the details of the IT contact person have changed or when you want to modify the node, roles or permissions.
· If your certificate has expired, you should create a request to RENEW CERTIFICATE (see chapter 3.8)
Select the type of request
1. On the menu Utilities > Access Requests click on the icon to create a new Access Request.
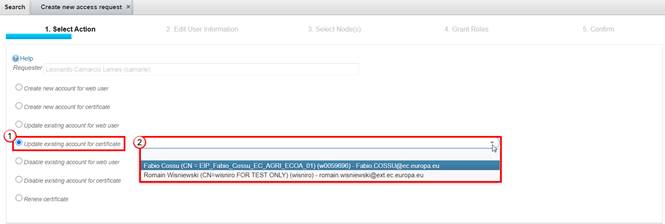
2. The
wizard appears. Select the action Update Existing
Account For Certificate .
3. Enter
the first name of the user in the blank field that appears next to the selected
type of request and select the user you want to update from the list displayed.
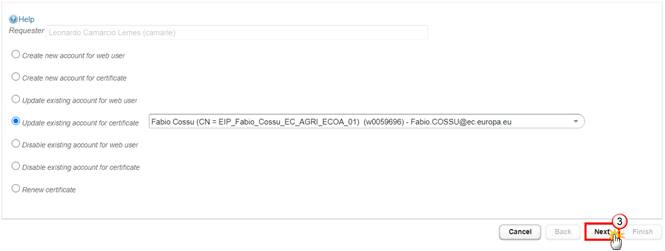
4.
After having selected the user, click NEXT.
|
TIP |
The fields with a down-arrow contain a 'drop-down' list. To select the user you want to create the request for, you can either: • enter the (first
letters of) the user's first name • or you can click on
the down-arrow
|
Modify the user information
The Edit User Information screen appears.

5.
Modify the requested information if necessary .
You can modify the information on the user or you can skip this step by clicking Next. The following information can be modified.
Fields marked with an asterisk (*) are mandatory:
· First Name*
· Last Name*
· Email*
· Business Phone*
· Alternative Email
· Mobile Phone
· Organisation name*
· Organisation name (EN)
· Gender
· Preferred language (for the notifications)
· Function (within the organisation)
· Address
· Country
· Comments
6.
Update the Certificate file (.csr) and update the IT Contact
person data, if necessary
|
Important |
Make sure to verify that your Certificate file (.csr) contains the following elements: · Distinguished Name string with the attributes: C=, ST=, L=, O=, OU=, CN=, emailAddress= · no blank included before or after each element of the Distinguished Name · none of the elements in the DN contains quotes " " . · none of the elements in the DN contains a comma or a special character like " / ", " & ", " ü ", " ñ " etc. This is very important because it may block their internal system in connecting to connect to SFC2014 . · the Public Key size equals 2048 bit · the Signature Algorithm is SHA256: Signature Algorithm: sha256WithRSAEncryption |
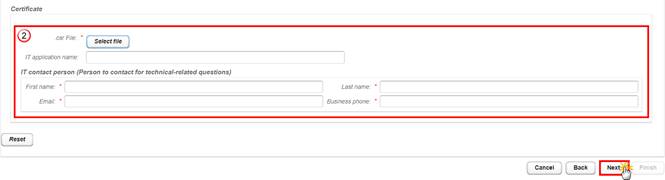
Fields marked with a red asterisk (*) are mandatory:
· .csr File*
· First Name*
· Last Name*
· Email*
· Business Phone*
7. Click Next to continue.
You can click BACK to go back to the previous step or click CANCEL to cancel the creation of the whole request.
|
IMPORTANT |
The ECAS-uid cannot be modified! |
|
IMPORTANT |
You can click on the button Get User Info to retrieve the details of the user from ECAS. Clicking on this button will update the First name, Last name, Email, Business Phone, Organisation name and Address from ECAS for the current ECAS-uid. Clicking on the Get User Info button will overwrite the current information in SFC2014 with the information from ECAS! Please make sure that the information in ECAS for that user is up to date! If not, please ask the user to update the information in his/her ECAS account first. |
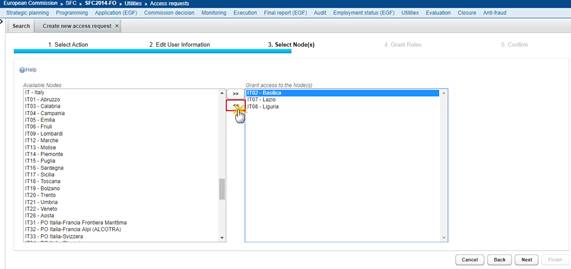
Modify nodes (only for multi-node countries)
|
IMPORTANT |
This step is only available for the MS liaison (deputy) from countries having a multi-node structure. For countries with a single node structure (this step is skipped by the wizard! You can continue to the following chapter. |
You can modify the nodes the user will have access to. In case you only want to modify roles and permissions, you can skip this step by clicking Next.

8. The
Select Node(s) window shows the current User Profile Node(s) on the right pane.
9. To
add another Node select the Node from the left pane (Available Nodes) .
10. Click the
right-arrow button in the middle of the panes

11.
The node is added to the pane on the right side.
Repeat these steps for each node you want to add.
12.
When finished, click NEXT
to go to the next step
|
TIP |
To remove a node from the list in the right pane, select the node and click on the left-arrow button.
|
Modify the user's roles and permissions
You can modify the roles and permissions for the user or you can skip this step by clicking Next.
The Grant Roles screen appears. You can check additional roles or you can uncheck roles that are no longer needed.
If you manage several nodes and you have selected more than 1 node for the user in the previous screen you will have to grant roles and permissions for each node separately and thus select each of the nodes first.
|
IMPORTANT |
The USM automatically detects incompatible roles. The roles that are incompatible with the role you selected are greyed. You cannot select these. Example: You select "MS Managing Authority ESF Send". The roles, "MS Certifying Authority ESF Send" and "MS Audit Authority ESF Send", "MS Certifying Authority FEAD Send", "MS Audit Authority FEAD Send", "MS Certifying Authority YEI Send" and "MS Audit Authority YEI Send" are greyed. |

13. Select the
node (if you have selected more than 1 node in the previous screen).
14. Open the
fund(s).
15. Tick the
boxes to select the additional roles and permissions you want to grant or
uncheck the boxes of the roles that are no longer needed.
16. Once you've
flagged the roles on each Node and for each fund click NEXT to get to the final step
(reviewing and sending the request to the Commission).
Send the request to the SFC2014 Support team
After modifying the User Information, nodes, roles and permissions to grant, you are ready to send the request to the SFC2014 Support team.
The overview of your request is shown. You see:
· The user information you entered.
· The roles and permissions you selected to be granted for the selected nodes.
· Before sending the request you can click BACK to go back to the previous step or click CANCEL to cancel the creation of the whole request.
17.
Click the button FINISH
to send the request to the SFC2014 Support team.
18.
Click YES
to confirm.

Once the request is sent, the system attributes a unique identifier number (ID) to the request. The status of the request is SENT.
The request can now be processed by the SFC2014 Support team. If there are mistakes or other issues, the request is returned to you by the SFC2014 Support team.
If the request is processed…
If the request is processed, the status becomes PROCESSED and two automatic e-mails are sent:
· One e-mail to the MS liaison or MS liaison Deputy who created the request containing:
o A link with the request identifier (ID) to view the processed request.
· One mail to the concerned user containing:
o The updated access information.
If the request is returned (not processed)…
If the Support team detects problems or missing information the status becomes RETURNED and one e-mail is sent to the MS liaison or MS liaison Deputy with an explanation on the reason for returning.
The MS liaison (deputy) can:
· Correct the request and send it again or
· Cancel the request
Create a request for renewal of a(n) (expired) certificate
You can request for a renewal of a certificate when the existing one is about to expire or is expired (the validity of a certificate is two years).
Select the type of request you want to create
1. On the menu Utilities > Access Requests click on the icon to create a new Access Request.
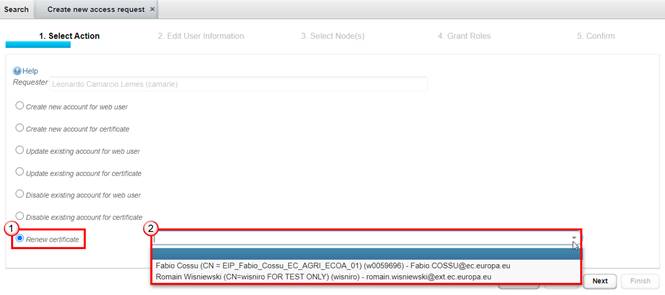
2. The
wizard appears. Select the action Renew Certificate
.
3. Enter
the first name of the user in the blank field that appears next to the selected
type of request and select the user you want to update from the list displayed.
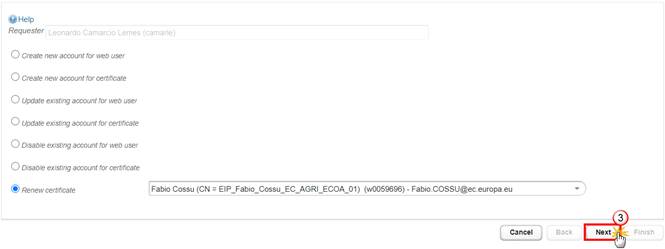
4.
After having selected the user, click NEXT.
|
TIP |
The fields with a down-arrow contain a 'drop-down' list. To select the user you want to create the request for, you can either: • enter the (first
letters of) the user's first name • or you can click on
the down-arrow
|
Modify the user information
The Edit User Information screen appears:

5.
Update the requested information (if necessary) :
Fields marked with a red asterisk (*) are mandatory:
· ECAS-uid*
· First Name*
· Last Name*
· Email*
· Business Phone*
· Alternative Email
· Mobile Phone
· Organisation name*
· Organisation name (EN)
· Gender
· Preferred Language (for the notifications)
· Function
· Address
· Country
· Comments
You can click Back to go back to the previous step or click Cancel to cancel the creation of the whole request.
6.
Upload the Certificate file (.csr) to be renewed and update
the IT Contact person data (if necessary)
|
Important |
Make sure to verify that your Certificate file (.csr) contains the following elements: · Distinguished Name string with the attributes: C=, ST=, L=, O=, OU=, CN=, emailAddress= · no blank included before or after each element of the Distinguished Name · none of the elements in the DN contains quotes " " . · none of the elements in the DN contains a comma or a special character like " / ", " & ", " ü ", " ñ " etc. This is very important because it may block their internal system in connecting to connect to SFC2014 . · the Public Key size equals 2048 bit · the Signature Algorithm is SHA256: Signature Algorithm: sha256WithRSAEncryption |
Fields marked with a red asterisk (*) are mandatory:
· .csr File*
· First Name*
· Last Name*
· Email*
· Business Phone*
7. Click Next to continue.
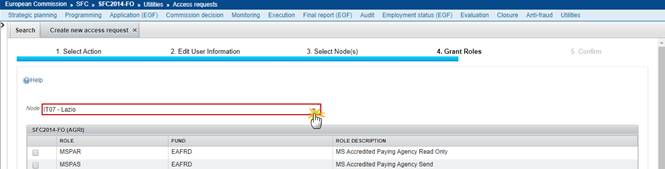
Select node(s) (only for multi-node countries)
|
IMPORTANT |
This step is only available for the MS liaison (deputy) from countries having a multi-node structure. For countries with a single node structure this step is skipped by the wizard! You can continue to the chapter to Grant roles & permissions |
You must define the nodes the user will have access to. As there are different nodes within your country, the user probably needs only access to one or some of them, so you must specify this.

8. On
the select nodes window, select the node from the left pane (Available Nodes) .
9. Click
the right-arrow button in the middle of the panels.
10. The node is
added to the pane on the right side.
11. Repeat these steps for each node you want to add.
12. When
finished, click Next to go to the
next step.
To remove a node form the list in the right pane, select the node and click on the left-arrow button.
Once the user has been created, each node defined for the user will become a profile. When connected in SFC2014 the user has to choose the profile he/she wants to use and will have access to the node corresponding to the profile selected.
Grant user's roles and permissions
The Grant Roles screen appears. On this screen you must select the roles and permissions you want to grant for this user.
The roles and permissions shown correspond to the roles and permissions related to the Funds for which the MS liaison (deputy) can request access.
· EMPL: ESF - YEI - FEAD - IPA Component IV
· REGIO: ERDF - CF –ENI - IPA Component II and III
· MARE: EMFF
· AGRI: EAFRD - IPA Component V
· HOME: ISF - AMF
The roles and permissions are created on the Node for which the MS liaison (deputy) can request (or on each of the nodes selected in previous step).
|
IMPORTANT |
The USM automatically detects incompatible roles. The roles that are incompatible with the role you selected are greyed. You cannot select these. Example: You select "MS Managing Authority ESF Send". The roles, "MS Certifying Authority ESF Send" and "MS Audit Authority ESF Send", "MS Certifying Authority FEAD Send", "MS Audit Authority FEAD Send", "MS Certifying Authority YEI Send" and "MS Audit Authority YEI Send" are greyed. |
If you are dealing with a multi-node country, you must first select each of the nodes you have chosen in the previous step.
If you are dealing with a single-node country, the node is automatically displayed.
13. Click on
the fund to display the list of roles . For each fund tick
the boxes to select the roles and permissions you want to grant . The USM automatically
detects incompatible roles. The roles that are incompatible with the role you
select are greyed. You cannot select these (see example below).
14. Click Next to get to the final step
(reviewing and sending the request to the Commission) .
You can click Back to go back to the previous step or click Cancel to cancel the creation of the whole request.
Send the request to the SFC2014 Support team
After having selected the nodes and the roles and permissions to grant, you are ready to send the request to the SFC2014 Support team.
The overview of your request is shown. You see:
· The user information.
· The roles and permissions you selected to be granted for the selected nodes.
· Before sending the request you can click BACK to go back to the previous step or click CANCEL to cancel the creation of the whole request.
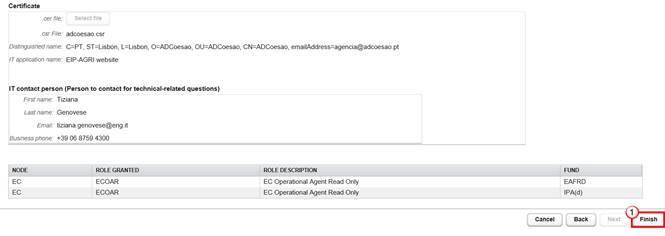
15. Click the
button FINISH to send the request to the
SFC2014 Support team .

16. Click YES to confirm .
Once the request is sent, the system attributes a unique identifier number (ID) to the request. The status of the request is SENT.
The request can now be processed by the SFC2014 Support team. If there are mistakes or other issues, the request is returned to you by the SFC2014 Support team.
If the request is processed…
If the request is processed, the status becomes PROCESSED and two automatic e-mails are sent:
· One e-mail to the MS liaison or MS liaison Deputy who created the request containing:
o A link with the request identifier (ID) to view the processed request.
· One mail to the concerned user containing:
o The existing roles and permissions (the ones the user had already from the other MS liaison) and the roles and permissions granted by you on your node (s). For each node, there will be a profile the user can choose when connected to SFC2014.
If the request is returned (not processed)…
If the Support team detects problems or missing information, the status becomes RETURNED and one e-mail is sent to the MS liaison or MS liaison Deputy with an explanation on the reason for returning.
The MS liaison (deputy) can:
· Correct the request and send it again or
· Cancel the request
Create a request for disabling a certificate
When a certificate is no longer needed, the MS liaison (and deputies) can create a request to disable (deactivate) the certificate.
Select the type of request you want to create
1. On
the menu UTILITIES > ACCESS REQUESTS click on
the icon to create a new Access Request.
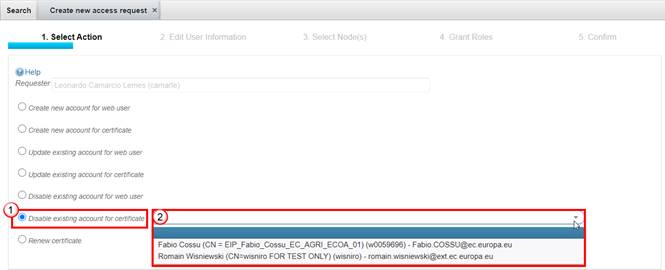
2. The
wizard appears. Select the action DISABLE
EXISTING ACCOUNT FOR WEB USER.
3. Enter
the first name of the user in the blank field that appears next to the selected
type of request and select the user you want to disable from the list displayed.
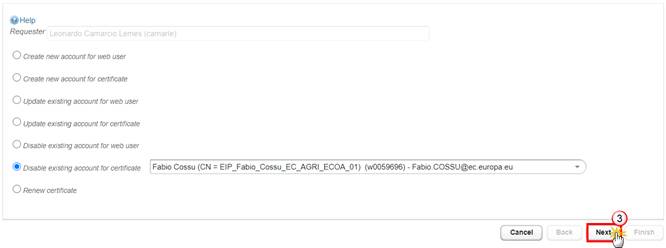
4.
After having selected the user, click NEXT .
|
INFO |
As this user will be deactivated, it is not necessary to modify or remove the User information or the Roles and Permissions. These steps are therefore skipped by the wizard. |
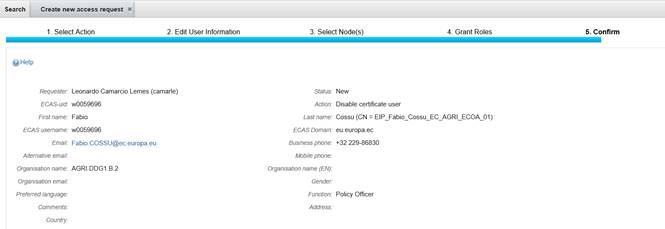
Send the request to the SFC2014 support team
The overview of your request is shown. You see:
· The user information and the nodes, roles and permissions the user currently has.
· Before sending the request you can click BACK to go back to the previous step or click CANCEL to cancel the creation of the whole request.
Send the request to the SFC2014 Support team
The overview of your request is shown. You see:
· The user information and the nodes, roles and permissions the user currently has.
· Before sending the request you can click BACK to go back to the previous step or click CANCEL to cancel the creation of the whole request.
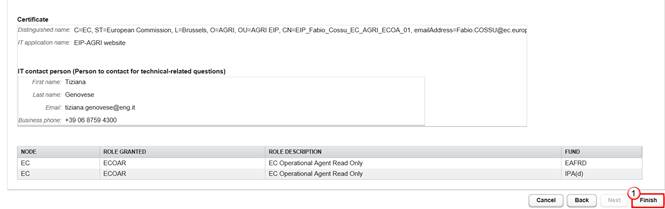
5. Click
the button FINISH to send the request to the
SFC2014 Support team.

6.
Click YES
to confirm.
Once the request is sent, the system attributes a unique identifier number (ID) to the request. The status of the request is SENT.
The request can now be processed by the SFC2014 Support team. If there are mistakes or other issues, the request is returned to you by the SFC2014 Support team.
If the request is processed…
If the request is processed, the status becomes PROCESSED and one e-mail is sent to the MS liaison or MS liaison Deputy informing that the request has been processed successfully. No e-mail is sent to the user (as the user no longer needs the account, the USM assumes the user doesn't expect to be notified).
If the request is returned (not processed)…
If the Support team detects problems or missing information the status becomes RETURNED and one e-mail is sent to the MS liaison (deputy) with an explanation on the reason for returning.
The MS liaison (deputy) can:
· Correct the request and send it again or
· Cancel the request
Edit a request
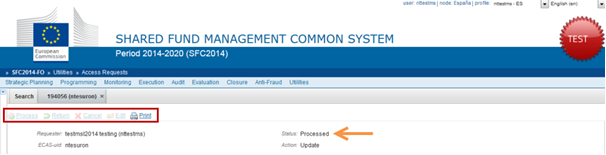
You can edit an Access Request in status SENT or RETURNED. If the SFC2014 Support team has returned a request, you can edit the request to make the corrections asked by the Support team.
Once the request has been processed you cannot edit the request anymore. The Edit link will be disabled as shown below:

1. To edit a request in status SENT or RETURNED you can open the request from the list of requests in the UTILITIES > ACCESS REQUESTS menu or via the link provided in the notification email if you want to edit a request which has been returned by the SFC2014 Support team.
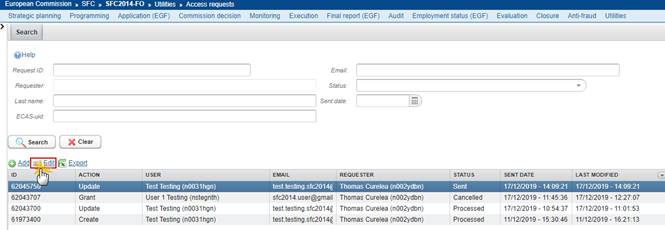
2. On the menu UTILITIES > ACCESS REQUESTS select the request you want to edit and click the edit icon on top of the list or double click on the access request to open it.
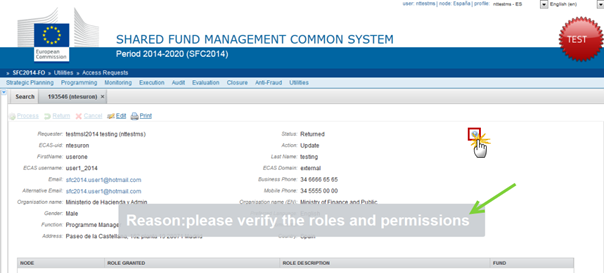
3. The overview of the request is displayed. If the request was returned by the SFC2014 Support team you can see the reason for this return by clicking on the question mark on the right side of the screen.
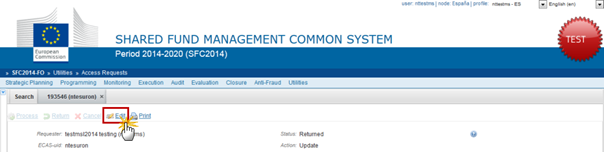
4. Click on the Edit link on the upper part of the screen to start editing the request
5. The wizard appears. You can add, remove or overwrite the information in each step before sending
Once the request has been sent to the Commission the status of the request will turn into SENT again.
Cancel a request
You can cancel an Access Request in status SENT or RETURNED.
Once the request has been processed you cannot cancel the request anymore. The Cancel link will be disabled as shown below:
You can cancel a request for the following reasons:
· You have sent the request to the Commission but you realise afterwards you don't need this request to be processed. The status of the request is SENT.
· The Commission returned a request sent by you and you realise you don't need this request to be processed. The status of the request is RETURNED.
If the Commission returned your request and you still need the request to be processed, you can edit it. You don't have to cancel it and create a new one (to edit and send the request again see chapter 3.10).
To cancel a request you can open the request from the list of requests in the UTILITIES > ACCESS REQUESTS menu or via the link provided in the notification email if you want to cancel a request which has been returned by the SFC2014 Support team.

1.
On the menu UTILITIES
> ACCESS REQUESTS select the request you
want to cancel and click the edit icon  on top of the list or
double click on the access request to open it.
on top of the list or
double click on the access request to open it.
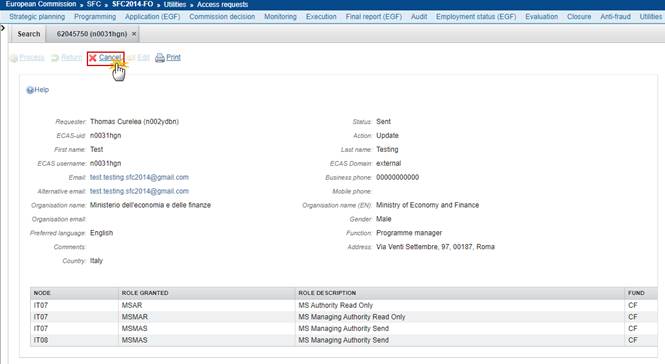
2. The overview of the request is displayed. Click on the Cancel link on the upper part of the screen to cancel the request.
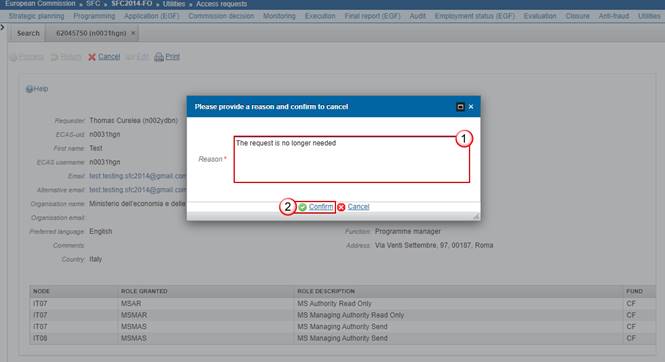
3.
Provide a reason for the cancel (this information is
mandatory) and
click CONFIRM .

4. The request is CANCELLED. Click on the question mark on the right side of the screen to display the reason you've entered for this cancel.
Once cancelled, the request will not disappear from the list of access requests. The request will appear as CANCELLED in the list.

User accounts
Via the submenu USER ACCOUNTS it is possible to view the list of users managed by the MS liaison (deputy) and to display the account details of each user.
Display the list of existing users
1. Open the menu UTILITIES > USER ACCOUNTS.
2. All
existing users managed by the MSL and the deputy, are displayed in the list.
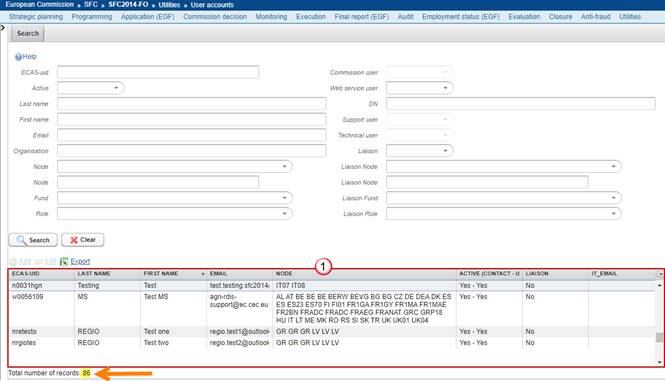
The total number of users is displayed on the bottom left-hand side of the screen.
The following details are displayed by default:
· ECAS-uid
· Last Name
· First Name
· Node: the node(s) the user has access to
· Active (Contact – User): Active Contact and User
o Yes – Yes: (user account is active)
o No – No: (user account is disabled and cannot access SFC2014)
· Liaison: indicates if the user is nominated as MS Liaison (Deputy) Officer
· To sort the list, click on the header of the column you want to sort on:

The arrow indicates how the list is sorted (A-Z). Click on the arrow to sort from Z-A

To add or remove columns from the list, click on the arrow
in the last column and select the
column(s) you want to add or remove :


Search for a user
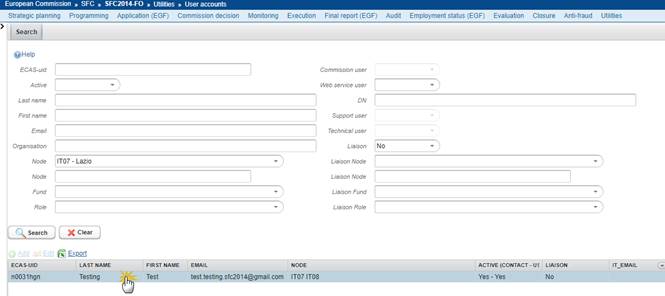
1. Open the menu UTILITIES > USER ACCOUNTS.

2. Enter
your search criteria .
You can enter one or more search criteria to look for a specific user or group of users:
· ECAS-uid
· Last name
· First Name
· Node: search for users on a specific node.
· Role: search for users with a specific role.
· Active: select Yes or No to display active or disabled users only. All users (active and disabled users) are shown by default.
· Liaison
3.
Click SEARCH.

The results of your search are displayed .
The total number of results found is displayed on the bottom left-hand side of
the screen.
.
The total number of results found is displayed on the bottom left-hand side of
the screen.
4.
Press the CLEAR
button to reset all the filters  and
then SEARCH to display all the users again
and
then SEARCH to display all the users again .
.
|
NOTE |
Use a percentage sign (%) to replace one or more characters. For example if you want to search for all users having their Last Name starting with the letter "S" enter in the field Last Name: S% |
Display the account details of a user
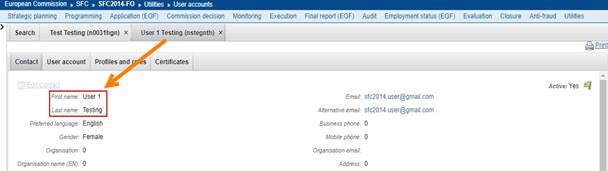
1. Double-click on the user in the list:
A new tab opens with the account details divided into different
sub-tabs. The first tab (CONTACT)
contains the user's contact information .
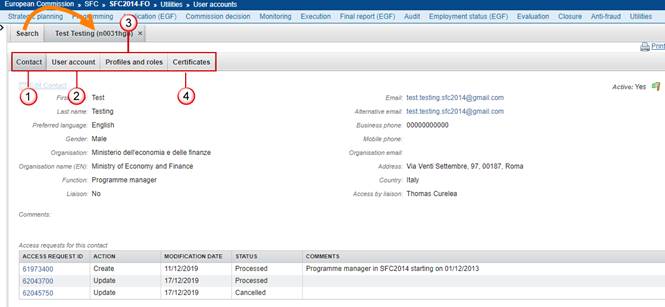
2.
Click on sub-tab USER ACCOUNT
to view the details of the user account including
the ECAS-uid and the ECAS Username (The user needs to enter his/her ECAS
Username and password to log in to SFC2014 Front-Office).
3.
Click on sub-tab PROFILES AND
ROLES to view the current profile(s) and role(s) of the user.
The CERTIFICATES sub-tab is not applicable
for Web Users.
|
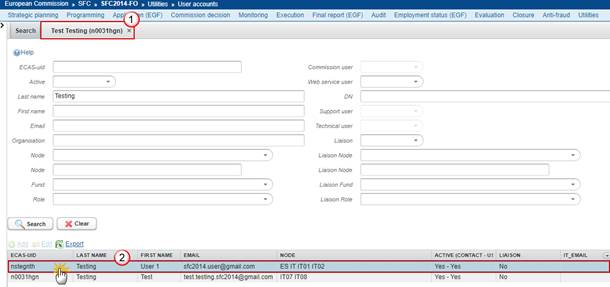
Tip |
You can view the account details of multiple users simultaneously by opening the different user accounts in different tabs.
To do so, on the SEARCH tab double-click on all the users in the list you wish to open.
Click on the name of the user to navigate through the different tabs.
To close the user account details tab click on
|

 .
.
Identify a disabled user
The column ACTIVE (CONTACT – USER) in the results list indicates if a user account is active or disabled.
If a user is marked 'NO – NO', the user account is disabled and the user will not be able to access the application SFC2014.


Identify an active user with a disabled Profile
If a user has been disabled on one node but still has access
to another node, the USER ACCOUNT PROFILE
which is disabled is marked with a red flag  . The
active Profile is marked with a green flag
. The
active Profile is marked with a green flag  .
.
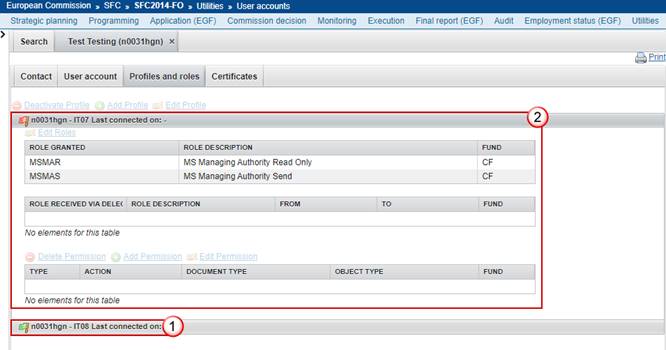
In the example above the user has 2 active profiles and 1 disabled profile.

The Profile name includes the node for which the roles and
permissions have been granted. Click on the Profile
name to display the roles and permissions on that node.