Specific action application
PURPOSE
This document describes the actions related to the Specific Action Application module for AMIF, ISF and BMVI, where the Member State expresses its interest to participate in a Specific Action by submitting an application. The submitted application will then be assessed by the Commission. The Specific Action Application will only contain documents, so no structured data.
REGULATIONS
More details regarding the regulation of the Specific action application can be found in the About SFC2021 section of the portal.
ROLES
Roles involved in the Specific action application are:
MS Managing Authority (MSMA) | Record the Specific action application Upload the Specific action application Documents Consult the Specific action application Delete the Specific action application Validate the Specific action application Prepare the Specific action application for send to EC Send the Specific action application |
FUNDS
AMIF | ISF | BMVI |
Workflow
This section shows the lifecycle to create and manage the Specific action application.
Click here to see the Specific action application workflow diagram in high resolution.

Create the Specific action application
Remark | The User is an identified User and has the Role of MS Managing Authority with Update rights (MSMAu) for the AMIF, ISF or BMVI Fund. When creating a new Specific Action Application for a CCI and Specific Action, it doesn't yet exist. The Programme is adopted and managed on the User’s Node. |
To access the Specific action application go to the Programming menu and select the Specific action application option:

In the search screen click on the Create button to create a new Specific action application:

You are redirected to the Specific action application Creation Wizard:

Enter or select the following information:
(1) Select the CCI number.
The CCI list contains all adopted AMIF/ISF/BMVI Programmes managed at the User’s Node and which only covers a Fund for which the User is registered. The list returns the CCI and the Programme Title.
(2) Select the Specific action.
A Specific Action Application is always for a Specific Action. The Specific Actions list contains all Specific Action codes, pre-defined by the Commission for the Fund of the selected Programme, which have not yet been used in another Specific Action Application for the same CCI.
(3) Click on Create.
The status of the Specific action application is Open.
Remark | On Create, the Table of Content (ToC)/Navigation Tree is presented, so the User can continue to upload the required documents and perform the required actions. |
Record/Edit the Specific action application
Remark | The User is an identified User and has the role of MS Managing Authority with Update rights (MSMAu). When editing a version of the Specific Action Application, its status is Open, Validated, Ready to send or Sent at the level of the Member State and currently resides on the User's Node. |
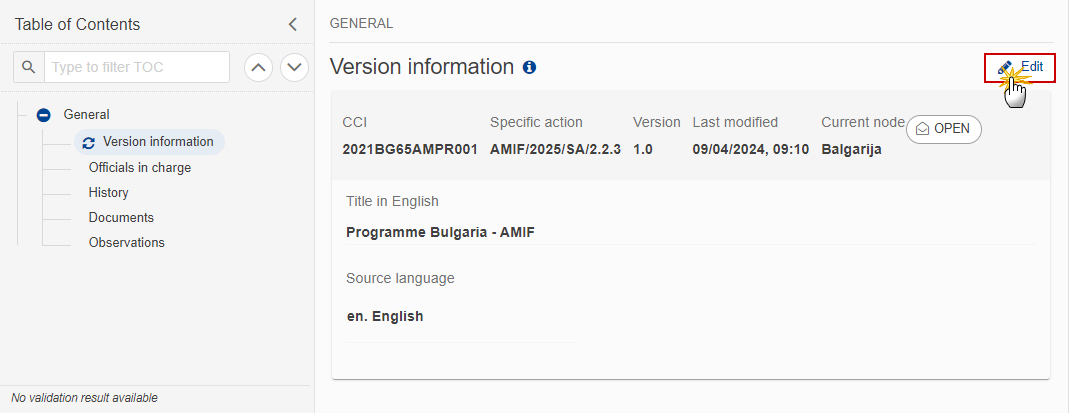
General
Version information
Note | The Version Information contains information on the identification and status of the Specific Action Application version like the CCI, the Version number, the Specific Action, the Status, the Node where it currently resides, the Title in English and the National reference. |
Click on the Edit button to modify the Source language if needed:
The Edit details pop-up window appears:

Enter the following information:
(1) Change the Source language if needed.
(2) Click on Save to save the information.
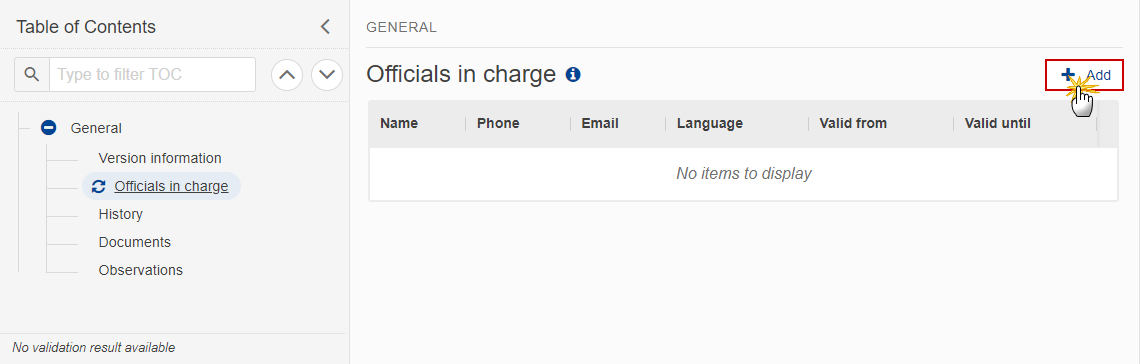
Officials in Charge
Note | Officials in Charge can be updated at any time, independent from the status of the Specific action application. Commission Officials (email domain "ec.europa.eu") can only be created/updated/deleted by Commission Users. |
Click on the Add button
 to add a new official in charge.
Clicking on the Edit icon
 of a row will allow you to modify the information of this official.
Clicking on the Delete icon
 of a row will allow you to delete the official in charge selected.
Click on the Add button to add a new Official in Charge:
The Edit details pop-up window appears:

(1) Enter the Name.
(2) Enter the Email.
The format of the Email address will be validated by the system and should be unique.
(3) Enter the Phone number.
(4) Select the Language.
(5) Enter the Valid from and Valid until dates.
The Valid until date should be greater than the Valid from date.
(6) Click on Save to save the information.
History
This section shows all the actions that have been taken on the Specific action application since it was created, for example:

Documents
Note | The Documents list shows all documents uploaded against this version of the Accounts by Member State and by Commission. Member State Users see all their own Documents and the sent Commission Documents. Commission Users see all their own Documents, unsent Integral Member State Documents and sent Member State Documents. |
The following documents are foreseen:
Description | Internal Code | Non-Integral (1) | Integral (2) | System (3) | Required (4) |
Snapshot of data before send | SNP.SAASNT |
| X | X | X |
MS application form | SAA.APF |
| X |
| X |
MS budget form | SAA.BUF |
| X |
|
|
MS partnership form | SAA.PAF |
| X |
|
|
Other Member State Document(5) | SAA.OM | X |
|
|
|
(1) Document can be sent at any time
(2) Document will be automatically sent when the Object is sent
(3) Document automatically created by the system
(4) Document required in the system before a next action can be executed
(5) Can only be created when the Specific Action Application has been sent to the Commission
Uploading & Sending Documents
Multiple documents can be uploaded in the Specific action application.
Clicking on the Add button
will open a pop-up window allowing you to add a new document type with attachments.Selecting a document row and clicking on the View icon
 will allow you to view the document information.
Selecting a document row and clicking on the Edit icon
will allow you to modify the document information. If a document of type 'Other Member State Document' must be sent, you can select the edit icon in order to send the document.Selecting a document row and clicking on the Delete icon
will allow you to delete the document and all attachements.
Remark | Integral Documents (Official Proposal, etc.) are only sent - together with the encoded data – once the Specific action application is sent to the EC. Referential/non-integral Documents (ie. 'Other Member State Document') can be sent at any time independently of the status of the Specific action application. The 'Other Member State Document' type demands a manual submission (they are NOT sent automatically when the object is sent to the EC). A non-integral document is only visible to the Commission when the SENT DATE is visible. |
Click on the Add button to add a new document:

The Edit document details pop-up window appears:
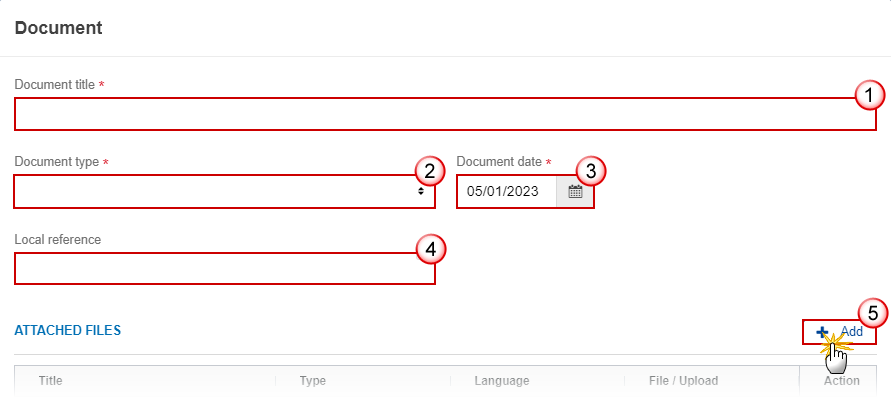
Enter or select the following information:
(1) Enter a Document title for your Document.
(2) Select a Document type.
The Document Type list in the edit screen will contain all non-System Integral and non-Integral Document Types from the Document Group.
(3) Enter a Document date.
The system automatically fills the field with todays date, but this can be modified.
(4) Enter a Local reference.
(5) Click on the Add button to add a new attachment:
You can add multiple attachments by clicking on the Add button.
You can remove unwanted attachments by selecting the attachment and clicking on the Remove button.
The Attached files window becomes editable:
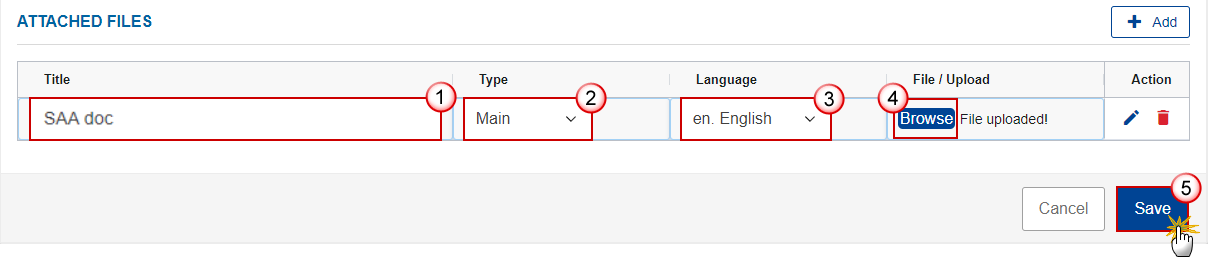
Enter or select the following information:
(1) Enter a Title for your attachment.
(2) Select the Type of the document.
It is possible to select from these 4 types: Annex, Cover Letter, Main or Translation.
(3) Select the Language of the document.
(4) Click on Browse to select the file that you want to add as an attachment.
(5) After the attachments are uploaded click on Save.
Remark | Integral document types will only display the Save button and will be sent when the Specific action application is sent to the Commission. Non-integral document types (such as ‘Other Member State Documents’) will display the Save button and a Save & Send button, and must be sent independently of the Specific action application. |
Sending an unsent non-integral document
Once the document and attachment(s) have been uploaded click on the Edit icon in the row containing the unsent document:

Click on Confirm to send the document to the Commission. For completing this action, the User will be redirected to the EU Login signature page:
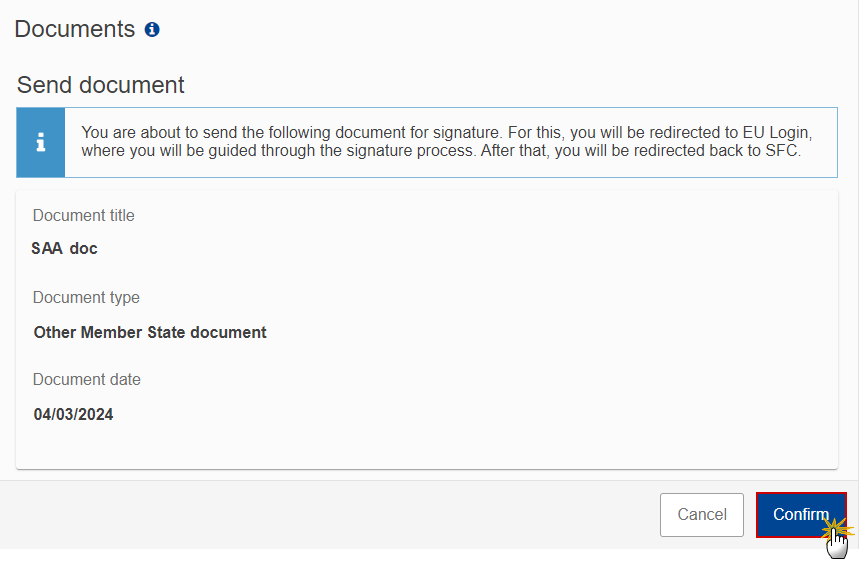
Remark | The Save & Send button will only be shown for documents which are not integral part of the Object and after at least one attachment was added. |
Deletion of an unsent document
Remark | Only unsent documents can be deleted. |
In the row of a previously uploaded unsent document click on the Delete icon to delete the document and associated attachments:

A confirmation window appears:

Click on OK to confirm deletion. Click on Cancel to return to the document section.
Observations
Note | This section is used to provide any relevant information to the Specific action application . It can be used as a type of 'chat' between the Member State and Commission. All Users who have Read permission on the Specific action application will be able to read all observations in the conversation. All Users who have Update permission on the Specific action application will be able to send an observation and participate in the conversation. All observations are kept against the specific version of the Specific action application . The observation is added below the Observations box and includes the username, the date and time of the post. |
Click on the Add button to add an observation:
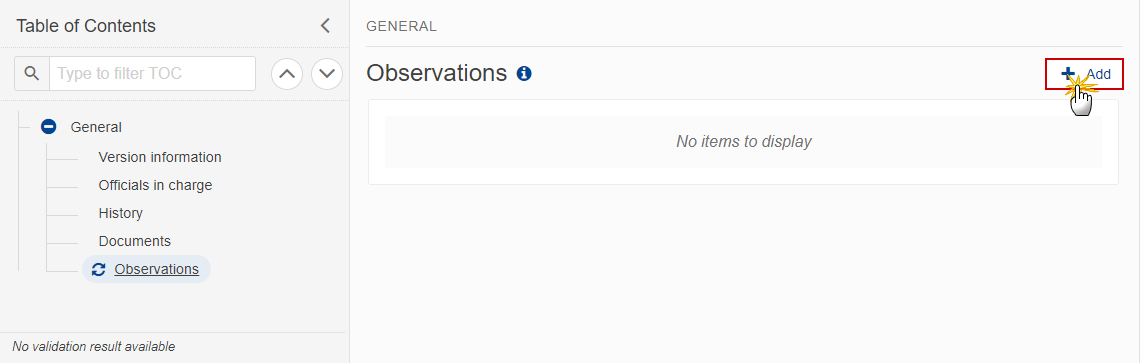
The Add new observation screen appears:

Enter the following:
(1) Enter an observation.
(2) Click on Save to save the information.
Validate the Specific action application
Remark | The Specific action application can be validated at any time, when the current version is in status Open and resides at the User’s Node. To validate the Specific action application, the User must have the role of MS Managing Authority with Update or Send rights (MSMAu/s). |
Click on the Validate button to validate the Specific action application:
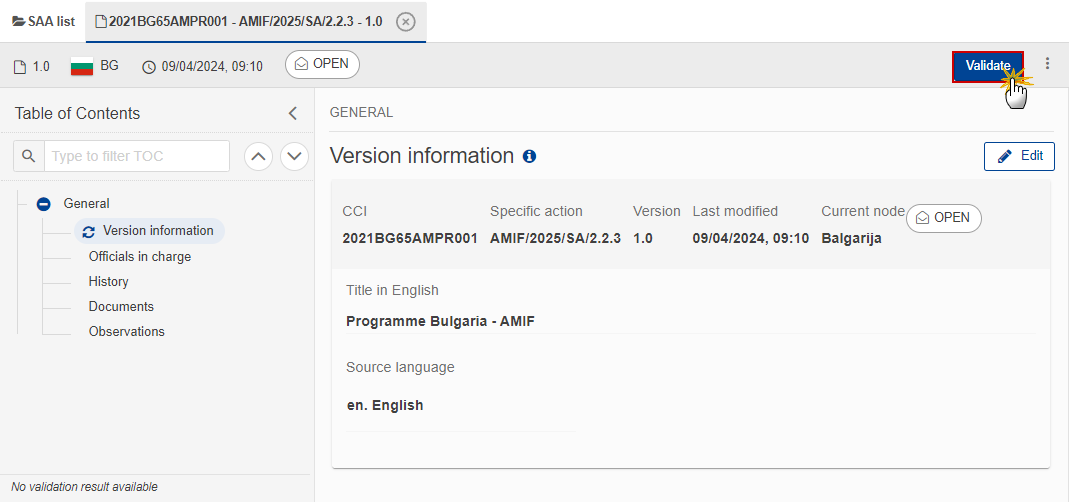
Remark | An Error will block you from sending the Specific action application. The error(s) should be resolved and the Specific action application must be revalidated. Note that a Warning does not block you from sending the Specific action application. |
The system validates the following information:
Code | Severity | Validation Rule |
001 | Error | Validate that at least one official in charge of the Member State exists. |
002 | Error | Validate that the CCI code matches the following regular expression: (……65AMPR…|……65ISPR…|……65BVPR…) (Implicit in web). |
003 | Error | Validate that all integral documents have at least one attachment with a length > 0. |
004 | Error | Validate that the programme is already adopted (Implicit in web). |
005 | Error | Validate that a MS application form (SAA.APF) is uploaded in the system with at least one attachment with length > 0. |
006 | Error | Validate that a MS budget form (SAA.BUF) is uploaded in the system with at least one attachment with length > 0. |
An example of a validation window:

You can check the list of validation results at any time throughout the Specific action application:

To see the last validation results:
(1) Click on one of the 4 categories: All results, Passed, Warning, Error.
(2) The list of latest validation results for the chosen category is displayed.
After all errors have been resolved the status of the Specific action application becomes Validated.
Prepare Specific action application for send to EC
Remark | The Prepare for Send can occur when a User on the highest MS Node wants to indicate that the Specific action application version can be prepared for sending to the Commission, once the Validation Errors have been removed and the status is Validated or Sent. To prepare the send of the Specific action application, the User must have the role of MS Managing Authority with Update or Send rights (MSMAu or MSMAs). |
Click on the Prepare for send to EC button to prepare to send the Specific action application to the Commission:
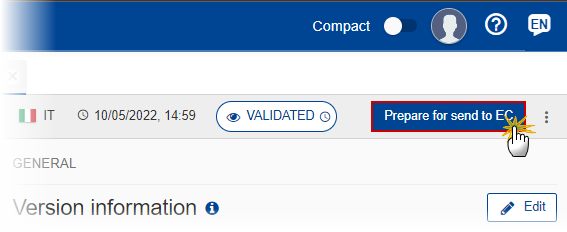
The system will ask you to confirm the send action:

Click on Confirm to confirm.
The status of the Specific action application is set to Preparing for send to EC.
Send the Specific action application
Remark | The Specific action application can only be sent once the Validation Errors have been removed and the status is Ready to Send or Sent. The "4 eyes principle" must be respected. Therefore, the User sending must be different from the User who last validated. To send the Specific action application, the User must have the role of MS Managing Authority with Send access (MSMAs). |
Click on the Send button to send the Specific action application to the Commission or to an upper Node:

The system will ask you to confirm the send action:

Click on Confirm to confirm.
On success, the Specific Action Application version has been sent to the Commission or to an upper Node. When sent, the status is set to Sent.
Remark | When on the highest MS node, different versions of the generated “Snapshot before send” document will be available so that the sender can first verify what will be sent to the Commission:
|
Delete the Specific action application
Remark | The Accounts can only be deleted when:
To delete the Specific action application, the User must have the role of MS Managing with Update rights (MSMAu). The delete is a physical delete and cannot be recovered! |
Follow the steps to remove the Specific action application from the system:

Select the following:
(1) Select the icon with 3 vertical dots.
(2) Click on the Delete button to remove the Specific action application from the system.
The system will ask you to confirm the delete action:

Click on Confirm to confirm or click on Cancel to return to the Specific action application.