Cooperation Programme (ETC)
PURPOSE
This document describes the actions related to Programming and Follow-Up and more specific those related to Cooperation Programmes for ERDF under the European Territorial Cooperation goal (ETC). This type of Programmes will be referenced in this document as Cooperation Programmes (CP).
REGULATION
More detail regarding the regulation of the Cooperation Programme (ETC) can be found in 'About SFC2014' section of this portal.
ROLES
MS Managing Authority |
Upload Cooperation Programme Documents Record Cooperation Programme Consult Cooperation Programme Delete Cooperation Programme Validate Cooperation Programme Send Cooperation Programme Return Cooperation Programme for Modifications Cancel Cooperation Programme Create New Version of a Cooperation Programme |
MS Audit Authority |
Consult Cooperation Programme |
FUNDS
ERDF |
ENI |
IPA |
PRE-Conditions
The CCI number used for the Cooperation Programme must have been previously allocated by the Commission.
Workflow
This section shows the lifecycle to create and manage a Cooperation Programme ETC.
Click here to see the CP ETC workflow diagram in high resolution.

Create the Cooperation Programme (ETC)
REMARK |
To create the OP you must have MS Managing Authority with Update access for the ETC funds covered by the CCI (you need update permission for all Funds covered by the CCI). The CCI number used for the Cooperation Programme must have been previously allocated by the Commission. |
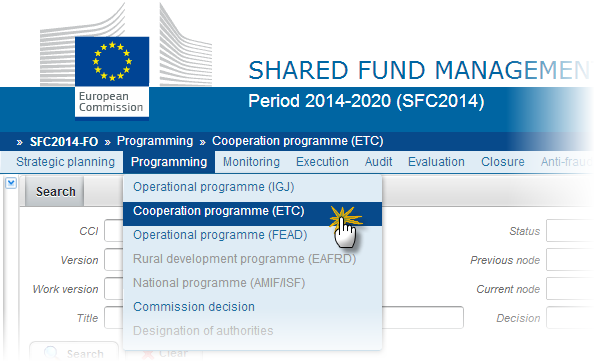
To access into Cooperation Programme (ETC) section, first click on the Programming link in the menu and then on the Cooperation programme (ETC) link.
Click on the Create new programme link to create a new Cooperation Programme.

You are redirected to Cooperation Programme creation:

Enter or select the following information:
(1) Select a CCI.
The CCI list contains all allocated ETC CCIs which contain the Funds for which you are registered (you need update permission for all Funds covered by the CCI).
If the CCI code is not in the list it is either not yet requested or not yet allocated by the Commission. The user can request a new CCI via the Request a new CCI number link in the creation wizard screen. For detailed instructions on requesting a CCI number please refer to the video guide on our Portal here.
When the CCI number used for the Cooperation Programme has been previously allocated by the Commission, you can continue with the creation of the Cooperation Programme (ETC).
(2) Enter a Title.
The title of the Cooperation Programme comes from the previously allocated CCI number, but can be overwritten.
(3) Select a First year.
(4) Select a Last year.
First Year is pre-filled with 2014 and Last Year with 2022. Both fields can be updated but First Year needs to be smaller than Last Year and between 2014 and 2022.
(5) Click on the Finish button to confirm the creation.
The status of the Cooperation Programme (ETC) is 'Open'.
Record/Edit the Cooperation Programme (ETC)
Find all the information to complete each screen of the Cooperation Programme, below there are the links to the main sections:
General
Version information
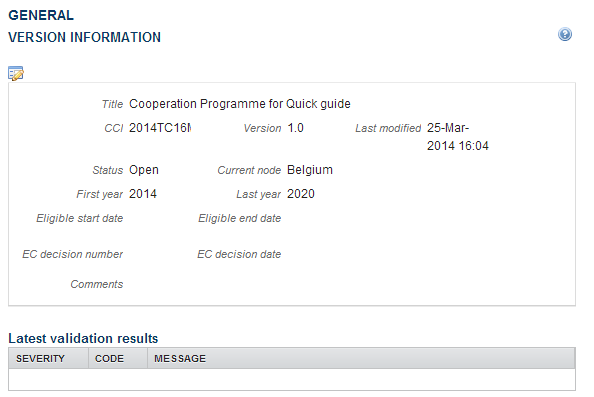
The Version Information contains information on the identification and status of the Cooperation Programme version; the CCI, Title, Version Number, Status, Current Node, First year and Last year.
The Version information for the Cooperation Programme can be modified once the version has been created:
Click on the Edit button
 to modify the general information of the Cooperation Programme.
The edit details form pop-up window appears:
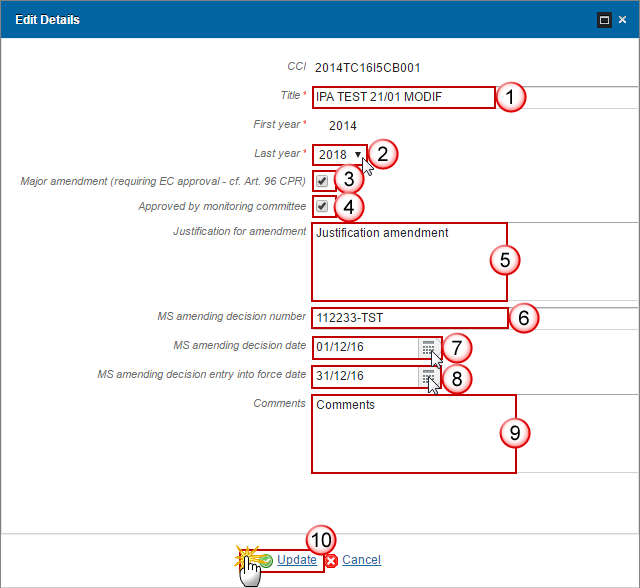
Enter the modifications:
(*) CCI
CCI can only be updated when Version 1
(1) Title
In some exceptional cases the title can be changed
(*) First Year
In Version 1, First Year is pre-filled with 2014.
(2) Last Year
In Version 1, Last Year is pre-filled with 2022 but it can be updated. In subsequent versions, only the Last Year can be extended up until 2022.
First Year and the Last Year are >= 2014 and <= 2022 and that First Year is <= Last Year
(3) Click on the box if Major Amendment
Only available in versions > 1.
(4) Click on the box if Approved by Monitoring Committee
Only available in versions > 1.
(5) Enter the Justification for Amendment
Only available in versions > 1.
(6) Enter the MS amending decision number
Only available in versions > 1.
(7) Enter the MS amending decision date
Only available in versions > 1.
(8) Enter the MS amending decision entry into force date
Only available in versions > 1.
(9) Enter the comments
(10) Click on the Update link to save the information
Note |
CCI can only be updated when Version 1. The CCI list contains all allocated ETC CCIs which contain the Funds for which you are registered (you need update permission for all Funds covered by the CCI). |
REMARK |
Major Amendment, Approved by Monitoring Committee, Justification for amendment, MS Amending Decision Number, MS Amending Decision Date and MS Amending Decision Entry into Force Date are only available in versions > 1. The MS related fields need to be filled in when the MS wants to create a version containing modifications which do not require a Commission Decision. This kind of version will automatically be set to 'Adopted by MS' when sent to the Commission and when only non-decisional parts of the Cooperation Programme have been modified. When Major Amendment is set, a Justification is required and the version will need a new Commission Decision, even when only non-decisional parts have been modified. When Major Amendment is not set, the MS amending decision fields are required (number, date, entry into force date). When version is > 1 then an approval by the Monitoring Committee is required. |
Region Coverage
Click on the Edit button
 to modify the regions of the table.

The select regions pop-up window appears:
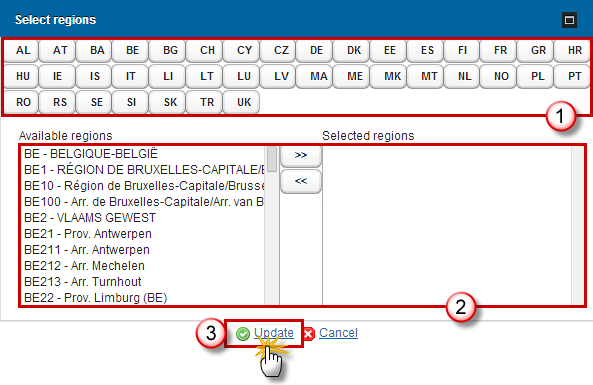
Enter or select the following information:
(1) Select the Country to show their regions to apply the fund.
(2) Choose the Available regions that pertain on the Cooperation Programme.
(3) Click on Update link to save the information.
Note |
The country where is based the Cooperation Programme is selected by default. The country button corresponding to the Country of the management node of the programme will be focussed and the corresponding available Regions will be shown. |
Officials in Charge
Clicking on the Add button
 will open a pop up window allowing you to add a new official in
charge.
will open a pop up window allowing you to add a new official in
charge.Selecting an official in charge row and click on the Edit button
 will
allow you to modify the selected official in charge information.
will
allow you to modify the selected official in charge information.Selecting a row and clicking on the Delete button
 will remove the data of the selected row.

Note |
Officials in Charge can be updated at any time, independent from the status of the Cooperation Programme. |
Click on the Add button
 to add a new Official in Charge.

The Edit Details pop-up window appears:

Enter the following information:
(1) Enter a Name.
(2) Enter an Email.
(3) Click on Update to save the information.
REMARK |
Commission Officials (email domain "ec.europa.eu") can only be created/updated/deleted by Commission Users. |
History
The History shows a history of all actions done against the Cooperation Programme version and the resulting Status. The email of the Actor/User is directly accessible via the email link.

Documents
The following documents will be foreseen:
Description |
Non-Integral |
Integral |
System |
Required |
Supplementary information |
|
X |
|
|
Other Member State Document |
X |
|
|
|
Snapshot of data before send |
|
X |
X |
X |
Acknowledgment of Receipt |
|
|
X |
X |
Draft Report of the Ex-ante Evaluation with an executive summary |
|
X |
|
X (only on version 1.0) |
Confirmation of agreement in writing to the contents of the cooperation programme |
|
X |
|
X |
Map of the area covered by the cooperation programme |
|
X |
|
|
Citizens' summary |
|
X |
|
|
Legal Entity Form |
X |
|
|
|
Bank Account Information Form |
X |
|
|
|
MS Request to withdraw programme version |
X |
|
|
|
MS Request to return programme version for modification |
X |
|
|
|
Uploading & Sending Documents
The first documents list (1) shows all documents uploaded against this version of the Programme by the Member State and by the Commission. Member State Users see all their own Documents and the sent Commission Documents. Commission Users see all their own Documents and the sent Member State Documents.
The second documents list (2) shows the last version uploaded against this Programme (independent of the Programme version) and sent to the Commission of document types: Programme Snapshot, Report of the Ex-Ante Evaluation, Confirmation of Agreement in writing to the contents of the Cooperation Programme, Map of the Area covered by the Cooperation Programme and Citizens' Summary.

Clicking on the Add button
 will open a pop up window allowing you to add a new document type
with attachments.
will open a pop up window allowing you to add a new document type
with attachments.Selecting a document row and click on the Edit button
 will
allow you to modify the document information. If a document of type
'Other Member State Document' must be sent, you can select the edit
button in order to send the document.
will
allow you to modify the document information. If a document of type
'Other Member State Document' must be sent, you can select the edit
button in order to send the document.Selecting a row and clicking on the Delete button
 will remove the data of the selected row.

Click on the Add button
 to add a new document.

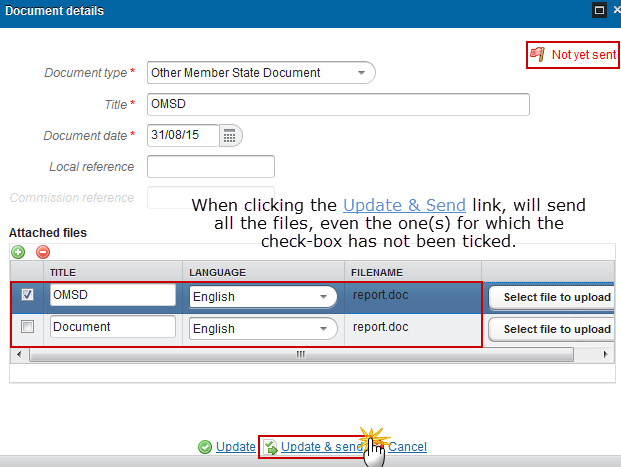
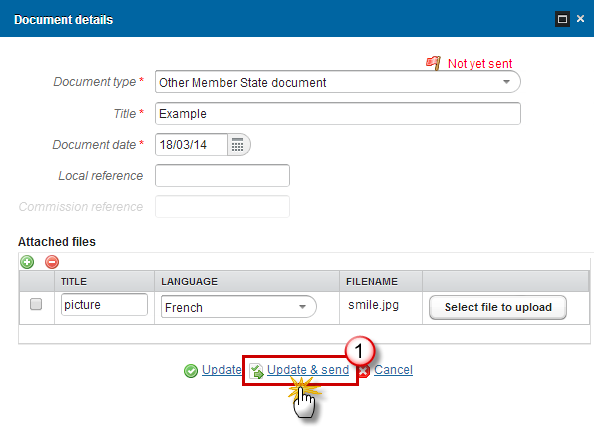
The document detail pop-up window appears:

Enter or select the following information:
(1) Select a Document Type.
(2) Enter a Title for your Document
(3) Enter a Document Date
(4)
Click on the Attachment
creation Add
button
![]() to add a new row in the table.
to add a new row in the table.
You can add multiple attachments by clicking on the Add button
![]()
You can remove unwanted attachments by selecting
the row and clicking on the Attachment
Delete
button
![]()
(5) Enter a Title for your attachment.
(6) Select the Language of the document.
(7) Select the file to upload.
(8) Click on Update to save the information.
REMARK |
Commission Reference N° is only enabled for Commission Users, while Local Reference is only enabled for Member State Users. |
The pop-up window closes and the documents are uploaded.
Sending an unsent non-integral document
Once the document and attachment(s) have been uploaded select the document row in the list (1) and click on the Edit button
 (2):
(2):

Click on Update & Send (1) to send the document to the Commission.
REMARK |
The Update & Send option is only shown for documents which are not an integral part of the Cooperation Programme and after at least one attachment was added. If more than one file are uploaded from the same document table, when clicking the Update & Send link, will send all the files and not only the one(s) for which the check-box has been ticked.
|
Remark |
Non-integral documents (ie. 'Other Member State Document') can be sent at any time independently of the status of the Cooperation Programme. The 'Other Member State Document' type demands a manual submission (they are NOT sent automatically within the Programme). The other document types, integral documents, are automatically sent - together with the encoded data – when the Programme is submitted to the EC. You can find in our Portal the types of documents that can be uploaded and sent by the Member State: https://ec.europa.eu/sfc/en/support/PRGAMF A document is only visible to the Commission when the Sent Date is visible. |
Deletion of an unsent document
Select a row (1) of a previously uploaded document and click on the Remove button
 (2)
to delete the document and associated attachments.

A confirmation window appears:

Click on Yes to confirm deletion. Click on No to return to the Cooperation Programme document.
Hiding a sent document
Note |
Sent Documents can never be deleted, but the sender can decide to hide the content for the receivers in case of an erroneous and/or accidental send. |
Select a row (1) of a previously sent document and click on the Edit button
 (2)
to hide the document and associated attachments.

Select the Hide Content option (1) and click on Update (2) to hide the Cooperation Programme document.

Observations
This section is to provide any relevant information to the Cooperation Programme.
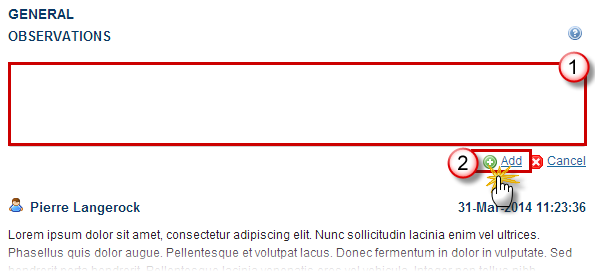
Enter the following information:
(1) Enter an Observation.
(2) Click on the Add link to save the information.
S1 Strategy
Description of Strategy
Click on the Edit button
 to modify the Description of strategy of the Cooperation Programme.

The edit details form pop-up window appears:
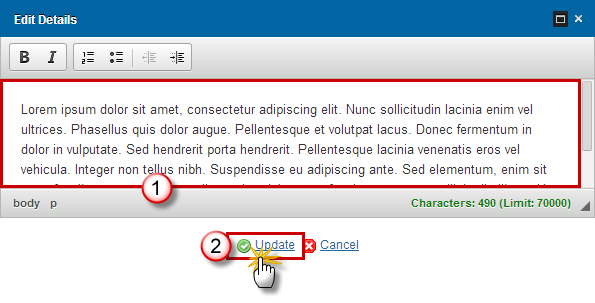
Modify the information.
(1) Edit the text.
(2) Click on the Update link to save all the information.
Fostering crisis repair
Clicking on the Edit button
 will open a pop up window allowing you to add a description text.

The Edit Details pop-up window appears:
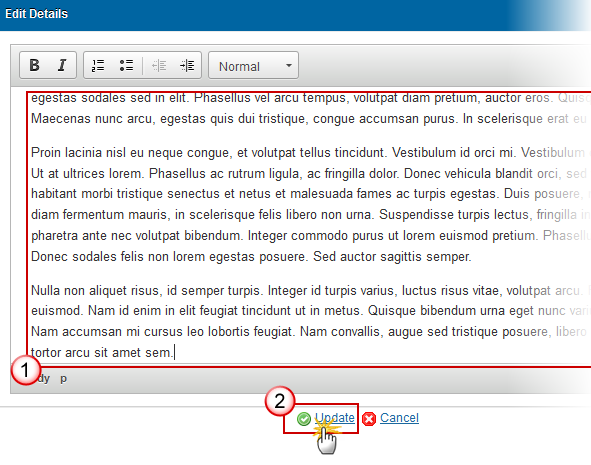
Enter the following information:
(1) Enter a description text.
(2) Click on the Update link to save the information.
Table1 TO and IP Justification
Clicking on the Add button
 will open a pop up window allowing you to add a new Thematic
Objective.
will open a pop up window allowing you to add a new Thematic
Objective.Selecting a row and click on the Edit button
 will
allow you to modify the selected Thematic objective.
will
allow you to modify the selected Thematic objective.Selecting a row and clicking on the Delete button
 will remove the data of the selected row.
REMARK |
For REACT-EU, the Thematic Objective is “13. Fostering crisis repair in the context of the COVID-19 pandemic and its social consequences and preparing a green, digital and resilient recovery of the economy” and the Investment Priority has the same name “13i. (ERDF) Fostering crisis repair in the context of the COVID-19 pandemic and its social consequences and preparing a green, digital and resilient recovery of the economy”. |
Click on the Add button
 to add a new Thematic Objective and Investment Priorities.
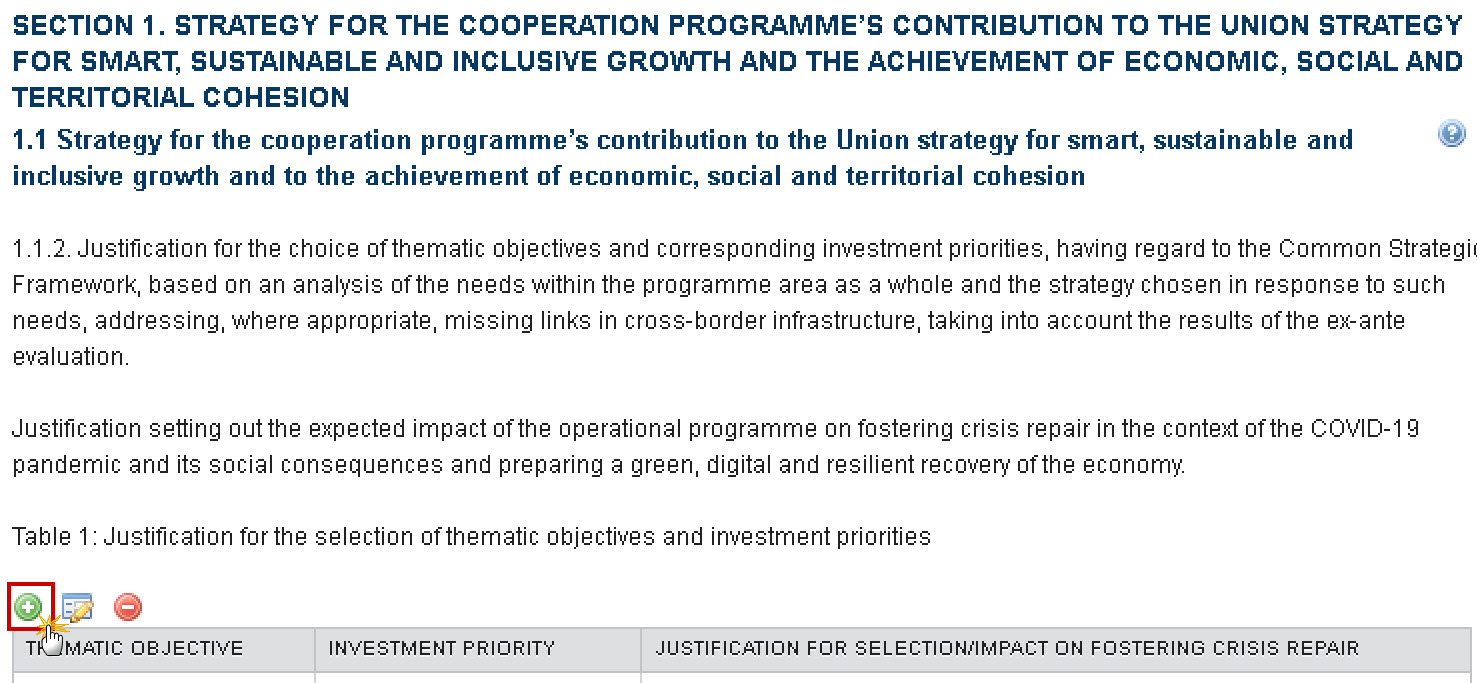
The Edit Details form pop-up window appears:
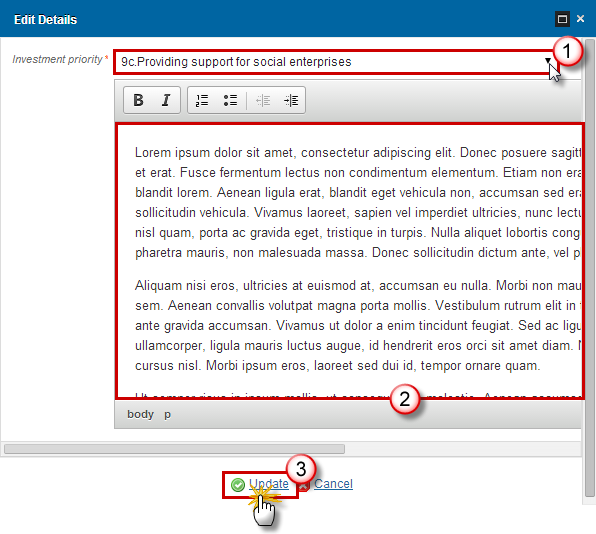
Enter the following information:
(1) Select the Thematic Objective / Investment priority from the list that contains all combinations valid for the Funds covered by the Programme (based on the CCI Budget Source).
(2) Edit the text.
(3) Click on the Update link to save all the information.
REMARK |
It is not allowed to delete an Investment Priority when it is used under a Priority Axis in the Programme. In that case an alert is issued saying "You cannot delete this investment priority while it is used under priority axes 1, 2, 5…" |
Justification for Financial Allocation
Click on the Edit button
 to modify the Justification for the financial allocation.
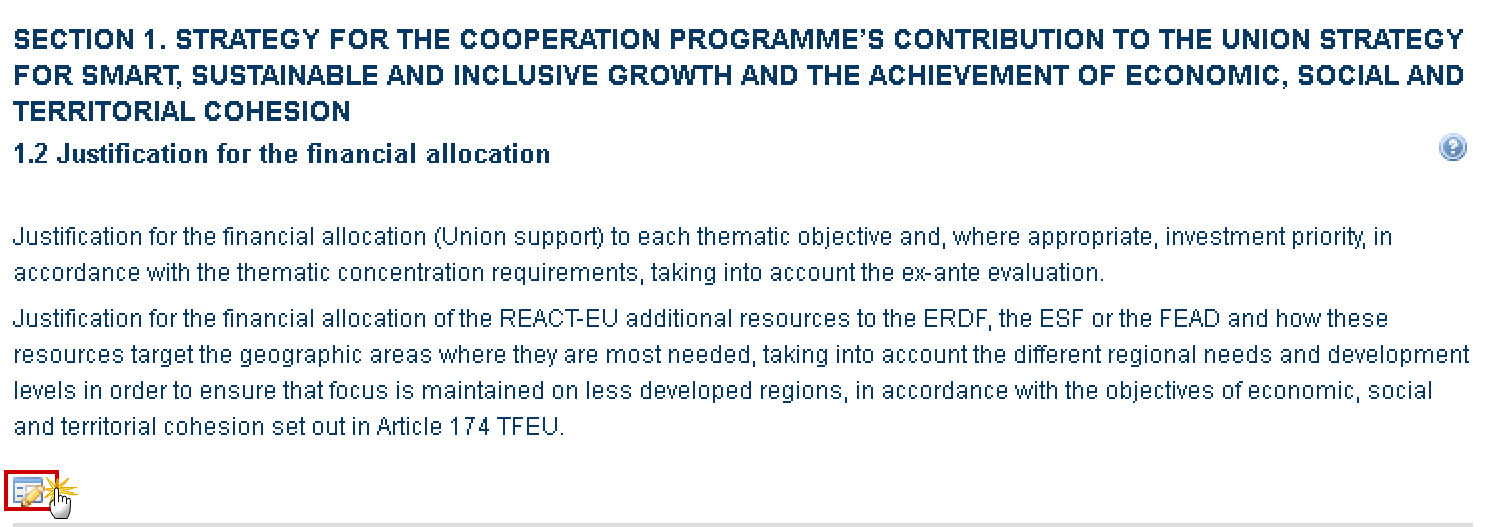
The edit details form pop-up window appears:

Enter or modify the following information:
(1) Edit the text.
(2) Click on the Update link to save all the information.
Table2 Investment Strategy
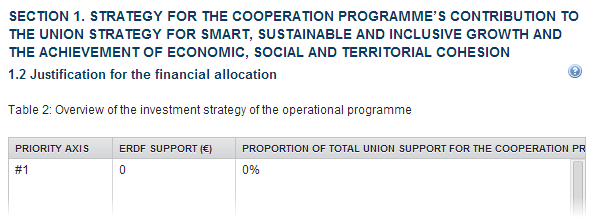
Note |
The ERDF Support is calculated per Priority Axis from Table 16. The Proportion is the Fund Union Support for a Priority Axis (Table 16) / Total CP Union Support. For ENI and IPA, this will only be possible if values have been defined in Table 16. If no values defined, leave blank. |
S2 Priority Axes
Non-TA Priority Axes
Clicking on the Add button
 will open the corresponding edit details pop up window allowing you
to add information.
will open the corresponding edit details pop up window allowing you
to add information.Selecting an official in charge row and click on the Edit button
 will
allow you to modify the selected row details.
will
allow you to modify the selected row details.Selecting a row and clicking on the Delete button
 will remove the data of the selected row.

ADDING A NON-TA PRIORITY AXIS
Click on the Add button
 to add a new Non-TA priority axis.

The priority axes form pop-up window appears:
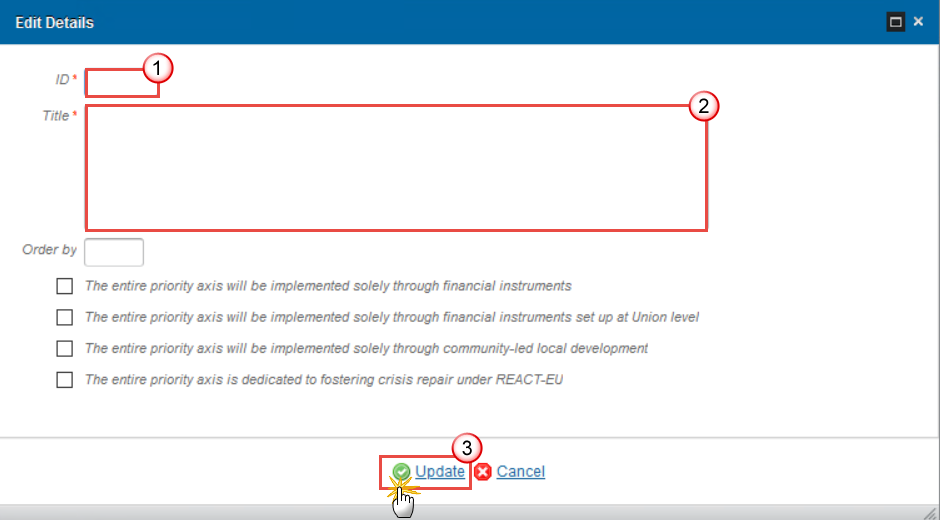
Enter or select the following information:
(1) Enter the ID.
(2) Enter the Title.
(3) Click on Update to save the information.
Note |
If the entire Priority Axis is dedicated to fostering crisis repair under REACT-EU then this option must be ticked:
|
REMARK |
In subsequent versions of the Cooperation Programme (>1), Priorities created in earlier versions:
|
DELETION OF A NON-TA PRIORITY AXIS
Select a row (1) and click on the Remove button
 (2)
to delete the selected row.

A confirmation window appears:

Click on Yes to confirm deletion. Click on No to return to the Non-TA Priority Axes table.
Priority Axis: 'ID'
Clicking on the Add button
 will open the corresponding edit details pop up window allowing you
to add information.
will open the corresponding edit details pop up window allowing you
to add information.Selecting an Official in Charge row and click on the Edit button
 will
allow you to modify the selected row details.
will
allow you to modify the selected row details.Selecting a row and clicking on the Delete button
 will remove the data of the selected row

ADDING AN INVESTMENT PRIORITY
Click on the Add button
 on the Investment Priorities table.
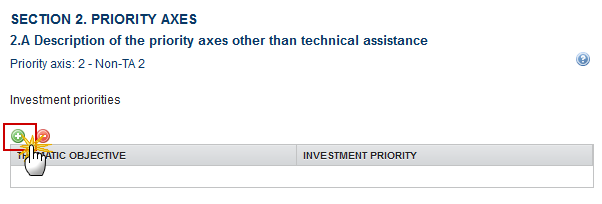
The Edit Details pop-up window appears:
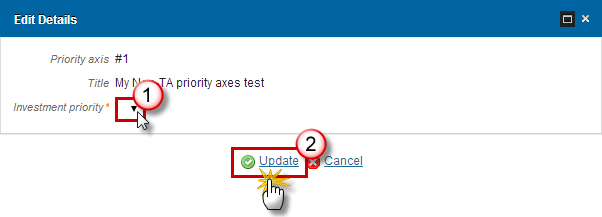
Select the following information:
(1) Select an Investment priority.
(2) Click on Update link to save the information.
Note |
The Investment Priority List is limited to the Investment Priorities selected in Table1 TO and IP Justification section. For REACT-EU Priority Axes the Investment Priority is limited to “Fostering crisis repair in the context of the COVID-19 …” (13i) for ERDF. The system will automatically maintain the records in the Thematic Objective Plan Table 17 for Priorities covering more than 1 Thematic Objective. |
DELETION OF AN INVESTMENT PRIORITY
Select a row (1) and click on the Remove button
 (2).
(2).

A confirmation window appears:

Click on Yes to confirm deletion. Click on No to return to the Non-TA Priority Axis.
ADDING A FUND AND CALCULATION BASIS FOR UNION SUPPORT
Click on the Add button
 on the Funds and calculation basis for Union Support table.
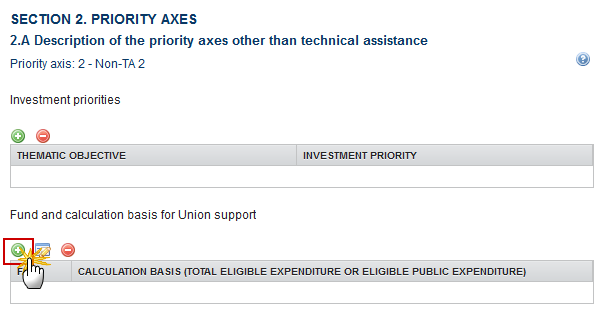
The Edit Details pop-up window appears:

Select the following information:
(1) Select the Fund.
(2) Select the Calculation basis.
(3) Click on Update link to save the information.
REMARK |
The Fund List will contain all Funds covered by the Cooperation Programme as indicated by its CCI code. If the CCI covers only one Fund, this value is set by default. For REACT-EU Priority Axes the Fund list is further restricted to ERDF. |
Note |
The system will automatically maintain the records in :
|
DELETION OF A FUND AND CALCULATION BASIS FOR UNION SUPPORT
Select a row (1) and click on the Remove button
 (2).
(2).

A confirmation window appears:

Click on Yes to confirm deletion. Click on No to return to the Non-TA Priority Axis.
Multi-Thematic Objective Explanation
REMARK |
Section 2.A.2 will be disabled for REACT-EU Priority Axes. |
Click on the Edit button
 to enter the justification for the establishment of a priority axis
covering more than one thematic objective.
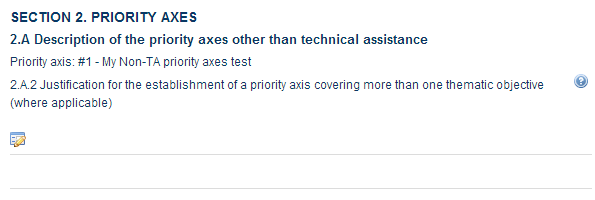
The edit details form pop-up window appears:
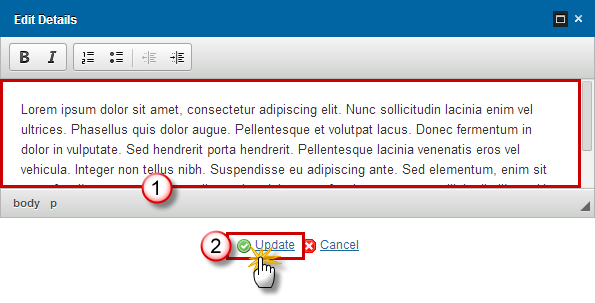
Modify the information.
(1) Edit the text.
(2) Click on the Update link to save all the information.
Investment priority: 'ID'
Clicking on the Add
button
![]() will open the corresponding edit details pop up window allowing you
to add information.
will open the corresponding edit details pop up window allowing you
to add information.
Selecting an official in charge row and click on the Edit
button![]() will
allow you to modify the selected row details.
will
allow you to modify the selected row details.
Selecting a row and clicking on the Delete
button
![]() will remove the data of the selected row.
will remove the data of the selected row.
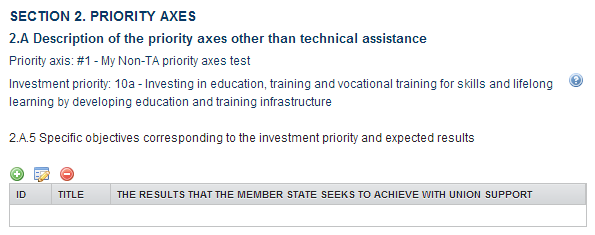
ADDING A SPECIFIC OBJECTIVE
Click on the Add button
 to add a specific objective corresponding to the
investment priority.

The Edit Details pop-up window appears:
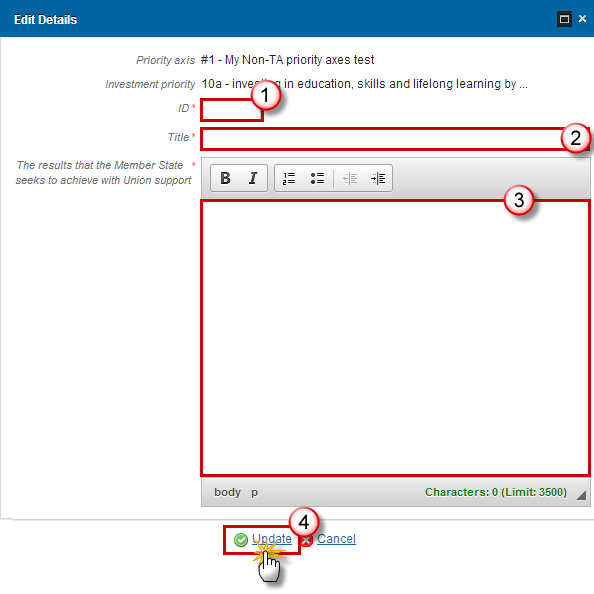
Enter the following information:
(1) Enter the ID.
(2) Enter the Title.
(3) Edit The results that the Member State seeks to achieve with Union Support.
(4) Click on the Update link to save all the information.
DELETION OF A SPECIFIC OBJECTIVE
Select a row (1) and click on the Remove button
 (2).
(2).
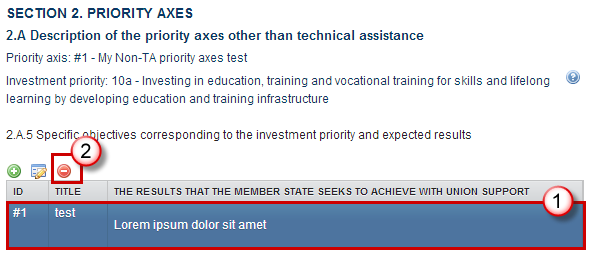
A confirmation window appears:

Click on Yes to confirm deletion. Click on No to return to the Investment Priority.
Specific Objective: 'ID'
Table3 Result Indicators
Clicking on the Add button
 will open the corresponding edit details pop up window allowing you
to add information.
will open the corresponding edit details pop up window allowing you
to add information.Selecting an official in charge row and click on the Edit button
 will
allow you to modify the selected row details.
will
allow you to modify the selected row details.Selecting a row and clicking on the Delete button
 will remove the data of the selected row.
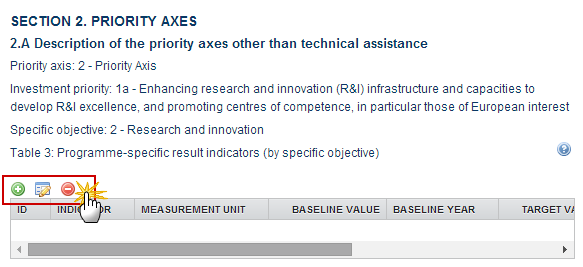
Adding a RESULT INDICATOR
Click on the Add button
 to add a programme-specific result indicator.
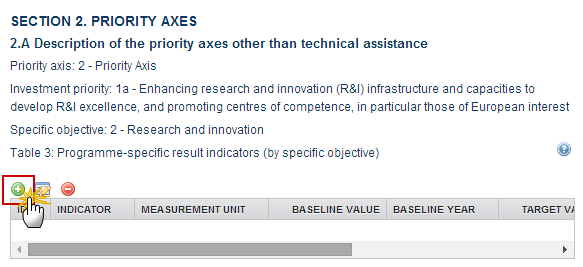
The Edit Details pop-up window appears:
Note |
There are two types of Specific Result Indicators depend the selection there are different ways to complete the form correctly. See all the possibilities below. |
First option 'Programme-Specific Result Indicator' is selected:
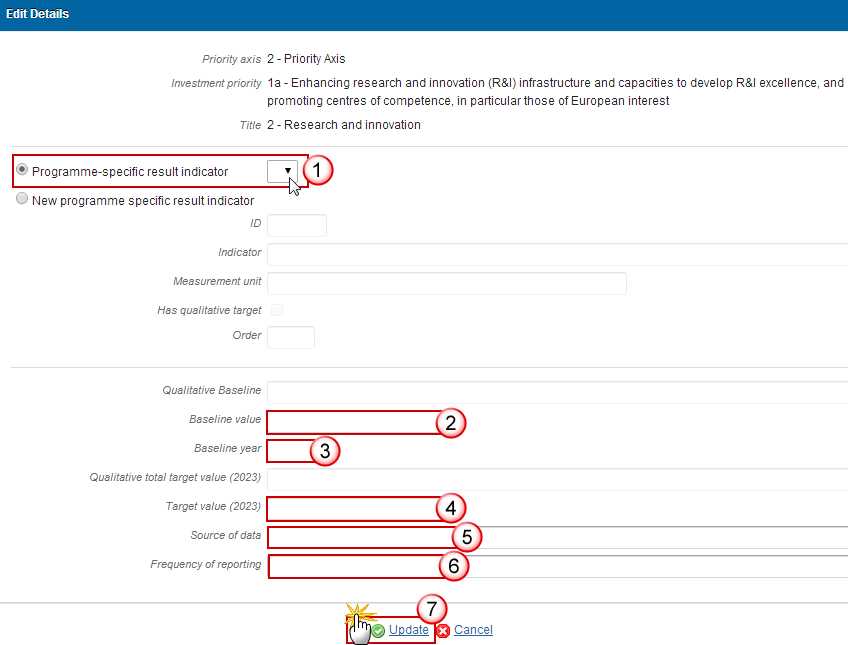
Enter or select the following information:
(1) Select the Programme-Specific Result Indicator from the list to use an existing specific result indicator.
(2) Enter the Baseline Value.
(3) Enter the Baseline Year.
(4) Enter the Total Target Value (2023).
(5) Enter the Source of Data.
(6) Enter the Frequency of reporting
(7) Click on the Update link to save all the information.
Note |
Programme Specific Indicators can be defined under a Specific Objective and re-used under other Specific Objectives. The Programme Specific Result Indicator List contains all Programme Specific Result Indicators previously defined on this Programme. |
Second option 'New Programme Specific Result Indicator' is selected:

Enter or select the following information:
(1) Select the New Programme Specific Result Indicator.
(2) Enter the Indicator.
(3) Enter the Measurement Unit.
(4) Enter the Order.
(5) Enter the Qualitative Baseline.
(6) Enter the Baseline Year.
(7) Enter the Qualitative Total Target Value (2023).
(8) Enter the Source of Data.
(9) Enter the Frequency of reporting
(10) Click on the Update link to save all the information.
Note |
When the Indicator has a Qualitative Target, the system will foresee a Field for the Baseline Value and for the Target Value and store in 'Qualitative Baseline' and 'Qualitative Target', otherwise the system will foresee a Number field and store in 'Baseline Value' and 'Target Value'. |
REMARK |
When using a Programme Specific Indicator ID of a reserved COVID-19 Result Indicator for ETC, then on Update an Alert will be issued saying “You are using a COVID-19 reserved programme specific result indicator code. The title and measurement unit will be overwritten with their reserved values. If this was not your intention, press cancel.” When OK is pressed, the title and measurement unit are overwritten with the official reserved values. When using a Programme Specific Indicator ID of a reserved COVID-19 indicator that is not a Result one for ETC, then an Alert is issued saying “You are using a reserved COVID-19 Indicator which cannot be used as result indicator for ETC”. |
DELETION OF A RESULT INDICATOR
Select a row (1) and click on the Remove button
 (2)
to delete the selected indicator.
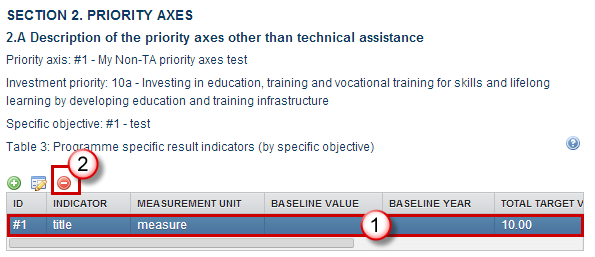
A confirmation window appears:

Click on Yes to confirm deletion. Click on No to return to the Result Indicators table.
REMARK |
When deleting a record using a Programme Specific Indicator, the Programme Specific Indicator definition gets also deleted when it is not used in any other record of any Indicator Table in any version of this Programme. This also applies for Tables 4, 5, 10 and 11. |
Actions to Be Supported
Click on the Edit button
 to modify the description.
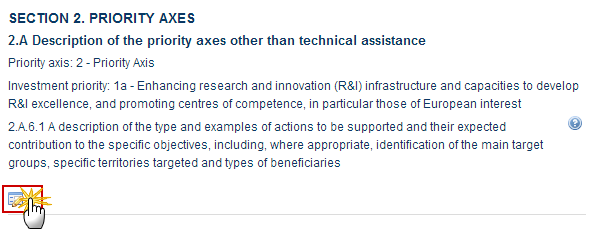
The Edit Details form pop-up window appears:

Modify the information:
(1) Edit the text.
(2) Click on the Update link to save all the information.
Guiding Principles
Click on the Edit button
 to enter the guiding principles for the selection of operations.
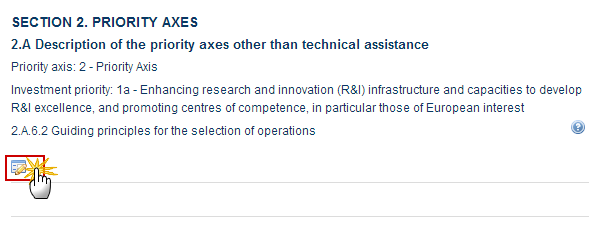
The Edit Details form pop-up window appears:

Modify the information:
(1) Edit the text.
(2) Click on the Update link to save all the information.
Financial Instruments
Click on the Edit button
 to enter or modify the planned use of financial instruments.
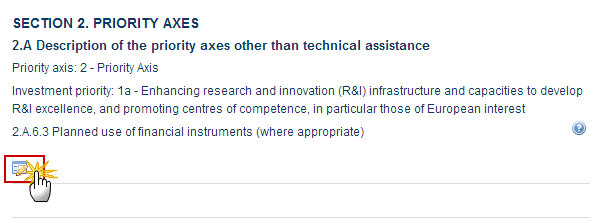
The Edit Details form pop-up window appears:

Modify the information:
(1) Edit the text.
(2) Click on the Update link to save all the information.
Major Projects
Click on the Edit button
 to enter or modify the planned use of major projects.
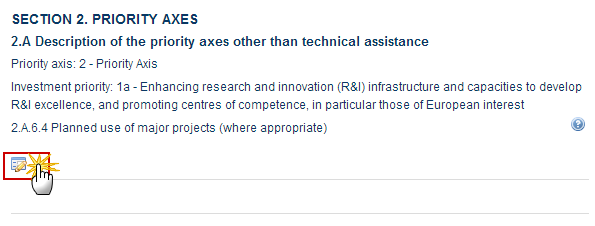
The Edit Details form pop-up window appears:

Modify the information:
(1) Edit the text.
(2) Click on the Update link to save all the information.
Table4 Output Indicators
Clicking on the Add
button
![]() will open the corresponding edit details pop up window allowing you
to add information.
will open the corresponding edit details pop up window allowing you
to add information.
Selecting an official in charge row and click on
the Edit
button![]() will
allow you to modify the selected row details.
will
allow you to modify the selected row details.
Selecting a row and clicking on the Delete
button
![]() will remove the data of the selected row.
will remove the data of the selected row.
ADDING AN OUTPUT INDICATOR
Click on the Add button
 to add a Common and Programme-Specific Output
Indicator.
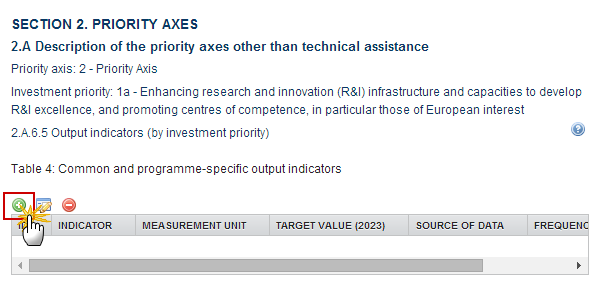
The Edit Details pop-up window appears:
Note |
There are three types of Output Indicators, depend the selection there are different ways to complete the form correctly. See all the possibilities below. |
First option 'Common Output Indicator' is selected:
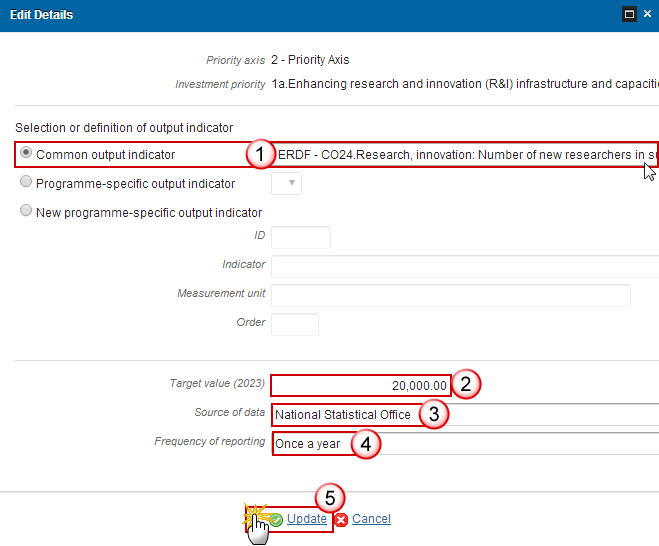
Enter or select the following information:
(1) Select the Common Output Indicator from the list.
The Common Output Indicator List contains all Common Output Indicators for the Fund covered by the Investment Priority.
(2) Enter the Target Value (2023).
(3) Enter the Source of data.
(4) Enter the Frequency of reporting.
(5) Click on the Update link to save all the information.
Second option 'Programme-Specific Output Indicator' is selected:
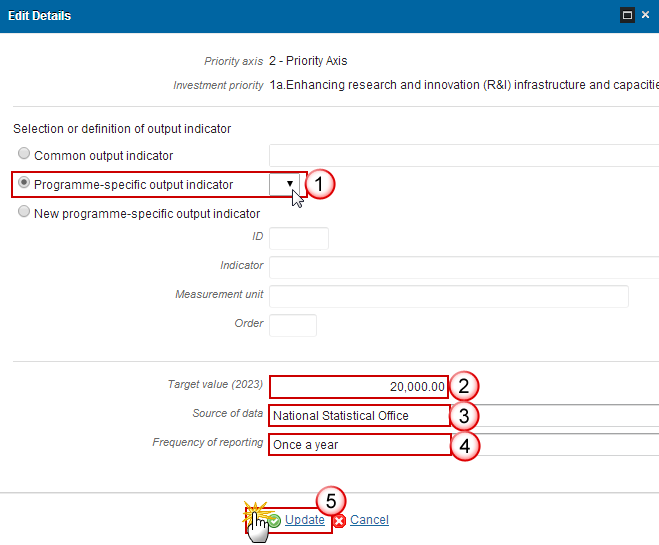
Enter or select the following information:
(1) Select the Programme-Specific Output Indicator from the list.
(2) Enter the Target Value (2023).
(3) Enter the Source of data.
(4) Enter the Frequency of reporting.
(5) Click on the Update link to save all the information.
Third option 'New Programme-Specific Output Indicator' is selected:

Enter or select the following information:
(1) Select the New Programme-Specific Output Indicator and enter the ID.
(2) Enter the Indicator.
(3) Enter the Measurement Unit.
(4) Enter the Order.
(5) Enter the Target Value (2023).
(6) Enter the Source of data.
(7) Enter the Frequency of reporting.
(8) Click on the Update link to save all the information.
REMARK |
When using a Programme Specific Indicator ID of a reserved COVID-19 Output Indicator for ETC, then on Update an Alert will be issued saying “You are using a COVID-19 reserved programme specific output indicator code. The title and measurement unit will be overwritten with their reserved values. If this was not your intention, press cancel.” When OK is pressed, the title and measurement unit are overwritten with the official reserved values. When using a Programme Specific Indicator ID of a reserved COVID-19 indicator that is not an Output one for ETC, then an Alert is issued saying “You are using a reserved COVID-19 Indicator which cannot be used as result indicator for ETC”. |
DELETION OF AN OUTPUT INDICATOR
Select a row (1) and click on the Remove button
 (2)
to delete the selected indicator.
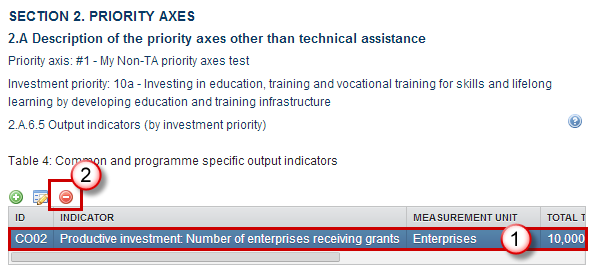
A confirmation window appears:

Click on Yes to confirm the delete action. Click on No to return to the Output Indicators table.
Table5 Performance Framework
REMARK |
Section 2.A.7 Table 5 will be disabled for REACT-EU Priority Axes. |
Clicking on the Add button
 will open the corresponding edit details pop up window allowing you
to add information.
will open the corresponding edit details pop up window allowing you
to add information.Selecting an official in charge row and click on the Edit button
 will
allow you to modify the selected row details.
will
allow you to modify the selected row details.Selecting a row and clicking on the Delete button
 will remove the data of the selected row.
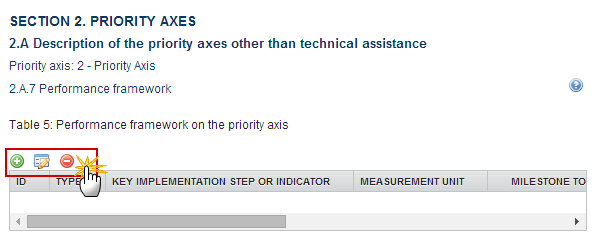
ADDING A PERFORMANCE FRAMEWORK
Click on the Add button
 to enter a Performance Framework on the Priority Axis.

The Edit Details pop-up window appears:
Note |
There are five types of Performance Framework: Key implementation step, Financial, Output indicator, Result indicator or New indicator, depend the selection there are different ways to complete the form correctly. See all the possibilities below. |
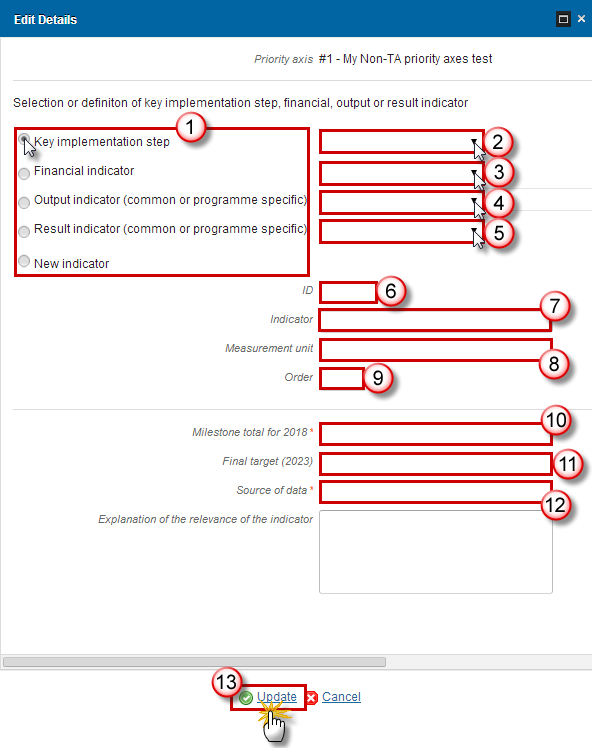
Enter or select the following information:
(1) Choose a Selection or definition of key implementation step, financial, output or result indicator:
Select Key implementation step then select (2) and go to (10), (3)(4)(5)(6)(7)(8)(9)(10) will be disabled.
Select Financial indicator then select (3) and go to (10), (2)(4)(5)(6)(7)(8)(9) will be disabled.
Select Output indicator (common or programme specific) then select (4) and go to (10), (2)(3)(5)(6)(7)(8)(9) will be disabled.
Select Result indicator (common or programme specific) then select (5) and go to (10), (2)(3)(4)(6)(7)(8)(9) will be disabled.
Select New indicator and go to (6), (2)(3)(4)(5) will be disabled.
(2) Select the Key implementation step indicator from the list.
(3) Select the Financial indicator from the list.
The Financial Indicator and the Implementation Step Lists contain all Financial Indicators and Implementation Steps previously defined on this Programme.
(4) Select the Output indicator from the list.
The Output Indicator List contains all Common Output Indicators for the Funds covered by this Priority Axis and all Programme Specific Output Indicators for the Funds covered by this Priority Axis previously defined on this Programme.
(5) Select the Result indicator from the list.
The Result Indicator List contains all Common Result Indicators for the Funds covered by this Priority Axis and all quantitative Programme Specific Result Indicators for the Funds covered by this Priority Axis previously defined on this Programme.
(6) Enter the ID.
(7) Enter the Indicator.
(8) Enter the Measurement unit.
(9) Enter the Order.
(10) Enter the Total target value (2023).
(11) Enter the Source of data.
(12) Enter the Frequency of reporting.
(13) Click on the Update link to save all the information.
Note |
Previously, only quantitative indicators could be used in the Performance Framework table for IGJ, ETC & IPACB. However, there were a few ERDF Programmes where the Key Implementation Step Indicator could be qualitative. Therefore, to allow for Qualitative Key Implementation Step Indicator in the Performance Framework Table (=T6, 28 for IGJ, T5, 24 for ETC and T5, 25 for IPACBC), an extra checkbox "Qualitative" and an extra field "Qualitative final target (2023)" were added. When the "Qualified" checkbox is checked, the numeric target fields are disabled and the qualitative one is enabled. |
DELETION OF A PERFORMANCE FRAMEWORK
Select a row (1) and click on the Remove button
 (2).
(2).
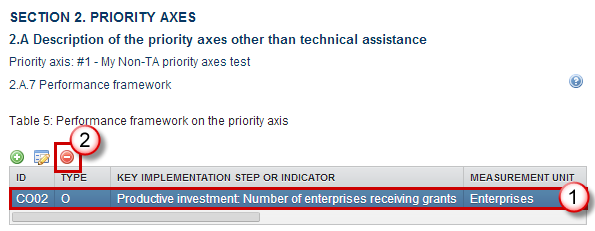
A confirmation window appears:

Click on Yes to confirm the delete action. Click on No to return to the Performance Framework table.
Establishment of Performance
REMARK |
Section 2.A.7 on additional qualitative information will be disabled for REACT-EU Priority Axes. |
Click on the Edit button
 to enter or modify the additional qualitative information on the
Establishment of the Performance framework.
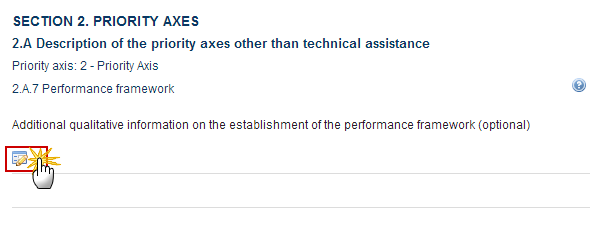
The Edit Details form pop-up window appears:

Modify the information.
(1) Edit the text.
(2) Click on the Update link to save all the information.
Categories of Intervention
Table6 Intervention Field
Clicking on the Add button
 will open the corresponding edit details pop up window allowing you
to add information.
will open the corresponding edit details pop up window allowing you
to add information.Selecting an official in charge row and click on the Edit button
 will
allow you to modify the selected row details.
will
allow you to modify the selected row details.Selecting a row and clicking on the Delete button
 will remove the data of the selected row.
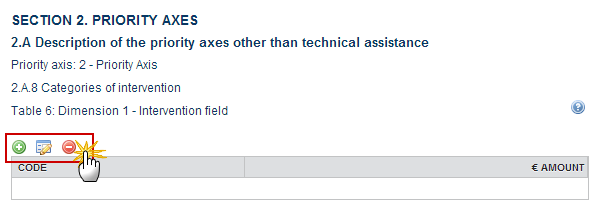
ADDING AN INTERVENTION FIELD
Click on the Add button
 to add an Intervention Field.
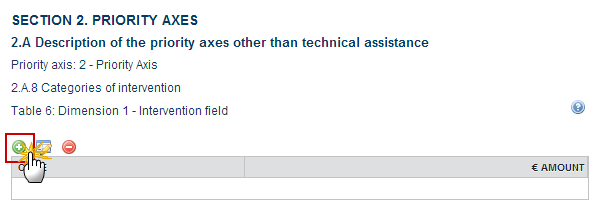
The Edit Details pop-up window appears:
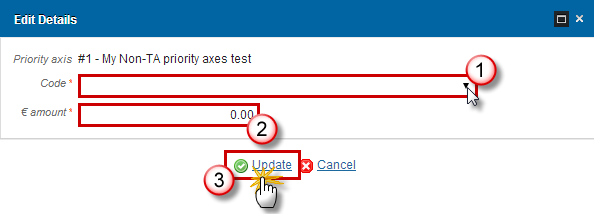
Enter or select the following information:
(1) Select the Code.
(2) Enter the € amount.
(3) Click on the Update link to save all the information.
DELETION OF AN INTERVENTION FIELD
Select a row (1) and click on the Remove button
 (2).
(2).
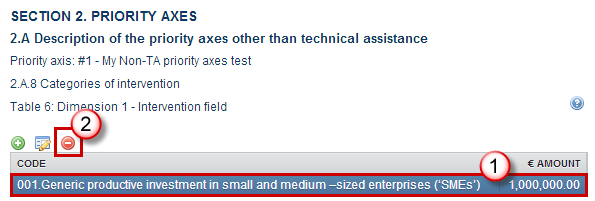
A confirmation window appears:

Click on Yes to confirm the delete action. Click on No to return to the Intervention Field table.
Table7 Form of Finance
Clicking on the Add button
 will open the corresponding edit details pop up window allowing you
to add information.
will open the corresponding edit details pop up window allowing you
to add information.Selecting an official in charge row and click on the Edit button
 will
allow you to modify the selected row details.
will
allow you to modify the selected row details.Selecting a row and clicking on the Delete button
 will remove the data of the selected row.
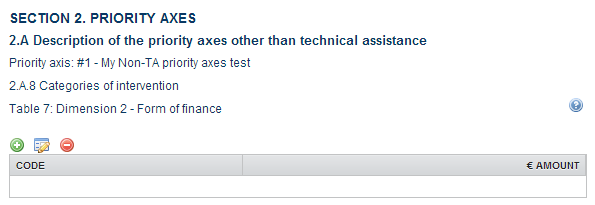
ADDING A FORM OF FINANCE
Click on the Add button
![]() to add information.
to add information.
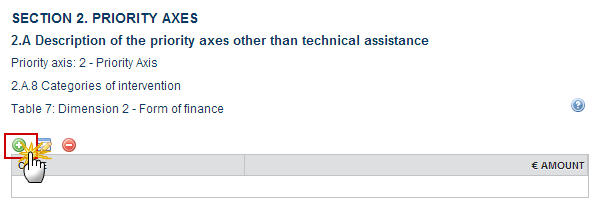
The Edit Details pop-up window appears:

Enter or select the following information:
(1) Select the Code.
(2) Enter the € amount.
(3) Click on the Update link to save all the information.
DELETION OF A FORM OF FINANCE
Select a row (1) and click on the Remove button
 (2).
(2).
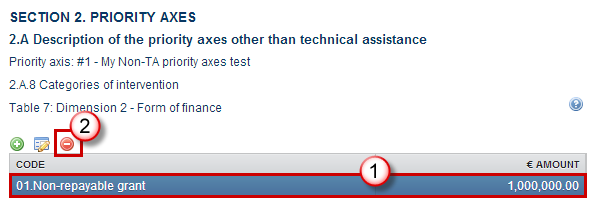
A confirmation window appears:

Click on Yes to confirm the delete action. Click on No to return to the Form of Finance table.
Table8 Territory Type
Clicking on the Add button
 will open the corresponding edit details pop up window allowing you
to add information.
will open the corresponding edit details pop up window allowing you
to add information.Selecting an official in charge row and click on the Edit button
 will
allow you to modify the selected row details.
will
allow you to modify the selected row details.Selecting a row and clicking on the Delete button
 will remove the data of the selected row.
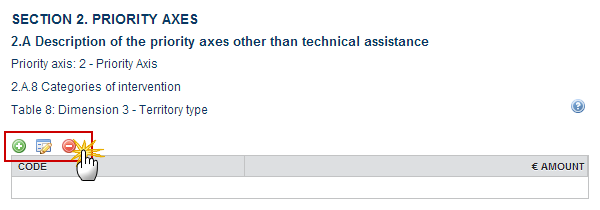
ADDING A TERRITORY TYPE
Click on the Add button
 to add information.
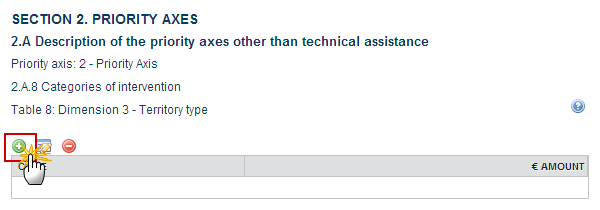
The Edit Details pop-up window appears:

Enter or select the following information:
(1) Select the Code.
(2) Enter the € amount.
(3) Click on the Update link to save all the information.
DELETION OF A TERRITORY TYPE
Select a row (1) and click on the Remove button
 (2).
(2).
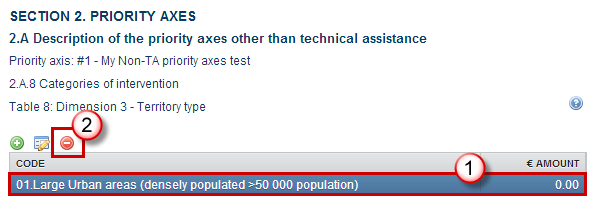
A confirmation window appears:

Click on Yes to confirm deletion. Click on No to return to the Territory Type table.
Table9 Territorial Delivery Mechanism
Clicking on the Add button
 will open the corresponding edit details pop up window allowing you
to add information.
will open the corresponding edit details pop up window allowing you
to add information.Selecting an official in charge row and click on the Edit button
 will
allow you to modify the selected row details.
will
allow you to modify the selected row details.Selecting a row and clicking on the Delete button
 will remove the data of the selected row.
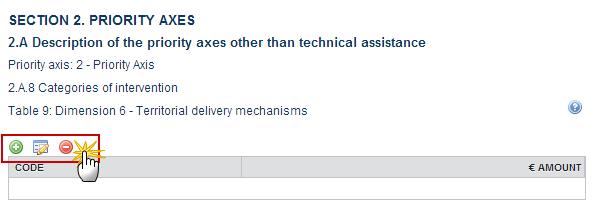
ADDING A TERRITORIAL DELIVERY MECHANISM
Click on the Add button
 to add a Territory Delivery Mechanism.
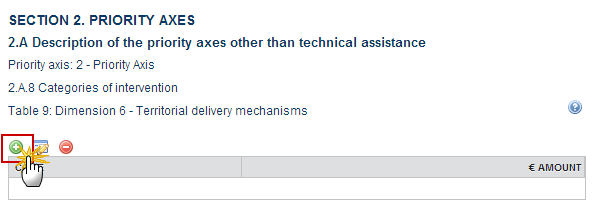
The Edit Details pop-up window appears:

Enter or select the following information:
(1) Select the Code.
(2) Enter the € amount.
(3) Click on the Update link to save all the information.
DELETION OF A TERRITORIAL DELIVERY MECHANISM
Select a row (1) and click on the Remove button
 (2).
(2).

A confirmation window appears:

Click on Yes to confirm deletion. Click on No to return to the Territorial delivery mechanism table.
Planned Use of Technical Assistance
Click on the Edit button
 to enter or modify the summary of the planned use of technical
assistance.
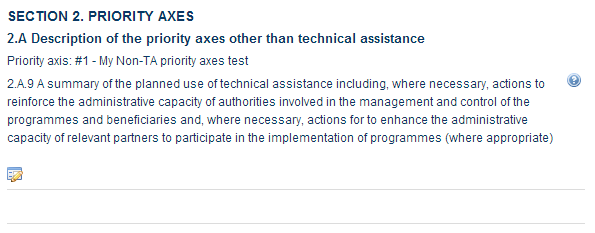
The edit details form pop-up window appears:

Enter or select the following information:
(1) Enter or edit the text.
(2) Click on the Update link to save all the information.
TA Priority Axes
Clicking on the Add button
 will open the corresponding edit details pop up window allowing you
to add information.
will open the corresponding edit details pop up window allowing you
to add information.Selecting an official in charge row and click on the Edit button
 will
allow you to modify the selected row details.
will
allow you to modify the selected row details.Selecting a row and clicking on the Delete button
 will remove the data of the selected row.

ADDING A TA PRIORITY AXIS
Click on the Add button
 to add a new TA Priority Axis.

The priority axes form pop-up window appears:
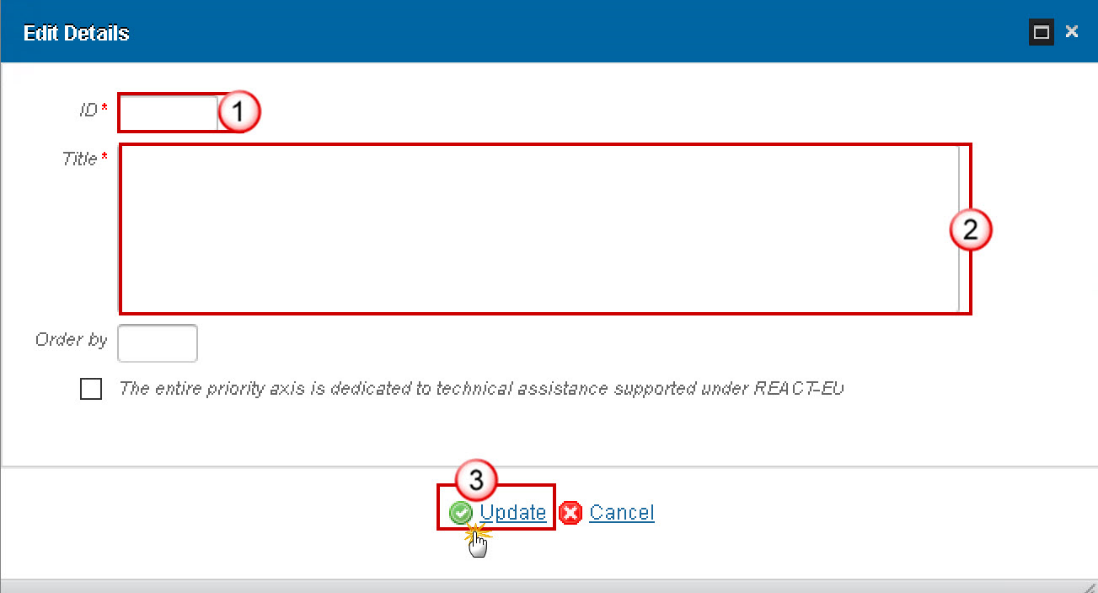
Enter or select the following information:
(1) Enter the ID.
(2) Enter the Title.
(3) Click on Update to save the information.
Note |
If the entire priority axis is dedicated to technical assistance supported under REACT-EU then this option must be ticked:
|
REMARK |
In subsequent versions of the Cooperation Programme (>1), Priorities created in earlier versions:
|
DELETION OF A TA PRIORITY AXIS
Select a row (1) and click on the Remove button
 (2)
to delete the selected row.

A confirmation window appears:

Click on Yes to confirm deletion. Click on No to return to the TA Priority Axes table.
Priority Axis: 'ID'
Clicking on the Add button
 will open the corresponding edit details pop up window allowing you
to add information.
will open the corresponding edit details pop up window allowing you
to add information.Selecting an official in charge row and click on the Edit button
 will
allow you to modify the selected row details.
will
allow you to modify the selected row details.Selecting a row and clicking on the Delete button
 will remove the data of the selected row.
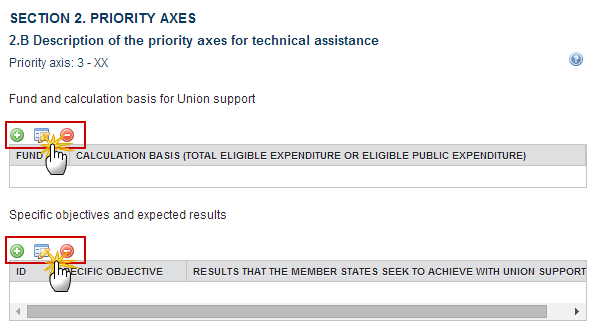
ADDING A FUNDS, CATEGORIES OF REGIONS AND CALCULATION BASIS OF UNION SUPPORT
Click on the Add button
 on the corresponding table.
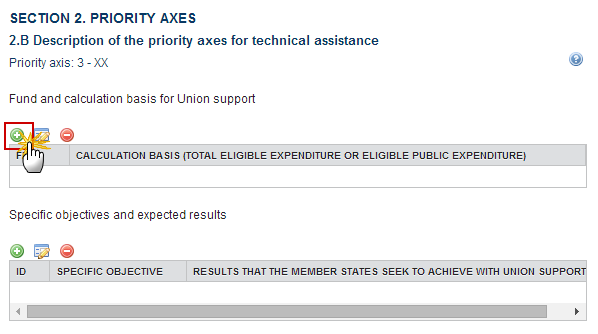
The Edit Details pop-up window appears:
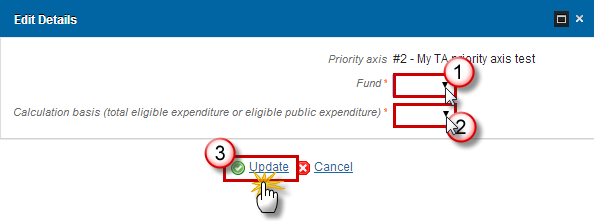
Select the following information:
(1) Select the Fund.
(2) Select the Calculation basis.
(3) Click on Update link to save the information.
Note |
The Investment Priority List is limited to the Investment Priorities selected in Table1 TO and IP Justification section. For REACT-EU Priority Axes the Investment Priority is limited to “Fostering crisis repair in the context of the COVID-19 …” (13i) for ERDF. The system will automatically maintain the records in the Thematic Objective Plan Table 17 for Priorities covering more than 1 Thematic Objective. |
DELETION OF A FUNDS, CATEGORIES OF REGIONS AND CALCULATION BASIS OF UNION SUPPORT
Select a row (1) and click on the Remove button
 (2).
(2).
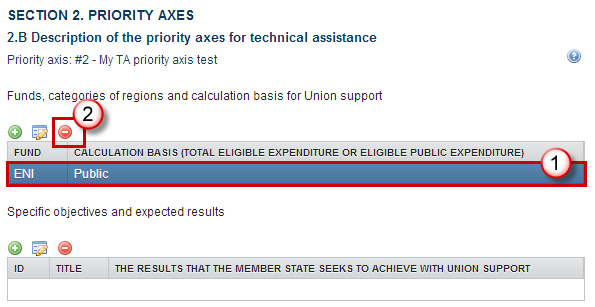
A confirmation window appears:

Click on Yes to confirm deletion. Click on No to return to the TA Priority Axes.
ADDING A SPECIFIC OBJECTIVE AND EXPECTED RESULT
REMARK |
The Specific Objective section will be disabled for REACT-EU TA Priority Axes. |
Click on the Add button
 on the corresponding table to enter an specific objective and
expected result.
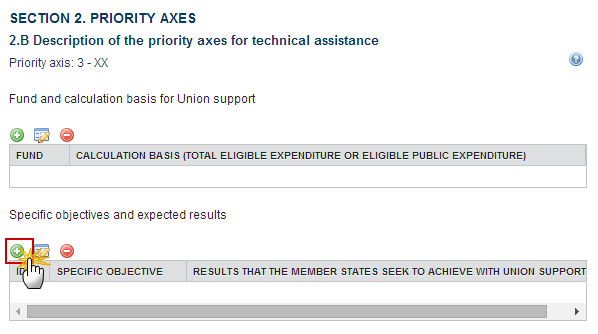
The Edit Details pop-up window appears:
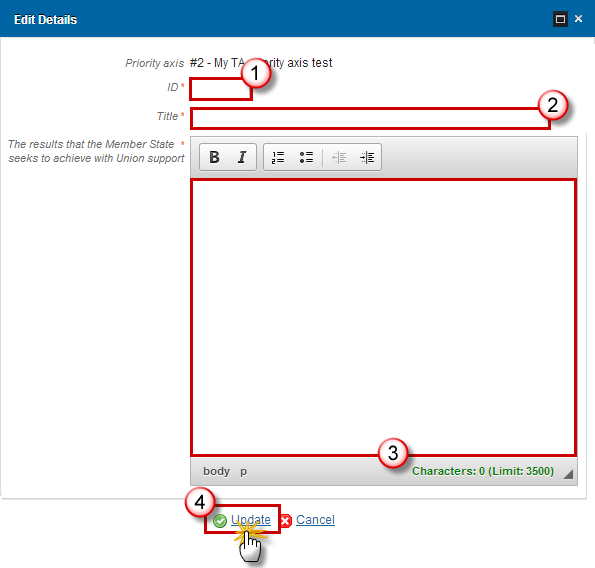
Select the following information:
(1) Select the ID.
(2) Select the Title.
(3) Enter The results that the MS seeks to achieve with Union support
(4) Click on Update link to save the information.
DELETION OF A SPECIFIC OBJECTIVE AND EXPECTED RESULT
Select a row (1) and click on the Remove button
 (2).
(2).
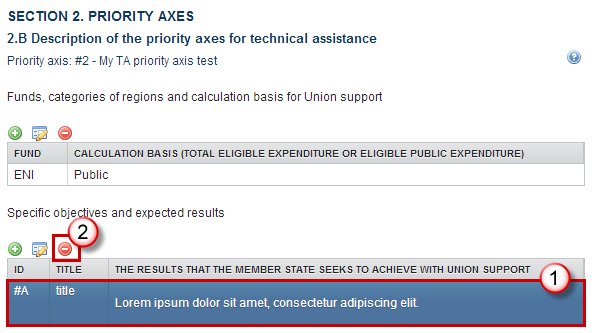
A confirmation window appears:

Click on Yes to confirm deletion. Click on No to return to the TA Priority Axes.
Specific Objective: 'ID'
Table10 Result Indicators
Clicking on the Add button
 will open the corresponding edit details pop up window allowing you
to add information.
will open the corresponding edit details pop up window allowing you
to add information.Selecting an official in charge row and click on the Edit button
 will
allow you to modify the selected row details.
will
allow you to modify the selected row details.Selecting a row and clicking on the Delete button
 will remove the data of the selected row.
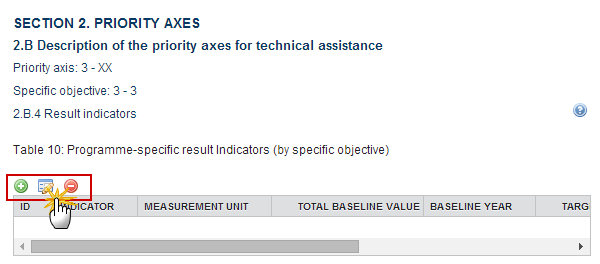
Adding a RESULT INDICATOR
Click on the Add button
 to add a result indicator.
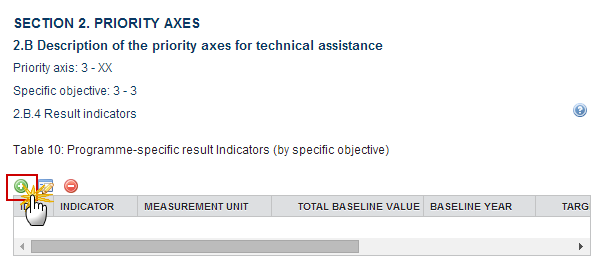
The Edit Details pop-up window appears:
Note |
There are two types of Programme-Specific Result Indicators, depend the selection there are different ways to complete the form correctly. See all the possibilities below. |
First option 'Programme-Specific Result Indicator' is selected:

Enter or select the following information:
(1) Select the Programme-Specific result indicator from the list to use an existing specific result indicator.
The Programme Specific Result Indicator List contains all Programme Specific Result Indicators previously defined on this Programme.
(2) Enter the Qualitative total Baseline Value.
(3) Enter the Baseline Year.
(4) Enter the Qualitative Total Target Value (2023).
(5) Enter the Source of data.
(6) Enter the Frequency of reporting.
(7) Click on the Update link to save all the information.
Note |
There are only Programme Specific Result Indicators on Technical Assistance Priority Axes. |
The second option 'New Programme-Specific Result Indicator' is selected:
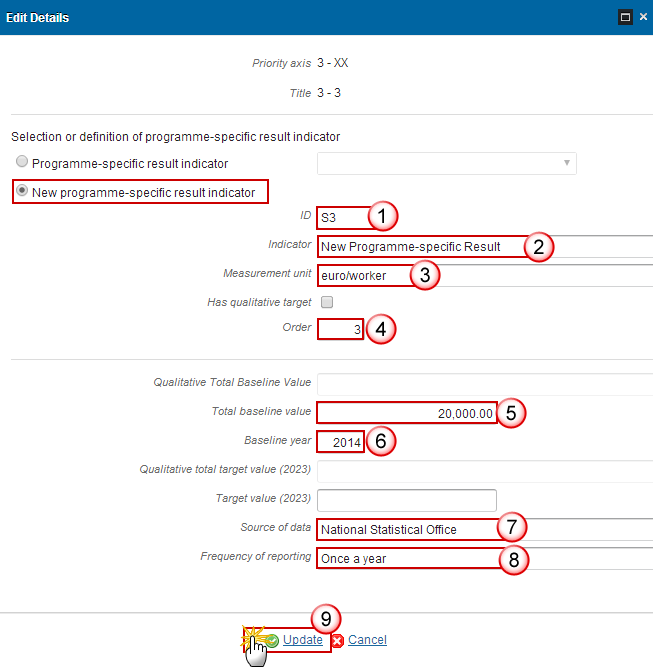
Enter or select the following information:
(1) Enter the ID.
(2) Enter the Indicator.
(3) Enter the Measurement unit.
(4) Enter the Order.
(5) Enter the Total Baseline Value.
(6) Enter the Baseline Year.
(7) Enter the Source of data.
(8) Enter the Frequency of reporting.
(9) Click on the Update link to save all the information.
REMARK |
When using a Programme Specific Indicator ID of a reserved COVID-19 Result Indicator for ETC, then on Update an Alert will be issued saying “You are using a COVID-19 reserved programme specific result indicator code. The title and measurement unit will be overwritten with their reserved values. If this was not your intention, press cancel.” When OK is pressed, the title and measurement unit will be overwritten with the official reserved values. When using a Programme Specific Indicator ID of a reserved COVID-19 indicator that is not a result one for ETC, then an Alert is issued saying “You are using a reserved COVID-19 Indicator which cannot be used as result indicator for ETC”. |
DELETION OF A RESULT INDICATOR
Select a row (1) and click on the Remove button
 (2)
to delete the selected indicator.
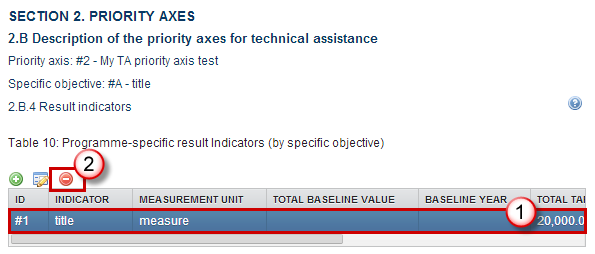
A confirmation window appears:

Click on Yes to confirm deletion. Click on No to return to the Result Indicators table.
Actions to Be Supported
Click on the Edit button
 to enter or modify the description of actions to be supported.

The edit details form pop-up window appears:

Enter or modify the following information:
(1) Edit the text.
(2) Click on the Update link to save all the information.
Table11 Output Indicators
Clicking on the Add button
 will open the corresponding edit details pop up window allowing you
to add information.
will open the corresponding edit details pop up window allowing you
to add information.Selecting an official in charge row and click on the Edit button
 will
allow you to modify the selected row details.
will
allow you to modify the selected row details.Selecting a row and clicking on the Delete button
 will remove the data of the selected row.
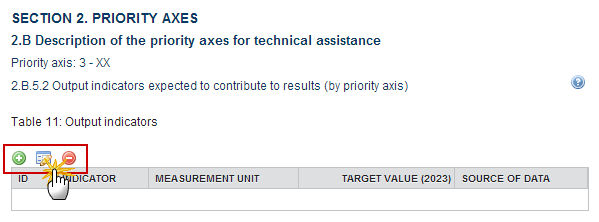
Adding AN OUTPUT INDICATOR
Click on the Add button
 to add information.
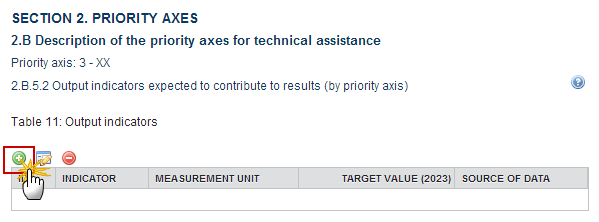
The Edit Details pop-up window appears:
Note |
There are three types of selection of Output Indicators, depend the selection there are different ways to complete the form correctly. See all the possibilities below. |
First option 'Common Output Indicator' is selected:
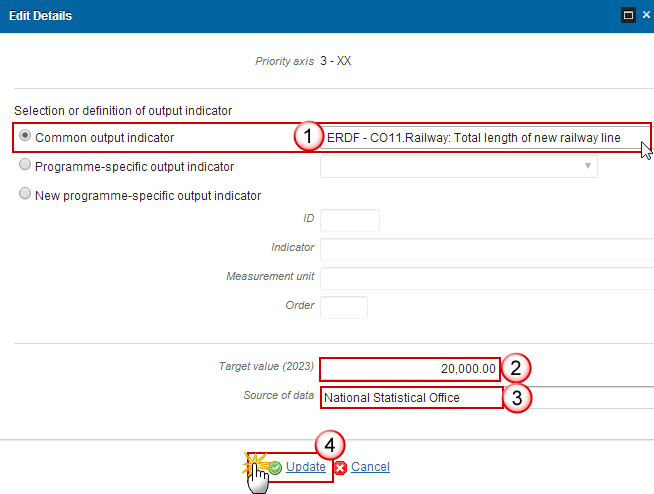
Enter or select the following information:
(1) Select the Common output indicator from the list to use an existing specific result indicator.
The Common Output Indicator List contains all Common Output Indicators for the Fund covered by this Priority Axis.
(2) Enter the Target Value (2023).
(3) Enter the Source of data.
(4) Click on the Update link to save all the information.
Second option 'Programme-Specific Output Indicator' is selected:
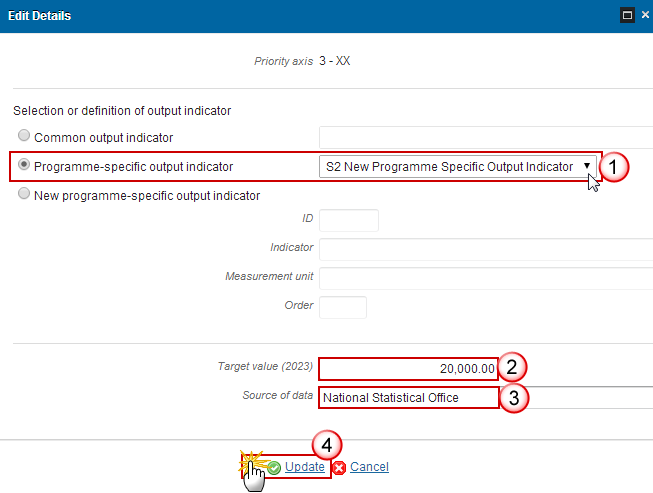
Enter or select the following information:
(1) Select the Programme-specific output indicator from the list.
The Programme Specific Output Indicator List contains all Programme Specific Output Indicators previously defined on this Programme.
(2) Enter the Target Value (2023).
(3) Enter the Source of data.
(4) Click on the Update link to save all the information.
Third option 'New Programme-Specific Output Indicator' is selected:
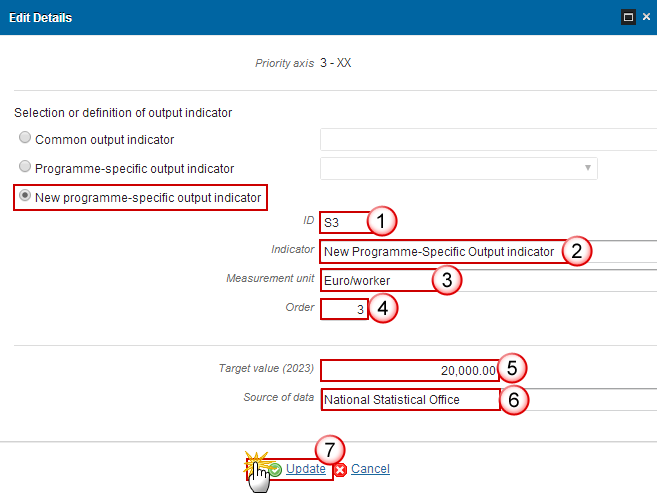
Enter or select the following information:
(1) Enter the ID.
(2) Enter the Indicator.
(3) Enter the Measurement Unit.
(4) Enter the Order.
(5) Enter the Target Value (2023).
(6) Enter the Source of data.
(7) Click on the Update link to save all the information.
REMARK |
When using a Programme Specific Indicator ID of a reserved COVID-19 Output Indicator for ETC, then on Update an Alert will be issued saying “You are using a COVID-19 reserved programme specific output indicator code. The title and measurement unit will be overwritten with their reserved values. If this was not your intention, press cancel.” When OK is pressed, the title and measurement unit will be overwritten with the official reserved values. When using a Programme Specific Indicator ID of a reserved COVID-19 indicator that is not an output one for ETC, then an Alert is issued saying “You are using a reserved COVID-19 Indicator which cannot be used as result indicator for ETC”. |
DELETION OF AN OUTPUT INDICATOR
Select a row (1) and click on the Remove button
 (2)
to delete the selected indicator.
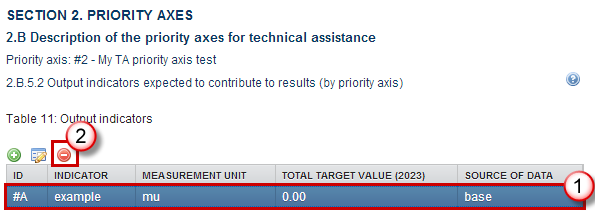
A confirmation window appears:

Click on Yes to confirm deletion. Click on No to return to the Output Indicators table.
Categories of Intervention
Table12 Intervention Field
Clicking on the Add
button
![]() will open the corresponding edit details pop up window allowing you
to add information.
will open the corresponding edit details pop up window allowing you
to add information.
Selecting an official in charge row and click on
the Edit
button![]() will
allow you to modify the selected row details.
will
allow you to modify the selected row details.
Selecting a row and clicking on the Delete
button
![]() will remove the data of the selected row.
will remove the data of the selected row.
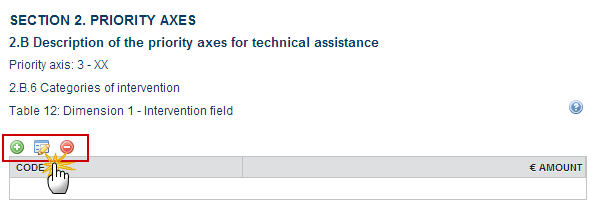
ADDING AN INTERVENTION FIELD
Click on the Add button
 to add an Intervention field.
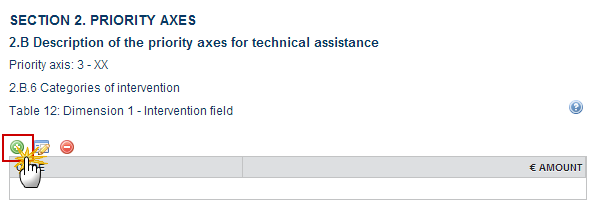
The Edit Details pop-window appears:
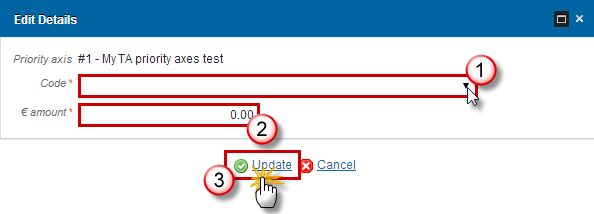
Enter or select the following information:
(1) Select the Code.
(2) Enter the € amount.
(3) Click on the Update link to save all the information.
DELETION OF AN INTERVENTION FIELD
Select a row (1) and click on the Remove button
 (2).
(2).

A confirmation window appears:

Click on Yes to confirm deletion. Click on No to return to the Intervention field table.
Table13 Form of Finance
Clicking on the Add button
 will open the corresponding edit details pop up window allowing you
to add information.
will open the corresponding edit details pop up window allowing you
to add information.Selecting an official in charge row and click on the Edit button
 will
allow you to modify the selected row details.
will
allow you to modify the selected row details.Selecting a row and clicking on the Delete button
 will remove the data of the selected row.
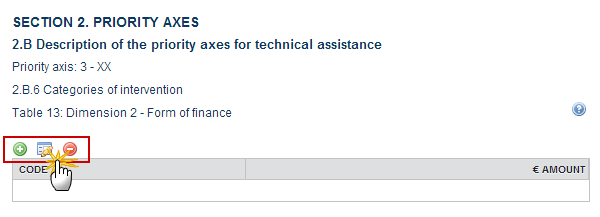
ADDING A FORM OF FINANCE
Click on the Add button
 to add information.

The Edit Details pop-up window appears:

Enter or select the following information:
(1) Select the Code.
(2) Enter the € Amount.
(3) Click on the Update link to save all the information.
DELETION OF A FORM OF FINANCE
Select a row (1) and click on the Remove button
 (2).
(2).

A confirmation window appears:

Click on Yes to confirm deletion. Click on No to return to the Form of Finance table.
Table14 Territory Type
Clicking on the Add button
 will open the corresponding edit details pop up window allowing you
to add information.
will open the corresponding edit details pop up window allowing you
to add information.Selecting an official in charge row and click on the Edit button
 will
allow you to modify the selected row details.
will
allow you to modify the selected row details.Selecting a row and clicking on the Delete button
 will remove the data of the selected row.
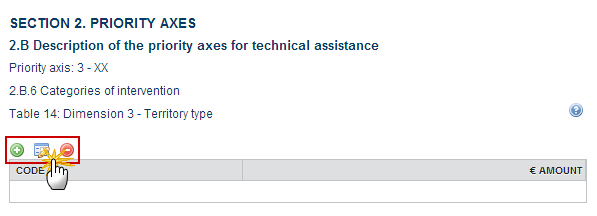
ADDING A TERRITORY TYPE
Click on the Add button
 to add information.
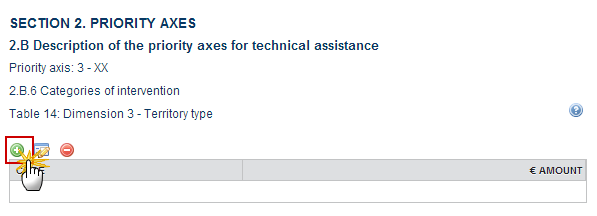
The Edit Details pop-up window appears:
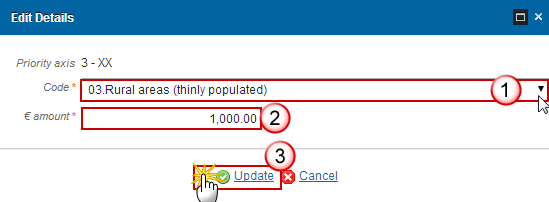
Enter or select the following information:
(1) Select the Code.
(2) Enter the € Amount.
(2) Click on the Update link to save all the information.
DELETION OF A TERRITORY TYPE
Select a row (1) and click on the Remove button
 (2).
(2).
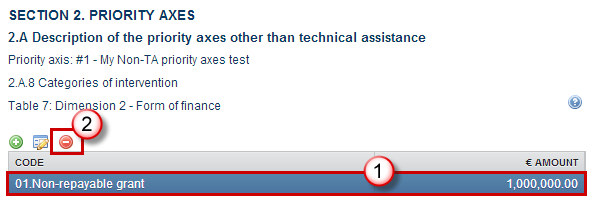
A confirmation window appears:

S3 Financing Plan
Table15 by Year
The Annual plan is presented for all years between First Year and Last Year and for all non-REACT-EU/REACT-EU, Funds covered by the Programme.
All non-REACT-EU records have only years 2014-2020 enabled.
All REACT-EU records have only years 2021-2022 enabled.
For REACT-EU records the label “REACT-EU” will be added to the Fund.
Click on the Edit button
 to modify the table values.
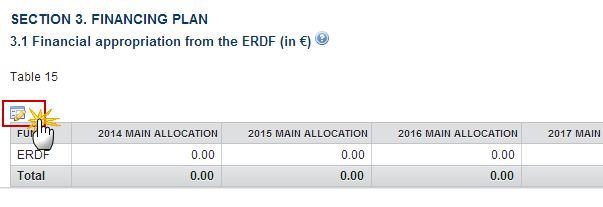
The Financing Plan becomes editable:
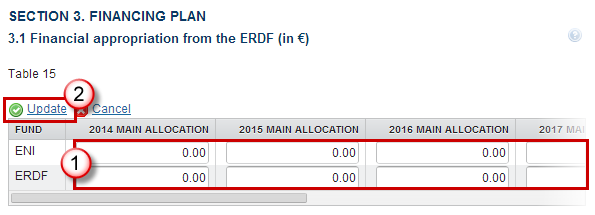
Enter or modify the following information:
(1) Modify the values.
(2) Click on the Update link to save all the information.
Table16 by Priority Axis
The Priority Axis plan is presented for all Priority and Fund combinations defined in this Programme.
Click on the Edit button
 to modify the table values.

The Table 16 becomes editable:
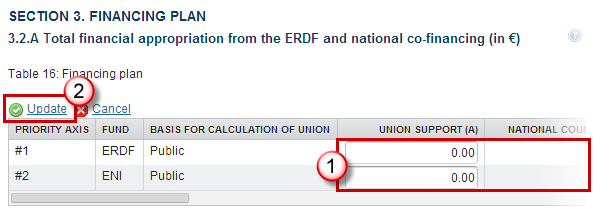
Enter or modify the following information:
(1) Modify the values.
(2) Click on the Update link to save all the information.
REMARK |
The EIB Contribution and the Contributions from third countries can only be updated on the first occurrence of a Priority Axis. For REACT-EU Priority Axes the label “REACT-EU” will be added to the Fund. Co-financing rate in Table 16 should have 10 decimals. Amounts and calculated amounts in Table 16 should have no decimals |
REMARK |
Derogation provided by Article 25(a)(1): The Member State can exceptionally edit the table 18a to request a co-financing rate of 100% to be applied to expenditure declared in payment applications during the accounting year 1 July 2020 - 30 June 2021 for the selected priority axis/axes by ticking the box in the column 100% CO-FINANCING RATE FOR ACCOUNTING YEAR 2020-2021. Derogation provided by Article 25a(1a): The Member State can exceptionally edit the table 18a to request a co-financing rate of 100% to be applied to expenditure declared in payment applications during the accounting year 1 July 2021 - 30 June 2022 for the selected priority axis/axes by ticking the box in the column 100% CO-FINANCING RATE FOR ACCOUNTING YEAR 2021-2022. Derogation provided by Article 25a(1b): The Member State can exceptionally edit the table 18a to request a co-financing rate of 100% to be applied to expenditure declared in payment applications during the accounting year 1 July 2023 - 30 June 2024 for the selected priority axis/axes by ticking the box in the column 100% CO-FINANCING RATE FOR ACCOUNTING YEAR 2023-2024.
|
Table17 by Thematic Objective
The Thematic Objective plan is presented for all Priority Axes covering more than 1 Thematic Objective.
Click on the Edit button
 to modify the table values.
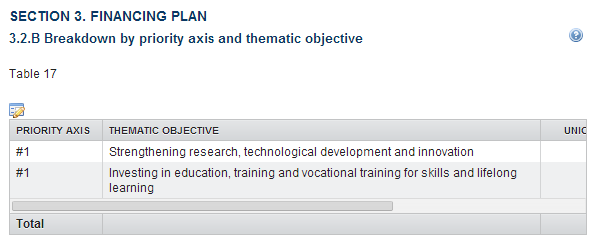
The Table 17 becomes editable:
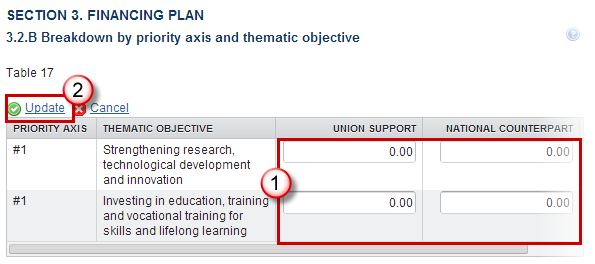
Enter or modify the following information:
(1) Modify the values.
(2) Click on the Update link to save all the information.
Table18 for Climate Change Objectives
Table 18 is a summary table:

REMARK |
The "Indicative Amount of Support to be used for Climate Change Objectives" is calculated by multiplying the Union Support of the Priority Axis with a Climate Change Rate. Get the Union Support and the Climate Change Rate form the Intervention Fields defined in Table 6 and Table 12. For Table 6, if the Climate Change Rate for an Intervention Field = 0, then check in Table 17 if the Thematic Objective of this Priority Axis is '04' or '05'. In this case, apply 40% as co-financing rate. We only show those Priority Axes which have a calculated amount > 0. |
S4 Territorial Development
Note |
In the case of programme revision in order to establish one or more separate priority axes for thematic objective “Fostering crisis repair in the context of the COVID-19 pandemic and its social consequences and preparing a green, digital and resilient recovery of the economy”, this part (Section 4) is required only where corresponding support is provided. |
Click on the Edit button
 to modify the description.
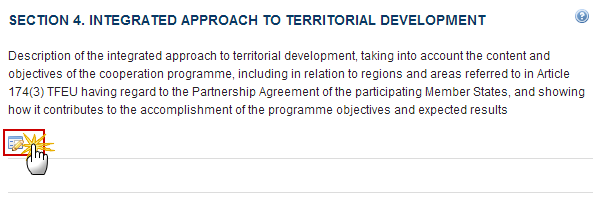
The Edit Details form pop-up window appears:

Enter or modify the following information:
(1) Edit the text.
(2) Click on the Update link to save all the information.
Community-led Local Development
Click on the Edit button
 to modify the description of the approach to the use of
community-led local development instruments.

The Edit Details form pop-up window appears:

Enter or modify the following information:
(1) Edit the text.
(2) Click on the Update link to save all the information.
Sustainable Urban Development
Click on the Edit button
 to modify the description.

The Edit Details form pop-up window appears:

Enter or modify the following information:
(1) Edit the text.
(2) Click on the Update link to save all the information.
Table19 Sustainable Urban Development
Click on the Edit button
 to modify the description of the integrated actions for sustainable
urban development.

The Edit Details form pop-up window appears:

Enter or modify the following information.
(1) Edit the Indicative amount of ERDF support.
(2) Click on the Update link to save all the information.
Integrated Territorial Investment (ITI)
Click on the Edit button
 to modify the description of the approach to the use of integrated
Territorial Investments.

The Edit Details form pop-up window appears:

Enter or modify the following information:
(1) Edit the text.
(2) Click on the Update link to save all the information.
Table20 Financial Allocation to ITI
Clicking on the Add
button
![]() will open the corresponding edit details pop up window allowing you
to add information.
will open the corresponding edit details pop up window allowing you
to add information.
Selecting an official in charge row and click on
the Edit
button![]() will
allow you to modify the selected row details.
will
allow you to modify the selected row details.
Selecting a row and clicking on the Delete
button
![]() will remove the data of the selected row.
will remove the data of the selected row.

ADDING A FINANCIAL ALLOCATION TO ITI
Click on the Add button
 to add the indicative financial allocation to
ITI.

The Edit Details pop-up window appears:

Enter or select the following information:
(1) Select the Priority axis.
The Priority Axis List contains all Priority Axes defined in this Programme.
(2) Enter the Union support.
(3) Click on the Update link to save all the information.
DELETION OF A FINANCIAL ALLOCATION TO ITI
Select a row (1) and click on the Remove button
 (2).
(2).

A confirmation window appears:

Click on Yes to confirm deletion. Click on No to return to the Financial Allocation to ITI table.
Macro-Regional & Sea-Basin Strategies
Click on the Edit button
 to enter or modify the description of planned interventions towards
macro-regional and sea basin strategies.
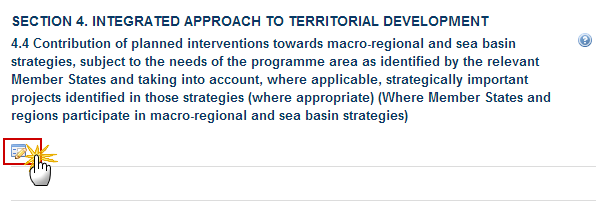
The edit details form pop-up window appears:

Enter or modify the following information:
(1) Edit the text.
(2) Click on the Update link to save all the information.
S5 Implementing Provisions
Relevant Authorities and Bodies
Table21 Programme Authorities
Clicking on the Add
button
![]() will open the corresponding edit details pop up window allowing you
to add information.
will open the corresponding edit details pop up window allowing you
to add information.
Selecting an official in charge row and click on
the Edit
button![]() will
allow you to modify the selected row details.
will
allow you to modify the selected row details.
Selecting a row and clicking on the Delete
button
![]() will remove the data of the selected row.
will remove the data of the selected row.

ADDING A PROGRAMME AUTHORITY
Click on the Add button
 to add the relevant Authorities.

The Edit Details pop-up window appears:
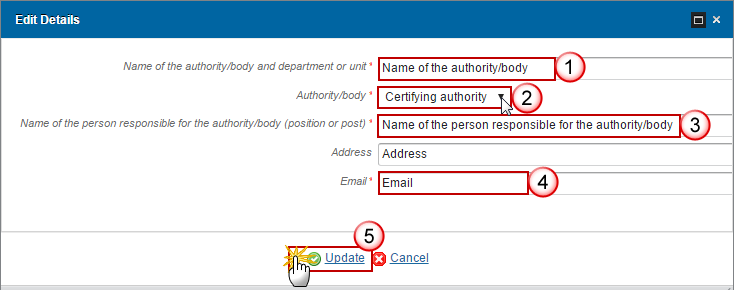
Enter or select the following information:
(1) Enter the Name of the authority.
(2) Select an Authority type.
The following Authority/Body Types are foreseen:
Managing Authority
Certifying Authority
Audit Authority
(3) Enter the Name of the person responsible for the Authority.
(4) Enter the E-Mail.
The Email Address is not required by the regulation, but is used by SFC2014 for automatic notification purposes.
(5) Click on the Update link to save the information.
Note |
The Email Address is not required by the regulation, but is used by SFC2014 for automatic notification purposes. The Authority information is not part of the Commission Decision. |
DELETION OF AN AUTHORITY
Select a row (1) and click on the Remove button
 (2).
(2).

A confirmation window appears:

Click on Yes to confirm deletion. Click on No to return to the Programme Authorities table.
Body Receiving Payments from EC
Click on the Edit button
 to modify the description about the Body to which payments will be
made by the Commission.
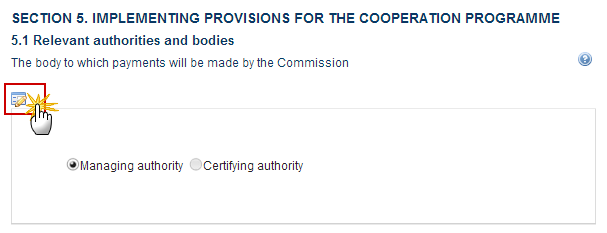
The edit details form pop-up window appears:
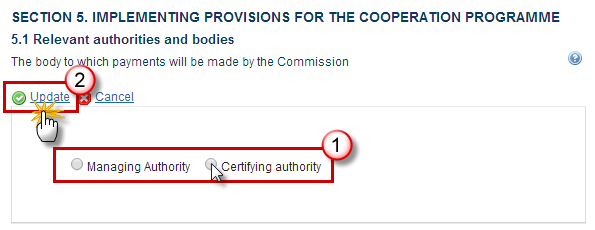
Select the information:
(1) Select the Body.
(2) Click on the Update link to save all the information.
Table22 Bodies for Control and Audit Tasks
Clicking on the Add button
 will open the corresponding edit details pop up window allowing you
to add information.
will open the corresponding edit details pop up window allowing you
to add information.Selecting an official in charge row and click on the Edit button
 will
allow you to modify the selected row details.
will
allow you to modify the selected row details.Selecting a row and clicking on the Delete button
 will remove the data of the selected row.

ADDING A BODY FOR CONTROL AND AUDIT TASKS
Click on the Add button
 to add a Body carrying out control and audits
tasks.

The Edit Details pop-up window appears:
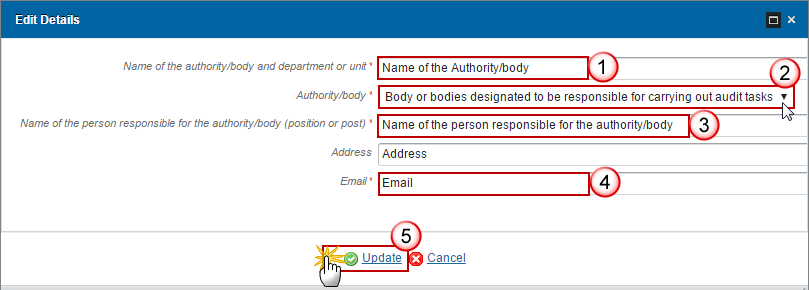
Enter the following information:
(1) Name of the Authority/body and department or unit
(2) Authority/body
The following Authority/Body Types are foreseen:
Body or bodies designated to carry out controls
Body or bodies designated to be responsible for carrying out audit tasks
(3) Name of the person responsible for the authority/body (position/post)
(4) E-mail
The Email Address is not required by the regulation, but is used by SFC2014 for automatic notification purposes. The Authority information is not part of the Commission Decision.
(5) Click on the Update link to save the information.
Note |
The Email Address is not required by the regulation, but is used by SFC2014 for automatic notification purposes. The Authority information is not part of the Commission Decision. |
DELETION OF A BODY FOR CONTROL AND AUDIT TASKS
Select a row (1) and click on the Remove button
 (2).
(2).

A confirmation window appears:

Click on Yes to confirm deletion. Click on No to return to the Bodies for control and audit tasks table.
Joint Secretariat
Click on the Edit button
 to modify the description of the Procedure for setting up the joint
secretariat.

The edit details form pop-up window appears:

Enter or modify the following information:
(1) Edit the text.
(2) Click on the Update link to save all the information.
Management & Control
Click on the Edit button
 to modify the description.

The edit details form pop-up window appears:

Enter or modify the following information:
(1) Edit the text.
(2) Click on the Update link to save all the information.
Liabilities
Click on the Edit button
 to modify the description.

The edit details form pop-up window appears:

Enter or modify the following information:
(1) Edit the text.
(2) Click on the Update link to save all the information.
Use of Euro
Click on the Edit button
 to enter or modify the description of the method chosen for the
conversion of expenditure.

The edit details form pop-up window appears:

Enter or modify the following information:
(1) Edit the text.
(2) Click on the Update link to save all the information.
Involvement of Partners
Click on the Edit button
 to enter or modify the description of the actions taken to involve
the partners.

The edit details form pop-up window appears:

Enter or modify the following information:
(1) Edit the text.
(2) Click on the Update link to save all the information.
S6 Coordination
Click on the Edit button
 to modify the description about the mechanisms that ensure effective
coordination.
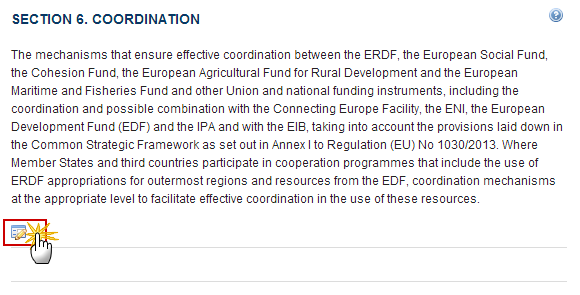
The edit details form pop-up window appears:

Enter or modify the following information:
(1) Edit the text.
(2) Click on the Update link to save all the information.
S7 Administrative Burden
Click on the Edit button
 to enter or modify the description of the administrative burden for
beneficiaries.

The edit details form pop-up window appears:

Enter or modify the following information:
(1) Edit the text.
(2) Click on the Update link to save all the information.
S8 Horizontal Principles
Sustainable Development
Click on the Edit button
 to modify the description of specific action to take into account
environment protection requirements.

The edit details form pop-up window appears:

Enter or select the following information.
(1) Edit the text.
(2) Click on the Update link to save all the information.
Equal Opportunities
Click on the Edit button
 to modify the description of specific action to promote equal
opportunities.

The Edit details form pop-up window appears:

Enter or modify the following information:
(1) Edit the text.
(2) Click on the Update link to save all the information.
Equality Men & Women
Click on the Edit button
 to modify the description about the promotion of equality between
men and women.

The edit details form pop-up window appears:

Enter or modify the information:
(1) Edit the text.
(2) Click on the Update link to save all the information.
S9 Separate Elements
Table23 List of Major Projects
Clicking on the Add button
 will open the corresponding edit details pop up window allowing you
to add information.
will open the corresponding edit details pop up window allowing you
to add information.Selecting an official in charge row and click on the Edit button
 will
allow you to modify the selected row details.
will
allow you to modify the selected row details.Selecting a row and clicking on the Delete button
 will remove the data of the selected row.
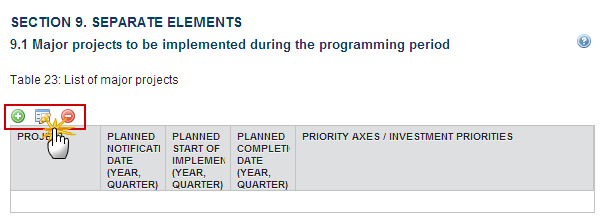
ADDING A MAJOR PROJECT
Click on the Add button
 to add information.
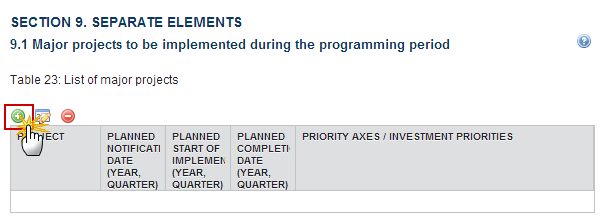
The Edit Details pop-up window appears:
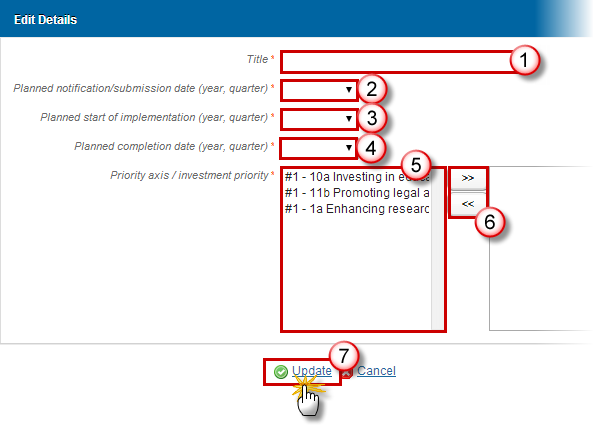
Enter or select the following information:
(1) Enter the Title.
(2) Select the Planned notification/submission date.
(3) Select the Planned start of implementation.
(4) Select the Planned completion date.
(5) Choose the Priority axis/Investment priority from the list.
The Priority Axis – Investment Priority List contains all Priority Axis – Investment Priority combinations defined for this Programme.
(6) Add the Priority axis/Investment priority to the Selected list.
(7) Click on the Update link to save all the information.
DELETION OF A MAJOR PROJECT
Select a row (1) and click on the Remove button
 (2).
(2).

A confirmation window appears:

Click on Yes to confirm deletion. Click on No to return to the List of Major Projects.
Table24 Performance Framework
Table 24 is a summary table:

Relevant Partners
Click on the Edit button
 to modify the description.

The edit details form pop-up window appears:

Enter or modify the information:
(1) Edit the text.
(2) Click on the Update link to save all the information.
Programme Implementation Conditions
Click on the Edit button
 to modify the description.

The edit details form pop-up window appears:

Enter or modify the information:
(1) Edit the text.
(2) Click on the Update link to save all the information.
Validate the Cooperation Programme (ETC)
REMARK |
A Cooperation Programme can be validated only if its status is 'Open' and resides at your Node. It is a must to have the role of MS Managing Authority with update access. |
Click on the Validate link to validate the Cooperation Programme.

The system validates the integrity of the input fields:
REMARK |
An Error will block you from sending the CP. The error(s) should be resolved and the CP must be revalidated. Note that a Warning does not block you from sending the CP. |
CODE |
VALIDATION RULES |
SEVERITY |
2.1 |
Validate that the First Year and the Last Year are >= 2014 and <= 2020 and that First Year is <= Last Year. |
Error |
2.2 |
Validate that at least one Priority Axis has been defined. |
Error |
2.5 |
validate that the Financing Plan by Year (Table 15) only contains records for all the years between First Year and Last Year and for all the REACT-EU flag, Funds defined in the Programme. Additionally, Union Support must have been specified for all of them |
Error |
2.6 |
Validate that the Financing Plan per Priority Axis (Table 16) contains records for all Priority Axis, Fund combinations defined in the Programme. Additionally, Union Support must have been specified for ERDF, but is optional for IPA and ENI (error). In versions > 1 this ERDF Union Support can be 0. |
Error Warning |
2.7 |
validate that the sum of Union Support per REACT-EU flag in the Financial Plan by year (Table 15) = sum of the Union Support per REACT-EU flag in the Financing Plan by Priority Axis (Table 16). |
Error |
2.8 |
Validate that one and only one Managing Authority has been specified. |
Error |
2.9 |
Validate that one and only one Audit Authority has been specified. |
Error |
2.10 |
Validate that one and only one Certifying Authority has been specified |
Error |
2.10 |
The Fund Support in closed previous years has not been modified. |
Error |
2.11 |
Validate that for each of the Categorisation Breakdowns (Tables 6-9 and 12-14), the total Union Support per Priority Axis equals the total ERDF Union Support per Priority Axis in Table 16. When ProgrammeVersion.majorAmendment is true then (error) else (warning). |
Error Warning |
2.12 |
Validate that for version 1, the Draft Report of the EX-ante Evaluation (PRG.EEVA) was uploaded in the system. Remark: For consecutive versions, it is not mandatory to upload this document. |
Error |
2.14 |
Validate that at least one official in charge of the Member State exists. |
Warning |
2.15 |
Validate that the CCI code matches the following regular expression (error): (….TC16RF..…|….TC16M4..…| ….TC16M5TN…| ….TC16M6TN…) |
Error |
2.16 |
validate for subsequent versions that compared to the previous adopted major version
|
Error
Error Error Error
Warning
Error |
2.18 |
Validate that there is at least one Indicator defined in the relevant Indicator Tables:
|
Error Warning Warning Error Warning
Warning |
2.22 |
Validate that Major Projects defined against this Programme in the Major Project module are listed in Table 23 by comparing the Priority Axis, Investment Priority and Major Project Title information. |
Error |
2.28 |
Validate the maximum length of the text fields (implicit in web. |
Error |
2.31 |
Validate that in Table 23 on the Major Projects, the notification date <= the start date <= completion date |
Error |
2.35 |
Validate that at least one Investment Priority with one Specific Objective is defined for each non-Technical Assistance Priority Axis. |
Error |
2.36 |
Validate that at least one Specific Objective is defined for each Technical Assistance Priority Axis where the Union Support exceeds €15M. |
Error |
2.39 |
Validate that baseline is not null in Table 3. "Indicator {0} has no baseline in Table 3". |
Warning |
2.49 |
Validate that target value is not null in Table 10. "Indicator {0} has no target in Table 10". |
Warning |
2.51 |
Validate that all programme specific output and result indicators are quantitative in Table 5. "Indicator {0} is not a quantitative indicator in Table 5". |
Warning |
2.58 |
Validate in Table 17 that the total amounts over Priority Axis equal the amounts per Priority Axis of Table 16:
|
Error |
2.59 |
Validate for subsequent major versions that compared to the previous major version
|
Error |
2.60 |
Validate that all integral documents have at least one attachment with a length > 0 |
Error |
2.61 |
Validate that for major version 1 in Table 15, the Main Allocation amounts have no decimals "The annual financing plan must be in euros, without decimals". |
Error |
2.64 |
Validate that in Table 16, the Union Support (a), the National Public Funding (c), the National Private Funding (d), the EIB Contribution and the Contribution from Third Countries have no decimals "The financing plan must be in euros, without decimals" |
Error |
2.66 |
Validate that the (Union Support (A) / (Union Support (A) + National Public Funding (C))) * 100 of each ERDF Programme/Priority/Plan record in Table 16 is minimum 20% (Art. 120(6) of Reg. 1303/2013 says that “the contribution from the funds for each priority axis shall not be less than 20% of the eligible public expenditure”) |
Error |
2.67 |
Validate that the co-financing rate of each Programme/Priority/Plan record in Table 16 doesn't exceed the maximum allowed co-financing rate. The maximum allowed co-financing rate for a ProgrammePriorityPlan record and the severity level for the rule are determined as followed: IF NonTaPriorityAxisSfCf.unionFinancialInstruments is true or FosteringCrisisRepair is true THEN set maximum co-financing rate = 100% (error); ELSIF NonTaPriorityAxisSfCf.financialInstruments is true or NonTaPriorityAxisSfCf.localDevelopment is true THEN set maximum co-financing rate = 95% (error); ELSE set maximum co-financing rate = 85% (error); END IF; |
Error |
2.69 |
Validate that there is at least one record in the Region Coverage |
Error |
2.73 |
Validate when version > 1 that when Major Amendment is set, that the Justification for Amendment is not null. |
Error |
2.74 |
Validate when version > 1 that when Major Amendment is not set, that MS Amending Decision information is not null (Number, Date and Entry into force date). |
Error |
2.75 |
Validate that the Confirmation of agreement in writing to the contents of the cooperative programme (PRG.CCP) was uploaded in the system. |
Error |
2.76 |
Validate that at least one control body has been specified in Table 22 |
Error |
2.77 |
Validate that at least one audit body has been specified in Table 22 |
Error |
2.78 |
Validate that Body to which payments will be made is specified |
Warning |
2.79 |
Validate when version > 1 that the Approval by the monitoring committee is ticked (error: 'In accordance with Article 210(2)(e) CPR, any amendment of the programme needs the approval by the monitoring committee). |
Error |
2.88 |
Validate in Table 16, when minor amendment, that the Union Support (A) for a Priority/Fund does not decrease by more than 8% compared to the value existing in the last adopted programme version existing at 01.02.2020. |
Warning
|
2.89 |
Validate in Table 16, when minor amendment, that the Union Support (A) for a Priority/Fund does not decrease by more than 4% of the Programme Total Union Support (A) in the last adopted programme version existing at 01.02.2020. |
Warning
|
2.90 |
Validate in Table 16, when minor amendment, that the total Union Support (A) for a Fund has not changed compared to the value existing in the last adopted programme version. |
Error |
2.92 |
Validate that REACT-EU Priority Axes only use Thematic Objective 13 |
Error |
2.94 |
Validate that a REACT-EU Priority Axis only covers ERDF |
Error |
2.95 |
Validate that Thematic Objective “Fostering crisis repair” (13) is only used by REACT-EU Priority Axes |
Error |
2.96 |
Validate in Table 15 for all REACT-EU records that Allocations > 0 have only be encoded for years 2021 and 2022 |
Error |
2.97 |
Validate in Table 15 for all non-REACT-EU records that Allocations > 0 have only be encoded for years 2014 to 2020 |
Error |
2.98 |
Validate that REACT-EU Priority Axes do not have any record in Table 5 |
Error |
2.100 |
Validate in Table 15, that Allocation for 2022 if exists = 0 |
Error |
2.106 |
Validate in table 16 that there is no priority axis selected in the column ‘100% co-financing rate for accounting year 2020-2021’ |
Error |
2.107 |
Validate in table 16, that the column ‘100% co-financing rate for accounting year 2021-2022’ for a Priority Axis, Fund was not changed compared to last adopted version |
Error |
2.108 |
Validate in table 16, that the column ‘100% co-financing rate for accounting year 2023-2024’ for a Priority Axis, Fund, was not deselected compared to last adopted version In table 16, for priority axis “{0}”, Fund “{1}”, ‘100% co-financing rate for accounting year 2023-2024’ has been deselected. |
Warning
|
2.109 |
Validate in table 16, when column ‘100% co-financing rate for accounting year 2023-2024’ is selected for a Priority Axis and Fund, that it is selected for all other Funds under that Priority Axis In table 16, for priority axis “{0}”, Fund “{1}”, ‘100% co-financing rate for accounting year 2023-2024’ must be selected. |
Error |
Send the Cooperation Programme (ETC)
REMARK |
It is a must to have the role of MS Managing Authority Send. A Cooperation Programme can be send only if its status is 'Ready to send' or 'Sent'. For web users, the "4 eye principle" must be respected. Therefore, the user sending must be different from the user who last validated. The Sending of information by a Member State to the Commission should be electronically signed in accordance with Directive 1999/93/EC. Sending of the different objects is generating a snapshot document and after the sending an acknowledge document is generated by the European Commission. |
Click on the Send link to send the Cooperation Programme.
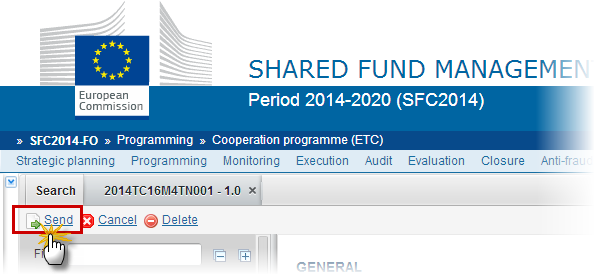
The system will ask you to confirm the send action:
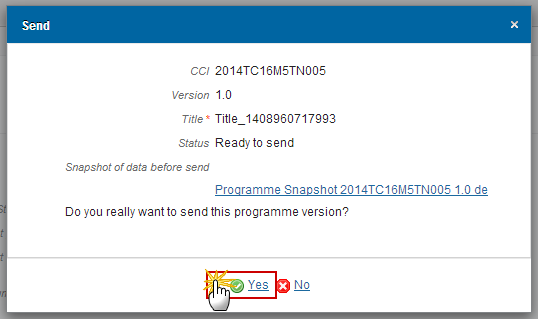
Click on Yes to confirm the send action or click on No to return to the Cooperation Programme.
The 'Sending' of information by a Member State to the Commission should be electronically signed in accordance with Directive 1999/93/EC.
Sending of the different objects is generating a snapshot document and after the sending an acknowledge document is generated by the European Commission.
This acknowledge document is signed but the Member State was not signing the snapshot document. The EU Login now provides a functionality of signing without forcing the user to have a certificate. The action to sign will only be triggered when sending to the European Commission:
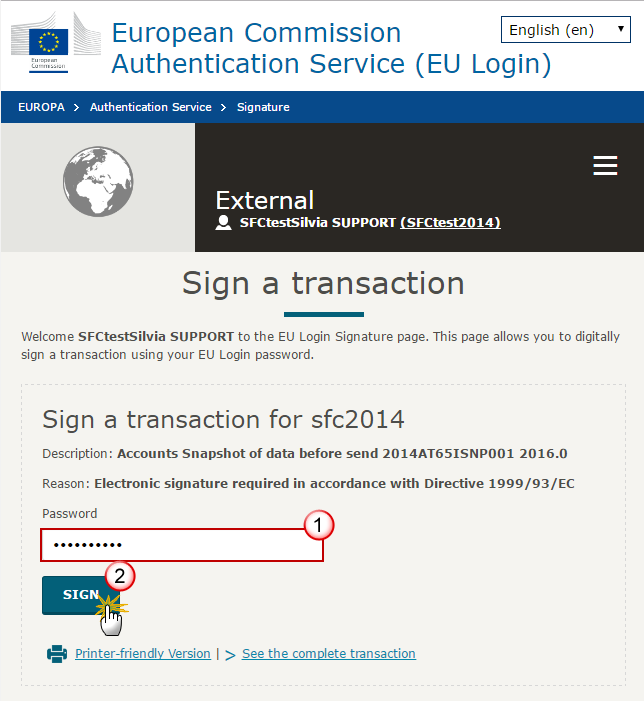
(1) Enter your SFC2014 Password
(2) Click on the Sign button
On success, the Cooperation Programme has been sent to the Commission or to an upper Node. When sent to an upper Member State Node, the status is set to 'Sent'. When sent to the Commission and when it concerns a Minor modification, the status is set to 'Adopted by MS' and also the status is set to 'Sent'.
A Minor modification is a modification which does not modify data which is part of the Commission Decision and for which the Member State has indicated that it does not concern a Major Amendment.
REMARK |
When sending the first version of the Cooperation Programme, automatically set the Eligibility Start Date to the smallest of the current date and 01/01/2014, and set the Eligibility End Date to 31/12/(Programme Last Year + 3). |
Delete the Cooperation Programme (ETC)
REMARK |
A Cooperation Programme can be deleted only if its status is 'Open', 'Ready to send' or 'Returned for modification by MS' and has never been sent to the Commission before and has no sent documents attached. |
Click on the Delete link to remove the Cooperation Programme from the system.
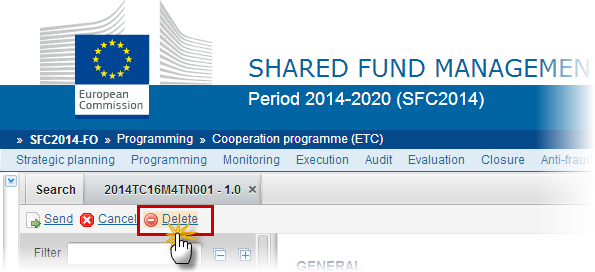
The system will ask you to confirm the delete action:
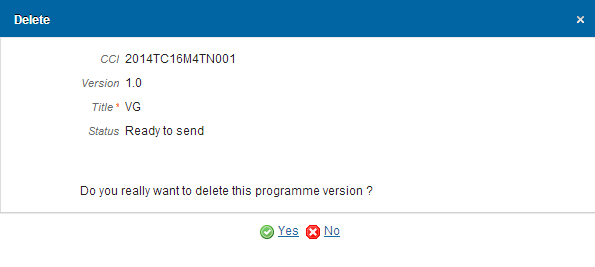
Click on Yes to confirm the delete action. The Cooperation Programme will be physically deleted. Click on No to return to the Cooperation Programme.
Cancel the Cooperation Programme (ETC)
REMARK |
A Cooperation Programme can be cancelled with documents sent to the Commission only if its status is 'Open', 'Ready to send' or 'Returned for modification by MS' and has never been adopted by the Commission before and contains sent Documents. It is a must to have the role of MS Managing Authority with update access. |
Click on the Cancel link to cancel the Cooperation Programme.

The system will ask you to confirm the cancel action:
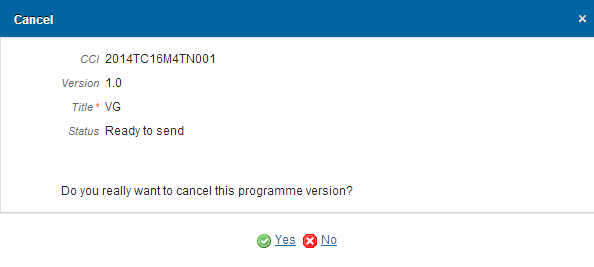
Click on Yes to confirm or click on No to return to the Cooperation Programme.
On success, the Cooperation Programme status was set to 'Cancelled'.
Create a New Version of the Cooperation Programme (ETC)
REMARK |
A New Version of a Cooperation Programme can only be created when the current OP version status is 'Adopted by EC', 'Adopted by MS', ‘Non Adopted by EC’, 'Returned for modification by EC', 'Cancelled' or 'Withdrawn at the request of the MS'. It is a must to have the role of MS Managing Authority with update access. |
Click on the Create New Version link to create a new version of the Cooperation Programme.

The system will ask you to confirm the action:
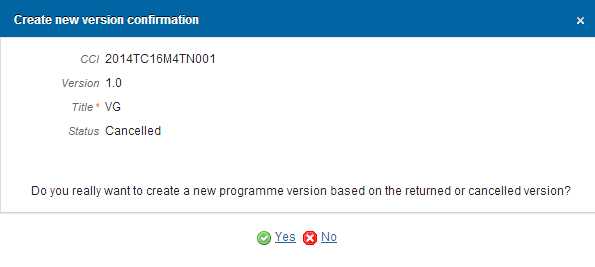
Click on Yes to confirm the creation of a new version. Click on No to return to the Cooperation Programme.
On success, a new version of the Cooperation Programme has been created as a copy of the last version. Its status was set to 'Open' and the version number was incremented by one when the previous version was ‘adopted by MS’ or ‘EC’ (ex. 1.0 2.0) or the working version was incremented by one when the previous version was 'returned for modification by the EC' or 'cancelled' (ex. 1.0 1.1).
When the status of the last version was ‘Not Adopted by EC’ then the new version should be based on the last adopted version and the version should be incremented by one (ex. 1.0 2.0)
When the status of the last version was 'Withdrawn at the request of the MS' and the user has chosen to create a new version based on the withdrawn version or on the last adopted version, then the version is incremented by one (ex. 1.0 -> 2.0).
REMARK |
Authority information from the Designation of Authorities object will be used to populate Tables 21 and 22 when this information is more recent than the Tables 21 and 22 information available in the last version of the OP. |
REMARK |
Major Amendment, Approved by Monitoring Committee, Justification for amendment, MS Amending Decision Number, MS Amending Decision Date and MS Amending Decision Entry into Force Date are only available in versions > 1. The MS related fields need to be filled in when the MS wants to create a version containing modifications which do not require a Commission Decision. This kind of version will automatically be set to 'Adopted by MS' when sent to the Commission and when only non-decisional parts of the Cooperation Programme have been modified. When Major Amendment is set, a Justification is required and the version will need a new Commission Decision, even when only non-decisional parts have been modified. When Major Amendment is not set, the MS amending decision fields are required (number, date, entry into force date). When version is > 1 then an approval by the Monitoring Committee is required. |
Withdraw the Cooperation Programme ETC
REMARK |
The Member State must request to withdraw the Cooperation Programme ETC uploading a document called 'MS Request to withdraw programme version'. The Programme version is in a status 'Sent' or 'Returned for modification by EC’ at the level of the Commission, or in a status ‘Open’, ‘Ready to send’, ‘Returned for modification by MS’ or ‘Cancelled’ at the owner node of the Member State and has previously been sent to the Commission. This scenario occurs when at the request of the Member State the Commission withdraw a Programme Version and stop the amendment procedure. |
Click on the Add button
 to add the withdraw document called 'MS
Request to withdraw programme version'
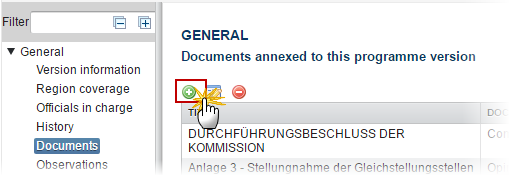
The Member State must request to withdraw the Cooperation Programme uploading a document and entering the mandatory information.

Enter or select the following information:
(1) Select a Document Type called 'MS Request to withdraw Programme version'.
(2) Enter a title for your Document
(3) Enter a Document Date
(4) Click on
the Add
button
![]() to add a new attachment
to add a new attachment
You can add multiple attachments by clicking on the Add
button
![]()
You can remove unwanted attachments by selecting the
attachment and clicking on the Remove
button
![]()
(5) Enter a Title for your attachment.
(6) Select the Language of the document.
(7) Select the file to upload.
(8) Click on Update to save the information or on Update & send to save the information and send the document to the Commission.
On success, the Operational Programme version status was set to 'Withdrawn at the request of the MS'.
REMARK |
Withdrawals are subject to confirmation by the Commission. As a consequence of the withdrawal, the ongoing programme amendment will be deemed as never submitted and have no legal effect. |

