Commission Decision
PURPOSE OF THIS FUNCTIONALITY
This document describes the specifications of the use-cases related to the registration of Commission Decisions for Partnership Agreements, Programmes, Major projects, Accounts and any other Object Type that needs a Commission Decision and that will be managed in SFC2014.
CONCERNED FUNDS
The procedure is the same for all Object Types and funds using SFC2014 as the default interface, depending on the internal procedures of your DG. If WAVE/RDIS should be used instead then the decision creation should be carried out in the relevant application and not in SFC2014.
USER ROLES AND PERMISSIONS NEEDED
Only EC user with ECOA or ECPO Update Access can create a Commission Decision.
BEFORE YOU START, CHECK THAT…
The Object type has been sent to the Commission: The status is set to 'Sent'.
Icons
|
Icons |
Actions |
|
|
Help, Explanation |
|
|
Confirm update of (inline table) data |
|
|
Cancel update of (inline table) data |
|
|
Edit |
|
|
Show, View |
|
|
Delete record |
|
|
Add record |
|
|
Download all Files of one or more Documents in a zip file. |
|
|
Show hierarchical list of correcting Commission Decisions |
|
Icons |
Workflow Actions/Statuses |
|
|
Create new |
|
|
Delete |


Workflow
This section shows the lifecycle to create and manage the Commission Decision.

Documents
Document types
The Documents list shows all documents uploaded against this Commission Decision.
Once a Commission Decision is taken and published, the electronic documents become available in Vista, which unfortunately is not available outside the Commission. Therefore, SFC2014 needs to store SFC2014 related Decisions and their electronic documents.
|
Description |
Internal Code |
Direction |
Integral |
System |
Required |
|
Commission Decision |
CD.D |
EC2MS |
|
|
|
|
Corrigendum |
CD.C |
EC2MS |
|
|
|
|
Correcting Act |
CD.A |
EC2MS |
|
|
|
|
Performance Review Decision |
CD.P |
EC2MS |
|
|
|
|
Suspension Decision |
CD.S |
EC2MS |
|
|
|
|
Repealing Decision |
CD.R |
EC2MS |
|
|
|
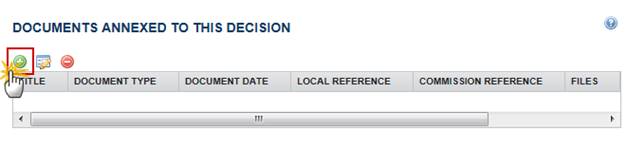
Adding documents
You can Add Documents by clicking on the Documents Menu on the left-hand side:

The Documents list shows all documents uploaded against this Commission Decision by the EC user.
This can be done in two different ways:
· Uploading Documents not registered in ARES
· Uploading Documents using the ARES number (Commission reference)
Uploading documents not registered in ARES
·
- Clicking on the Add button  will
open a pop up window allowing you to add a new document type with attachments.
will
open a pop up window allowing you to add a new document type with attachments.
·
- Selecting a document row and click on the Edit button will allow you to modify the
document information.
will allow you to modify the
document information.
·
- Selecting a row and clicking on the Delete button  will remove the data of the selected row.
1.
Click on the Add button to add a new document.

The document detail pop-up window appears:

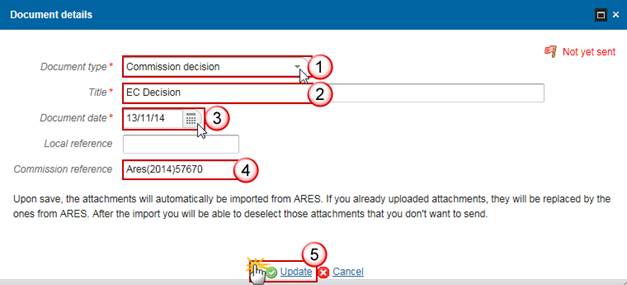
2. Enter the following information:
Select a Document Type
The Document Type list in the edit screen will contain all EC2MS Document Types from the Document Group 'CD'.
Enter a Title for your Document
Enter a Document Date
Click on the Attachment creation Add button to
add a new row in the table.
-
You can add multiple attachments by clicking on
the Add button
-
You can remove unwanted attachments by selecting
the row and clicking on the Attachment Delete
button
Enter a Title for your attachment.
Select the Language of the document.
Select the file to upload.
Click on Update to save the information.
|
Note |
Decision Documents created here are never sent because the Member State already received it outside SFC. They will only be linked to an Object (Partnership Agreement, Programme, Major Project…) when for that Object the action "Link to Commission Document" is performed. A |
Uploading Documents using the ARES number (Commission Reference)
|
Note |
When entering the Commission reference (ARES reference) the attachments will automatically be imported from ARES. If you already uploaded attachments, they will be replaced by the ones from ARES. After the upload action you will be able to remove those attachments that you don't want to show to the Member State. |
1. Click on the Add
button to
add a new document.
The document detail pop-up window appears:
2. Enter or select the following information:
Select a Document Type
The Document Type list in the edit screen will contain all EC2MS Document Types from the Document Group 'CD'.
Enter a Title for your Document
Enter a Document Date
Enter the ARES Reference
Upon entering the ARES reference and selecting Update the system will inform you that the documents will be imported directly from ARES.
Click on the Update link to save all the information.
3. The ARES import pop-up window appears:

Click on the Continue with save link to continue and confirm the ARES import.
The Commission Reference has been imported successfully:

|
Note |
The Commission Decision documents are never sent to the Member State but are visible without the send action. A |
Create the Commission Decision
When the EC User wants to create a new Commission Decision in the system.
1. Login to https://webgate.ec.europa.eu/sfc2014/frontoffice/ui
|
Remark |
To create a Commission Decision you must have the role of ECOA or EPCO Update Access |
2. To access the Commission Decision section first click on the Programming or on the Strategic Planning menu and then on the Commission Decision menu item OR on the Commission Decision menu:

3. Click on the Create a New Commission Decision link to create a new Commission Decision.

You are redirected to the Commission Decision creation screen:
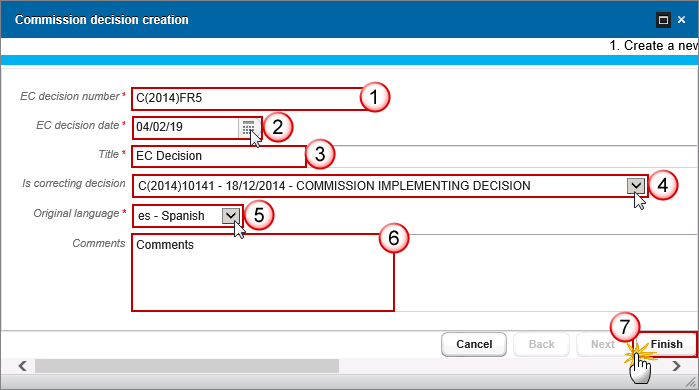
4. Enter or select the following information:
Enter the EC Decision number
A valid format for the Decision number should follow the rule 'C(2014)0000' - 'C(2022)9999'
Select the EC Decision Date
Enter a Title for the Decision
Select Commission Decision that it corrects (if any)
Select the Original Language
Enter the comments (if any)
Click on the Finish button to confirm the creation of the Commission Decision
Once the Decision is created the following screen will appear:

The Vista external link ‘Goto Vista’ opens a new window and is constructed by using the Vista URL stored in FO setting “vistaUrl” and the EC Decision Number in a slightly different format:

5. Select the CCIs covered
|
Remark |
If you have roles from more than one DG (so is the case of multi fund CCIs), therefore in edit covered CCIs page, you can now see the CCIs from all the DGs that you have a role from in the current profile. |
Click on
the Edit button to select the CCIs covered by this EC Decision.

The Edit CCIs covered window appears:

6. Enter or select the following information:
Select the CCI
The list of CCIs contains all CCIs of DGs covered by the user profile
Add it to the selected CCIs list
Click on the Update link to save all the information
Record/Edit the Commission Decision
When the EC user requests the modification of a Commission Decision in the system.
1.
Click on the Edit
button to modify the
information of the Commission Decision.

The edit details form pop-up window appears:
2. Enter or select the following information:
Enter the EC Decision number
Select the EC Decision Date
Enter a Title for the Decision
Select Commission Decision that it corrects (if any)
Select the Original Language
Enter the comments (if any)
Click on the Finish button to confirm the creation of the Commission Decision
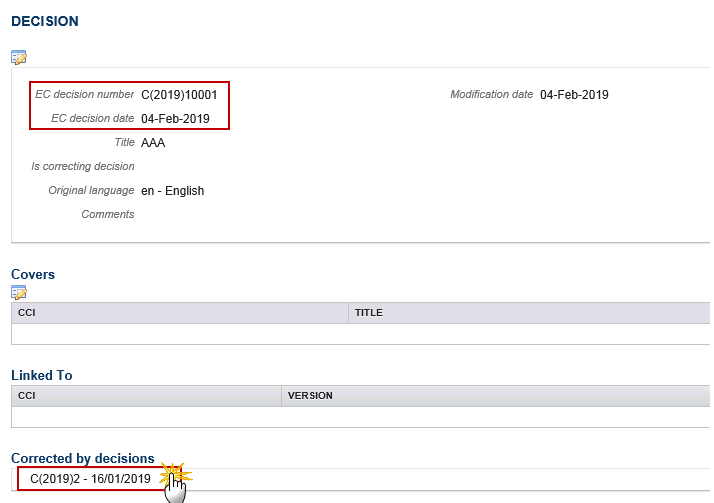
If you have enter a new decision in the field ‘is correcting decision’, then the new correcting decision will appear and you can click on the link to open the decision:

The correcting decision screen appears. You can also click on the ‘corrected by decision’ to come back to the previous page:
|
Remark |
When a Decision has been corrected, the The same If you have roles from more than one DG (so is the case of multi fund CCIs), therefore in edit covered CCIs page, you can now see the CCIs from all the DGs that you have a role from in the current profile. |
 icon
will be shown. Clicking on it will show a popup with a hierarchical list of
correcting Decisions. Clicking one of those decisions will open the detail
page in the same way as clicking on a Decision is the search result list.
icon
will be shown. Clicking on it will show a popup with a hierarchical list of
correcting Decisions. Clicking one of those decisions will open the detail
page in the same way as clicking on a Decision is the search result list.
Linking the Object type to the Commission Decision
1. To link the Object type, for example an OP to the Commission Decision first click on the Programming menu and then choose the programme type from the available menu items:
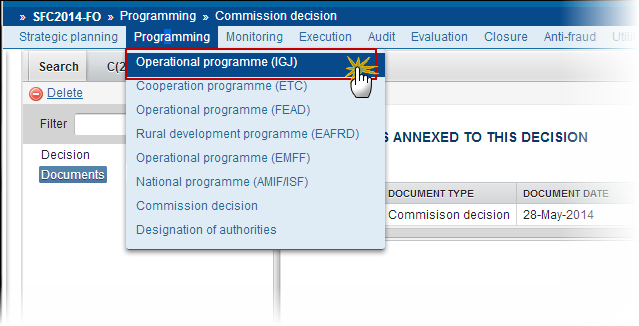
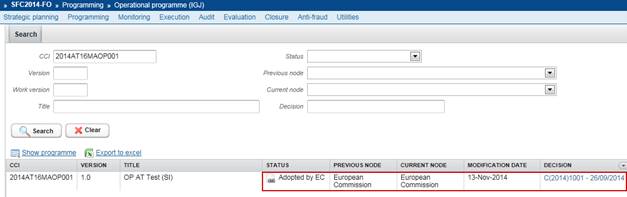
2. Select the programme from the list after searching (1) and click on Show programme (2):

3. To accept the decision click on Accept Decision

The Accept Commission decision confirmation pop-up window appears:
4. Click on Yes to accept the Commission Decision on this OP

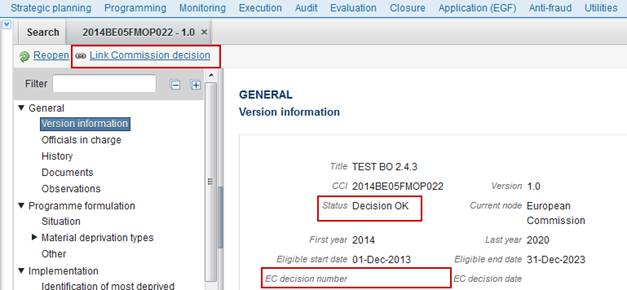
5. To link the Commission Decision click on Link Commission decision

6. Select your Decision from the list

7. Click on Yes to confirm

The OP is linked to the Commission Decision and the EC Decision Number appears on the Version information screen:

The Status is 'Adopted by EC', and the decision appears in the list:
|
Remark |
When a Decision has been corrected, the The same |
Accept MS decision
|
Remark |
THIS OPTION IS NOT AVAILABLE FOR HOME FUNDS (AMIF, ISF) To accept the MS decision on an Operational Programme, the OP must be in a status 'Sent' at the level of the Commission and must have a version number > 1. In this case the last applied Commission decision is still valid and no new Commission decision is required. |
1. To accept the MS decision on an OP, first click on the Programming menu and then choose the programme type from the available menu items:
2. Select the programme from the list after searching (1) and click on Show programme (2):

3. To accept the MS decision click on Accept MS decision

The Accept MS decision confirmation pop-up window appears:
4. Click on Yes to accept the MS Decision on this OP

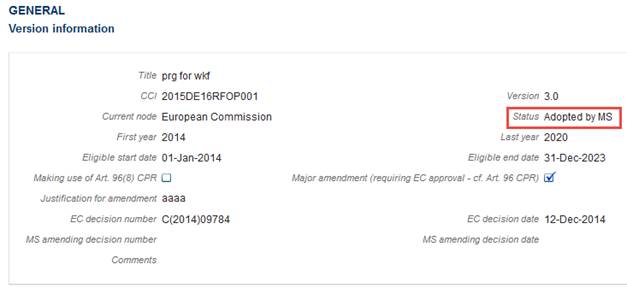
The OP Status becomes 'Adopted by MS', and the last available Commission decision on that Programme still appears in the list:

Delete the Commission Decision
|
Remark |
The Commission Decision is not yet linked to a Partnership Agreement, a Programme or a Major Project and it is not corrected by another Commission Decision. |
1. Click on the Delete link to remove the Commission Decision:
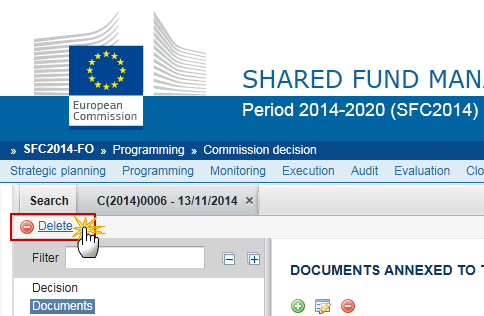
2. Click on Yes to confirm the deletion of the Commission Decision.

The delete is a physical delete.
Re-Open the Commission Decision
When a Commission Decision has been created and linked to an Object the option to 'Reopen' becomes available – this option will change the status of the Object back to 'Decision OK' and you can link again the Object with another Commission Decision or 'Reopen' the Object a second time and change the status to 'Sent to the EC'. This option undoes the 'Link Commission Decision' action.
|
Remark |
The 'Reopen' option should only be used exceptionally and when the 'Link Commission Decision' has been used accidentally or when you want to link the Object with another Commission Decision. |
1. Click on the Reopen link to change the Object status back to 'Decision OK'

The Re-open confirmation screen pop-up window appears:

2. Click on Yes to confirm the 'Reopen' action or on No to go back to the Commission Decision
After the re-open action its status will change to 'Decision OK' and the EC decision number will no longer appear on the Version Information screen. You can 'Link commission decision' again:
Additional Functionality
Notifications
For Commission internal use, it is necessary to generate the following events:
Since the Commission Decision has no state or procedural steps, the only events we will foresee are:
- CDCRE – generated when a Commission Decision record is created.
- CDDEL – generated when a Commission Decision record is deleted.
- CDUPD – generated when a Commission Decision record is updated and when any of the underlying data (CCIs covered, Documents, Attachments) is created, updated, deleted.
The following event type parameters will be
foreseen: 
|
PARAM_NAME |
MANDATORY |
DATA_TYPE |
COMMENT |
|
Action Date |
Y |
Date |
|
|
Action User Id |
N |
Int |
|
|
Action User Name |
N |
char |
|
|
CCIs |
N |
char |
covered CCIs |
|
Cd Uniq Id |
Y |
Long |
|
|
Decision Number |
Y |
Char |
|